
Ever stared at a fresh subwoofer and felt like you were about to start a science experiment, not a car audio upgrade?
You're not alone. The moment you pull that sleek 10‑inch Alpine out of the box, the question that pops up is: how do you wire a subwoofer to an amp without turning your trunk into a tangled mess?
In our shop, we see beginners scratching their heads over wire gauges, polarity, and impedance, while seasoned installers are already picturing the perfect parallel or series setup. The good news? The basics are surprisingly straightforward once you break them down into bite‑size steps.
First, think of the amp as the heart and the subwoofer as the muscle. If the connection is weak, the muscle won’t get enough blood and the beat will feel flat. That’s why choosing the right gauge and matching the impedance matters – it’s the difference between booming lows and a weak thump.
So, where do you start? Grab your power wire, ground wire, and speaker wire. Make sure the power wire is at least 4‑gauge for a 500‑watt amp, and the ground is the same size. The speaker wire can be 12‑gauge if you’re running a single 4‑ohm sub, but drop to 10‑gauge for dual‑sub setups.
Next, locate the amp’s (+) and (–) terminals. Connect the positive power lead to the battery’s positive post, add an inline fuse within 18 inches, and run the ground to a clean, unpainted metal spot on the chassis. A common mistake is skipping the fuse – we’ve seen amps fry because of that one oversight.
Now for the signal wire. If your head unit has a dedicated subwoofer output, run that RCA cable straight to the amp’s input. No sub‑output? Use a line‑level converter and you’ll be good to go.
When it comes to the subwoofer’s terminals, remember the polarity: positive to positive, negative to negative. If you’re wiring two subs in parallel, tie all the positives together and all the negatives together, then feed the combined pair into the amp. That keeps the final impedance at 2 ohms, which many modern amps love.
Finally, double‑check every connection, tighten all nuts, and give the system a power‑on test. If the bass is tight and the amp stays cool, you’ve nailed it.
Does this feel doable? Absolutely. With a little patience and the right wiring plan, you’ll turn that silent box into the low‑frequency powerhouse you imagined.
Ready to plug in and feel the rumble? Let’s dive into the step‑by‑step guide that walks you through each connection, tip, and trick.
TL;DR
Learn how to wire a subwoofer to an amp quickly, with step‑by‑step guidance that cuts guesswork and keeps your entire car audio system safe and booming. We walk you through power, ground, and signal connections, polarity checks, and final testing, so you can enjoy tight bass without frying components today.
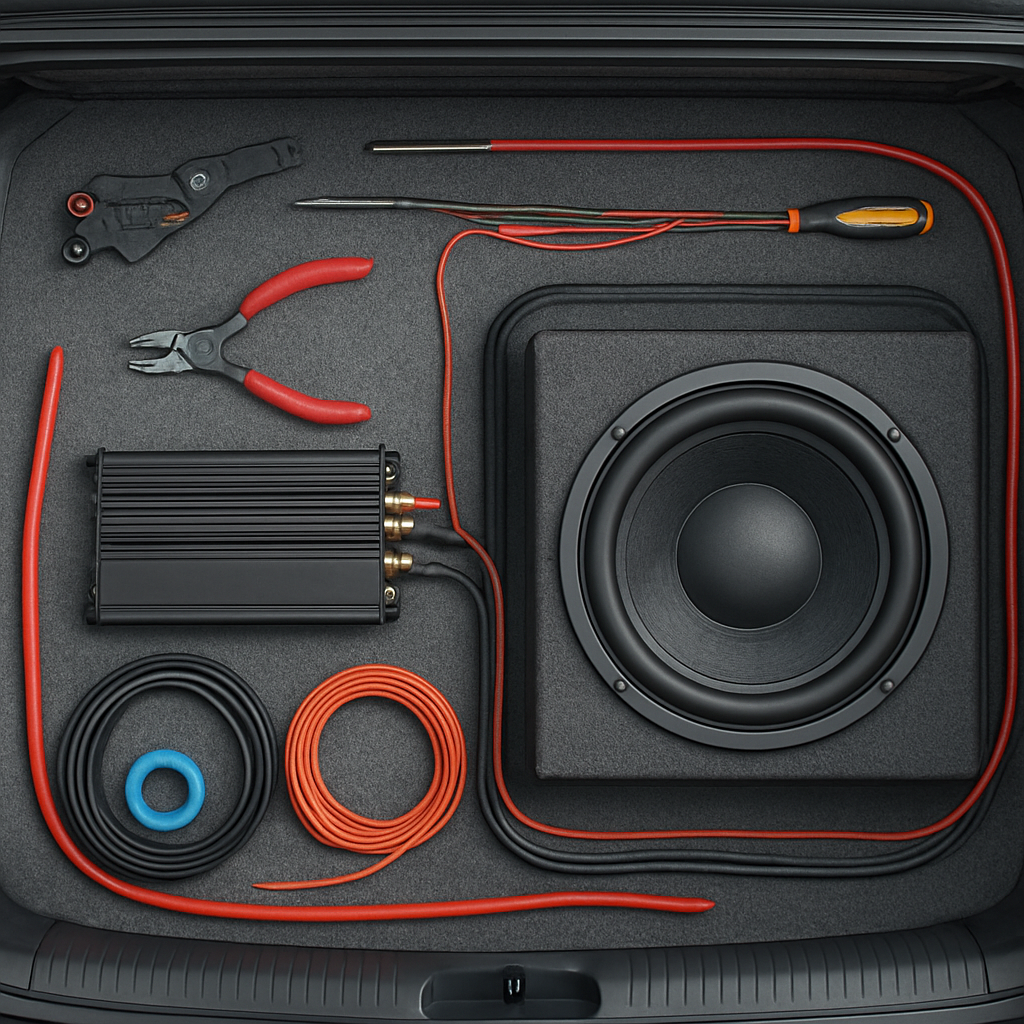
Step 1: Gather the Necessary Tools and Materials
Alright, before you start wrestling that subwoofer into your trunk, you’ve got to make sure you’ve got the right toolbox. It’s like cooking – you wouldn’t try to bake a cake without flour, right? The same principle applies when we’re figuring out how to wire a subwoofer to an amp.
Here’s the core list you’ll want on hand:
- Power wire (usually 4‑gauge for a 500 W amp, 0‑gauge if you’re pushing more)
- Ground wire – same gauge as the power lead
- Speaker wire – 12‑gauge for a single 4 Ω sub, 10‑gauge for dual subs or lower impedance
- Inline fuse (rated for your amp’s RMS power, placed within the first 18 inches of the power run)
- RCA cable or line‑level converter if your head unit lacks a dedicated sub output
- Wire‑stripping tool, crimping tool, and a set of metric and SAE screwdrivers
- Heat‑shrink tubing or electrical tape, plus zip‑ties for tidying the harness
- Multimeter – the unsung hero that will save you from polarity mishaps
Power wire is the biggest artery in the system, so choosing the right gauge matters. A rule of thumb we live by at Audio Intensity is: for every 100 W of RMS power, add one gauge size. That’s why a 500 W amp usually pairs with 4‑gauge copper; it keeps voltage drop low and your amp stays cool.
The ground isn’t just a safety net; it’s the return path that lets the amp push current cleanly. Look for a solid, unpainted metal spot on the chassis – a bolt near the battery or a chassis ground strap works best. Scrape off any rust, snug the nut, and you’ll avoid the dreaded “hissing” or “popping” noises that happen when the ground is flaky.
Never skip the inline fuse. It’s the circuit breaker that protects your vehicle’s wiring and the amp itself. If you’re running a 500 W amp, a 60 A fuse is a safe bet. Place it as close to the battery as possible; the shorter the distance, the less chance for a short to cause damage.
Speaker wire is where the magic gets delivered to the sub. If you’re only hooking up a single 4 Ω Alpine Shallow 10” sub (like the RSW10D4), 12‑gauge will do. But if you decide to add a second sub or drop the impedance to 2 Ω, bump up to 10‑gauge. Thicker wire means less resistance, which translates to tighter, more controlled bass.
RCA cables carry the low‑level signal from your head unit to the amp. If your factory stereo only has speaker‑level outputs, a line‑level converter bridges the gap. It’s a cheap plug‑in device that turns high‑level signals into clean RCA feeds – a lifesaver for many install‑first‑time folks.
Before you start cutting, use the wire‑stripper to expose about ¼ inch of conductor, then slide on heat‑shrink and crimp the terminals. A solid crimp prevents the wires from loosening when you slam the car over a pothole. Zip‑ties keep the bundle neat, and a tidy run not only looks professional but also reduces the chance of chafing against metal edges.
Grab your multimeter and double‑check continuity on every wire before you power up. A quick “beep” tells you the path is solid and there are no shorts – it’s a small step that saves a lot of headache later.
Once everything’s in the bag, lay out your wires on the floor of the trunk like a mini‑road map. Keep the power run separate from the signal run to avoid interference, and use the zip‑ties to lock each bundle in place. A little extra time here means you won’t be digging through a spaghetti mess when the amp finally powers on.
Pro tip: label each wire with a piece of masking tape before you connect anything. When you get to the final hook‑up, you’ll know exactly which end belongs to power, ground, or signal – no guessing, no re‑doing.
Step 2: Understand Your Subwoofer and Amplifier Wiring Basics
Alright, you’ve got the tools, you’ve got the sub, and the amp is waiting in the trunk like a silent partner. The next question is: how do those two actually talk to each other? It all comes down to wiring basics – power, ground, and signal – and getting the polarity right.
First up, the power feed. Most 500‑watt amps like the ones we see in the shop need a 4‑gauge cable from the battery, fused within the first 18 inches. The fuse protects everything if a short happens, and trust me, you don’t want a fried amp when you’re trying to feel the bass.
Next is the ground. A solid ground wire of the same gauge as the power lead should be attached to a clean, unpainted metal spot on the chassis. Scrape away any rust or paint, then tighten the nut until you feel that firm click. A weak ground is the sneaky culprit behind humming or a dead amp.
Now the signal path – the RCA cables that carry the low‑level audio from your head unit to the amp. Keep those cables away from the power run; even a few inches of separation can cut hiss and buzz dramatically. If your factory radio doesn’t have a dedicated sub‑out, a line‑level converter will do the trick.
Polarity is where many newbies trip up. Each subwoofer voice coil has a positive (+) and negative (–) terminal. Hook the amp’s positive output to the sub’s positive terminal, and the negative to negative. If you get it backwards, you’ll hear a thin, out‑of‑phase thump that feels more like a wobble than a punch.
Let’s talk about single‑voice‑coil (SVC) versus dual‑voice‑coil (DVC) subs. An SVC sub has one set of terminals, so you simply connect the amp’s speaker leads directly. A DVC sub gives you two coils, each with its own (+) and (–). This opens up wiring options: you can wire the coils in series for 8 Ω, in parallel for 2 Ω, or even bridge them if your amp supports it. The key is to check the amp’s stability at the resulting impedance – many modern mono amps love a 2 Ω load, but you don’t want to over‑stress a 4‑channel amp.
Here’s a quick real‑world example: I recently helped a hobbyist install two Alpine Shallow 10" subs in a compact sedan. He ran a single 4‑gauge power wire, split the ground to two chassis points, and wired the subs in parallel (2 Ω total). The result was a solid, punchy bass that filled the cabin without overheating the amp. You can see the exact wiring diagram for that setup on the product page Alpine Shallow 10" Subwoofer: Powerful Bass, Shallow Design.
When you finish the connections, do a quick continuity check with a multimeter. Verify that the power lead reads the same voltage at the amp’s (+) terminal as at the battery, and that the ground shows near zero resistance. Then power up the system and start with a low volume – you’ll hear a clean thump, and the amp’s temperature gauge should stay cool.
Pro tip: after the first power‑on, listen for any buzzing or distortion. If you notice noise, double‑check that the RCA cables aren’t crossing the power wire and that all connections are tight. A common fix is to add a small piece of ferrite bead on the RCA line – it acts like a tiny filter and often silences unwanted hiss.
Lastly, protect your ears while you’re testing. High SPL levels can be fun, but prolonged exposure isn’t great for anyone’s hearing. If you’re serious about safe listening, consider getting a professional hearing check. The folks at Brighter Ears specialize in audiology and can help you set safe volume limits.
And when you need a track that really shows off the low‑end, try streaming some high‑resolution bass‑heavy mixes from the L337B3AT Black Box Portal. Those files are engineered to stress test your system and let you hear every nuance of your wiring work.
Bottom line: match the wire gauge to the amp’s demand, respect polarity, keep power and signal routes separate, and verify everything with a multimeter. Follow these basics and you’ll have a solid foundation for any sub‑amp combo – no mystery, just pure, controlled bass.
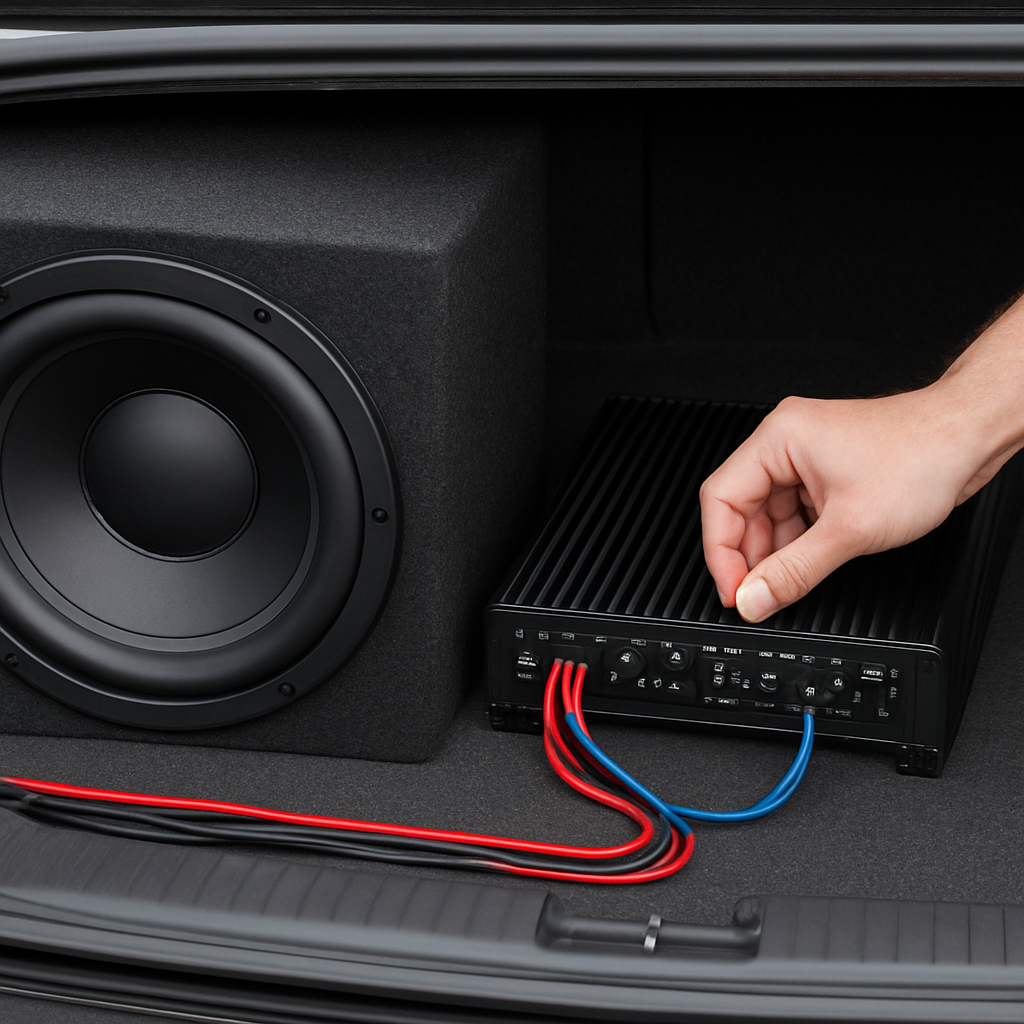
Step 3: Connect the Power and Ground Wires
Alright, the power and ground are the lifelines of your amp – without them, you’ve got a pretty expensive paperweight. Let’s walk through the exact steps so you don’t have to guess.
1. Gather the right wire and fuse
First, pull out the 4‑gauge power cable that came with your kit. It’s the thick orange bundle you’ll see in most install videos. Then grab an inline fuse holder and a fuse that matches your amp’s recommended rating – usually 100 A for a 500‑watt mono amp, but always double‑check the spec sheet.
Why the fuse matters: it’s the safety net that blows before your amp does. If a short happens, the fuse sacrifices itself, saving the rest of your gear.
2. Position the fuse within 18 inches of the battery
Cut the power wire a few inches from the battery terminal, strip the ends, and slide the fuse holder onto the stripped section. Crimp the connections tightly – a loose crimp is a common source of voltage drop.
Once the fuse is in place, connect the positive end of the power wire directly to the battery’s (+) post. Use a ring terminal that fits snugly over the post, then tighten the bolt until you feel that solid click.
3. Route the power cable cleanly
Run the power cable up the firewall, then along the vehicle’s interior trim. Keep it as short as possible while still avoiding sharp edges or moving parts. If you have to cross the chassis, use a grommet to protect the insulation.
And remember: keep the power wire away from any signal cables (RCA, speaker wire). Even a few centimeters of overlap can introduce hum that ruins your bass.
4. Ground the amp properly
Find a clean, unpainted metal spot on the chassis near the amp’s mounting location. A factory grounding point or a sturdy bolt works best. Scrape away any rust or paint – the amp needs a solid electrical connection, not a flaky one.
Cut a length of the same 4‑gauge wire you used for power, strip the ends, and attach a ring terminal. Tighten the nut until you hear that satisfying “snug” sound. A good ground will read near zero resistance on a multimeter.
If you’re installing two amps, give each its own ground strap to avoid ground loops.
5. Double‑check everything before you power up
- Verify the fuse rating matches the amp’s spec.
- Confirm the positive power lead is connected to the battery (+) and not the negative.
- Make sure the ground strap is on bare metal and the nut is torqued.
- Run a continuity test: set your multimeter to resistance, touch one probe to the battery (+) post and the other to the amp’s (+) terminal – you should see a very low reading.
A quick continuity check can save you from a nasty spark later.
6. Power‑on test
Turn the key to the “ON” position, but keep the amp’s gain low. You should see the amp’s power LED light up and the temperature gauge stay cool. If the amp doesn’t turn on, re‑inspect the fuse and the battery connection.
Got a faint click or no power at all? Most likely the fuse is blown or the ring terminal isn’t making contact. Swap the fuse, re‑tighten the terminals, and try again.
7. Pro tip from the shop floor
We often see installers skip the extra 2‑inch of wire between the fuse and the battery. Adding that little slack lets you replace a blown fuse without pulling the whole harness out of the car – a tiny time‑saver that pays off when you’re on a tight install schedule.
Also, if you have a battery with a built‑in fuse block, you can route the power wire through that block instead of a separate inline fuse. Just make sure the block’s rating matches or exceeds your amp’s draw.
With the power and ground firmly in place, you’ve laid the foundation for clean, punchy bass. The next step is hooking up the speaker wires, but that’s a story for the next section.
Step 4: Wire the Signal (RCA) Connections
Now that the power and ground are solid, it’s time to get the audio signal from your head unit to the amp – the little RCA cables that make the bass sing.
First thing’s first: do you even have a dedicated sub‑out on your factory radio? If you do, great, you’ll see a pair of red and white (or sometimes just red) RCA jacks labeled “SUB OUT.” If not, you’ll need a line‑level converter, but let’s assume you’ve got the sub‑out for this walkthrough.
Pick the right RCA cable
Don’t skimp on the cable. A decent 4‑inch, shielded RCA set with gold‑plated connectors will keep interference down and last longer than cheap braided stuff.
Make sure the length you choose lets you route the cable cleanly without stretching – you don’t want a tight bend that could crush the inner conductor.
Separate the signal from the power
One of the biggest headaches we see in shop floors is hum that shows up when the RCA runs right alongside the power wire. Keep at least a few inches of separation, or better yet, run the RCA on the opposite side of the trunk.
Use zip ties or a small grommet to secure the cable to a stable point, but avoid clipping it too tight; a little wiggle room helps prevent stress on the connectors.
Connect the head unit to the amp
Plug the red RCA plug into the head unit’s “SUB OUT” red jack, and the white (or black) plug into the matching “SUB OUT” white jack. Then take the other end and plug it into the amp’s RCA inputs – usually labeled “RCA IN” or “INPUT.”
Double‑check that you’re not mixing up the channels. Most mono amps only need one channel, but many still have a pair of inputs; in that case, feed the same signal into both jacks or use the amp’s bridging switch if it has one.
Secure the connections
Give each connector a firm twist and a gentle tug to make sure it’s seated. A loose RCA can cause crackling or total signal loss, which is the last thing you want after all that careful wiring.
For added peace of mind, you can slip a small piece of heat‑shrink tubing over the joint and apply a little heat. It’s not required, but it does keep moisture out if you ever get a leak in the trunk.
Test the signal before you power up
Turn the head unit on, set the volume low, and play a bass‑heavy track. You should hear a faint thump from the subwoofer even before you crank the amp’s gain.
If you get nothing, trace the RCA path: is the cable kinked? Are the plugs fully inserted? Use a multimeter set to continuity and check that the center conductor of each RCA leads from head unit to amp without interruption.
Fine‑tuning tips
Once the signal is flowing, you might notice a slight hiss. A tiny ferrite bead slipped onto each RCA lead can soak up high‑frequency noise without affecting the deep bass.
Another pro tip: route the RCA away from any moving parts like seat belts or door hinges. Vibration can eventually wear down the connector pins.
Final checklist
- RCA cable is shielded, appropriate length, and not damaged.
- RCA runs on the opposite side of the power wire with at least 2‑3 inches of clearance.
- Both plugs are fully seated and secured.
- Signal test completed – you hear the sub at low volume.
- Ferrite beads added if needed, and zip ties keep the cable tidy.
That’s it – the signal path is now complete. When you crank the amp’s gain and drop the bass knob on your head unit, you should get a clean, punchy thump that feels like the music is shaking the very seats. If anything sounds off, go back through this list and you’ll usually find a loose RCA or a stray power‑to‑signal crossing.
With the RCA side sorted, you’re just one step away from that final power‑on test that will have your car audio setup booming. Stay tuned for the next section where we’ll tie everything together and make sure your system stays cool under heavy bass.
Step 5: Fine‑Tune Settings and Test the System
Now that the power, ground, and RCA are all snug, it’s time to coax that subwoofer into behaving the way you want. Fine‑tuning isn’t magic; it’s a systematic walk‑through that lets you hear the difference between “loud enough” and “perfectly balanced.”
Set the gain correctly
The gain knob on the amp isn’t a volume control—it tells the amp how much voltage to let through to the sub. Start with the gain turned all the way down, then play a familiar bass‑heavy track at about 25 % of the head‑unit’s volume.
Gradually raise the gain until you hear the sub start to “click” on the first beat, then back off a notch. If the cone rattles or distorts, you’ve gone too far. A good rule of thumb is to aim for a clean, tight thump that stays in sync with the rest of the mix.
Dial in the crossover
Most amps let you set a low‑pass filter, usually between 40 Hz and 120 Hz. Pick a point where the sub’s output blends smoothly with your mids and highs. If you love deep rumble, try 50 Hz; if you need the sub to fill in the low end without muddying vocals, 80 Hz is a safe bet.
Listen for a “hole” in the sound—if the bass feels thin around 70 Hz, nudge the crossover a little higher. The sweet spot is where the sub adds weight without swallowing the rest of the music.
Check phase and polarity
Phase reversal is a sneaky culprit that can make a perfectly wired sub sound like it’s fighting the rest of the system. Most amps have a “phase” switch; flip it and listen to the same bass line a couple of times.
If one setting makes the low notes feel tighter and more centered, lock that position. If you notice a hollow, echo‑ey effect, you’re probably still out of phase.
Run a listening test
Grab a track you know well—something with a solid kick drum and a steady bass line. Start at low volume, then slowly raise the head‑unit level while keeping the amp’s gain where you left it.
Pay attention to three things: (1) the sub stays in time with the kick, (2) there’s no grinding or clipping, and (3) the overall mix feels cohesive. If you hear any buzzing, double‑check the RCA routing again; a stray power‑to‑signal crossing will show up now.
Quick checklist before you seal the install
- Gain set just before distortion appears.
- Crossover between 40‑120 Hz, matching your vehicle’s acoustic space.
- Phase switch set for tightest integration.
- All connections secure, no loose RCA or power crimps.
- Temperature gauge on the amp stays under 120 °F after a 10‑minute test run.
| Setting | Typical Range | How to Adjust |
|---|---|---|
| Gain | 0 dB – +10 dB (depends on amp) | Start low, increase until clean thump, back off 1‑2 clicks. |
| Crossover (Low‑pass) | 40 Hz – 120 Hz | Set lower for deep rumble, higher for tighter blend; listen for gaps. |
| Phase | 0° or 180° | Toggle switch, choose setting that makes bass feel centered and tight. |
When everything checks out, snap the trunk lid shut, drive a few miles, and give the system another quick listen. You’ll notice that a well‑tuned sub doesn’t just “boom” – it adds a controlled, musical foundation that makes every song feel larger than life.
And that’s it: fine‑tune, test, and you’ve turned a bundle of wires into a reliable bass machine. If you ever hit a snag, go back through these steps; most problems hide in the gain or crossover settings, not under the hood.
Step 6: Troubleshooting Common Issues
We've gotten the wires tight, the gain set, and the crossover dialed in. But what if the bass still sounds weak, or you hear a nasty buzz that makes you want to yank the plugs out? Don't panic – most problems hide in a handful of predictable spots, and you can hunt them down without tearing the whole install apart.
1. No sound at all?
First thing's first: double‑check that the amp is actually getting power. Look for the LED on the front panel – if it’s dark, the fuse is probably blown or the battery connection is loose.
Pull the inline fuse (we love to put it within 18 inches of the battery) and swap it with a new one of the same rating. If the light still stays off, use a multimeter to test voltage at the amp’s (+) terminal. You should see something close to 12‑14 V with the key in the “ON” position.
2. Buzz or hum creeping in
That humming sound is usually a power‑to‑signal crossover. Make sure your RCA cables are routed on the opposite side of the power wire, and keep at least a few inches of clearance between them.
If the buzz persists, try adding a tiny ferrite bead on each RCA lead – they act like a low‑pass filter for high‑frequency noise. Also, check that the ground strap is attached to clean, bare metal; any paint or rust can act like a resistor and introduce hum.
3. Distortion or clipping
Distortion is often a gain issue, but it can also mean the amp is being asked to deliver more power than it can at the current impedance. Remember the difference between RMS and peak power – you want an amp that can sustain the RMS rating at the impedance your sub(s) present.
Our friends at understand RMS vs. peak power ratings and explain why matching impedance is crucial. If you wired two 4‑ohm dual‑coil subs in parallel and ended up with a 1‑ohm load, make sure your amp is rated for that low impedance; otherwise you’ll see clipping and the amp may go into thermal protection.
4. Overheating amp
Feel the amp after a 10‑minute test run. If the temperature gauge is nudging past 120 °F, you’re either under‑ventilated or the amp is working too hard because the sub’s impedance is too high. Try adding a ventilation fan or moving the amp to a cooler spot in the trunk.
Also verify that the gain isn’t set too high – a small increase can push the amp into continuous high‑current mode, which creates heat faster than you’d expect.
5. Weak bass, but no distortion
When the sub sounds thin, it’s usually a crossover or phase problem. Dial the low‑pass filter a few hertz higher or lower and listen for a fuller punch. Flip the phase switch on the amp; the right setting will make the bass feel centered rather than pushing the front or rear seats.
If you have a dual‑voice‑coil sub, experiment with wiring the coils in series versus parallel. Changing the total impedance changes how much RMS power the amp can deliver, and that can turn a “meh” thump into a room‑shaking boom.
Quick troubleshooting checklist
- Power LED lit? If not, check fuse, battery connection, and voltage at amp.
- RCA cables separated from power leads? Add ferrite beads if hum persists.
- Gain set just before distortion? Back off a click if you hear clipping.
- Impedance match confirmed? Use a calculator or consult the amp’s spec sheet.
- Ground strap on bare metal, tight, and corrosion‑free.
- Temp gauge under 120 °F after 10‑minute run.
By walking through these steps, you’ll usually pinpoint the culprit in under ten minutes. And remember, most issues boil down to three things: power, grounding, and signal integrity. Fix one of those, and the rest falls into place.
Still stuck? It never hurts to unplug everything, start from the power lead, and rebuild the chain step by step. Patience pays off – the day you finally hear that clean, tight thump is the day you’ll know every wire is where it belongs.
FAQ
What wire gauge should I use when wiring a subwoofer to an amp?
For a typical 500‑watt mono amp you’ll want 4‑gauge power and ground cables – that thick orange bundle you see in most install kits. If you’re feeding a pair of subs or a higher‑power amp, bump up to 2‑gauge to keep voltage drop low. Speaker‑level wiring can stay at 12‑gauge for a single 4‑ohm coil, but drop to 10‑gauge when you’re handling dual‑coil or higher‑current loads.
How do I properly connect the ground wire for a subwoofer amp?
Find a clean, unpainted metal spot on the chassis near the amp, scrape off any rust, and attach a ring terminal with a sturdy nut. Tighten until you hear that satisfying click – you want near‑zero resistance on a multimeter. If you’re installing two amps, give each its own strap to avoid ground loops, and keep the strap as short as possible.
Can I run the RCA cables alongside the power wire without causing noise?
Ideally no – power‑to‑signal crossing is the #1 source of hum. Keep RCA runs at least a few inches away from the thick power lead, or run them on opposite sides of the trunk. If you’re short on space, a small ferrite bead on each RCA will help filter high‑frequency interference, but physical separation is still the safest bet.
What’s the difference between wiring a single‑voice‑coil and a dual‑voice‑coil subwoofer?
A single‑voice‑coil (SVC) sub has just one (+) and (‑) terminal, so you hook the amp’s speaker leads straight in. A dual‑voice‑coil (DVC) gives you two sets of terminals, letting you wire in series (8 Ω), parallel (2 Ω), or even bridge them if the amp supports it. The key is to match the resulting impedance to what the amp’s spec sheet says it can handle.
How do I choose the right fuse and where should it be placed?
Pick an inline fuse that matches the amp’s recommended current – usually 100 A for a 500‑watt mono, but always double‑check the manual. Clip the fuse holder within the first 18 inches of the power run, right after the battery post. That way the fuse protects the entire harness and you can swap it out without pulling the whole wire bundle.
What’s the best way to set the amp’s gain and crossover for a clean bass?
Start with the gain all the way down, play a familiar bass‑heavy track at about 25 % head‑unit volume, and raise the gain until you hear the first clean thump. Back off a click if the cone starts to “growl.” Set the low‑pass crossover between 40 Hz and 80 Hz depending on how deep you want the rumble, then listen for any gaps in the mids and adjust as needed.
What should I check if the subwoofer isn’t producing any sound after wiring?
First, verify the amp is getting power – the LED should be lit and the fuse intact. Next, do a continuity test on the RCA cables to make sure the center conductors aren’t broken. Confirm the ground strap is on bare metal and the speaker leads match polarity. Finally, turn the head‑unit up low, watch the amp’s gain knob, and listen for a faint thump before cranking the volume.
Conclusion
We've walked through every step of how to wire a subwoofer to an amp, from grabbing the right gauge wire to dialing in the perfect crossover.
So, what does all that effort give you? A clean, tight thump that feels like the music is vibrating the seat backs, not just rattling the chassis.
If you pause now and double‑check the three things we keep coming back to – power and fuse placement, a solid ground strap, and RCA separation – you’ll save yourself hours of troubleshooting later.
Remember the simple checklist: fuse within 18 inches, ground on bare metal, gain set just before distortion, and phase set for the tightest integration.
Does it feel overwhelming? Not really. Most installers I’ve seen finish the whole install in under an hour once the wire runs are mapped out.
When you finally crank the volume, listen for that first clean thump. If it sounds right, you’ve nailed the wiring and the amp will stay cool even on long drives.
And if anything still seems off, go back to the step that feels fuzzy – usually the ground or the RCA routing – and fix it before the next test run.
Now you’re ready to install confidence‑boosting subs in any vehicle, knowing the wiring is solid and the bass will keep you coming back for more.


