
Ever sat in your car, cranked the volume, and felt that the bass just never quite hits the way you want? It’s that moment when you realize the stock speakers are missing the thunder you crave, and you start wondering how to install a subwoofer in car without turning the whole cabin into a rattling box. Don't worry—we've all been there, and the good news is the solution is more reachable than you think.
The first thing to accept is that a good subwoofer installation is part art, part science. You’ll need to balance power, placement, and wiring, but you don’t have to be an electrician to get it right. In our experience, starting with a clear plan saves you a ton of frustration later on, especially when you’re juggling tools in a tight trunk space.
So, where do you begin? First, decide whether you want a passive sub that needs an external amp, or a powered (active) unit that bundles the amp inside the box. Passive setups give you more flexibility to upgrade the amp later, while powered subs cut down on wiring complexity—a real win for DIYers who don’t want to run a separate power cable all the way from the battery.
Next up is placement. Picture this: you’re loading groceries, and the sub sits right where it can’t be knocked around but still delivers punchy low‑end. In many hatchbacks, the best spot is under the seat—quiet, secure, and close to the vehicle’s chassis ground. If you have a sedan with a spare‑tire well, that’s another sweet spot, as long as you keep the sub away from heat sources.
Finally, wiring might feel intimidating, but it’s really just a matter of keeping things tidy and safe. Grab a proper gauge power wire from the battery, run it through the firewall with a grommet, and don’t forget a solid ground strap to the chassis. Add a fuse close to the battery, and you’ve got a clean, protected circuit that lets your new sub roar without blowing fuses.
TL;DR
If you’ve struggled to hear real bass, this guide shows how to install subwoofer in car, from choosing passive or powered units to basic placement.
By the end you’ll know where to mount it securely, how to wire a power line, and ensure the sub roars without draining the battery.
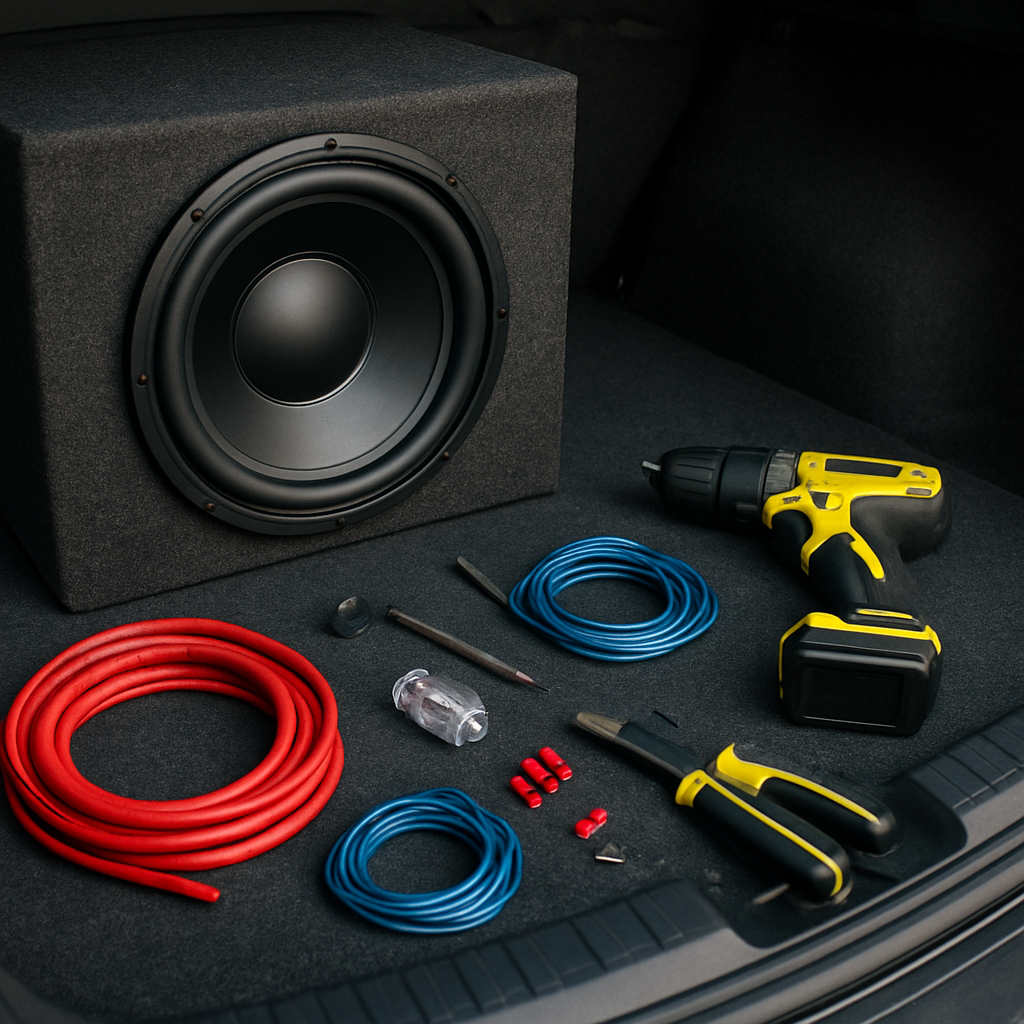
Step 1: Gather Tools and Materials
Alright, before you even think about cranking that subwoofer up, you’ve got to make sure you’ve got the right tools and parts on hand – otherwise you’ll end up hunting around the garage halfway through the job and losing momentum.
Ever opened the trunk, stared at a half‑empty toolbox, and wondered “Did I forget something crucial?” That moment of panic is why a solid prep list is worth its weight in copper wire.
Here’s what we’ve learned from countless installations: write down every screwdriver, wrench, and piece of hardware you’ll need, then line them up on a clean surface. When everything is visible, you’ll spend less time digging and more time getting that low‑end thump you’re after.
Essential Tools
– A Phillips and flat‑head screwdriver set. Most subwoofer boxes use #2 screws, but a few models prefer #1, so having both sizes saves you from stripping heads.
– Wire cutters/strippers. You’ll be trimming power and ground wires, and a clean strip makes a solid connection without frayed strands.
– Crimping tool and appropriate crimp connectors (ring terminals for the power feed, bullet connectors for speaker leads). A good crimp means the amp can draw power without heating up.
– A socket wrench set, preferably with a 10 mm socket for the mounting bolts that come with most enclosure kits.
– A drill with a 3/8‑inch bit if your mounting location requires new holes in the trunk floor or seat rails.
– A multimeter. A quick voltage check before you hook up the amp can spare you a blown fuse later.
Materials Checklist
– The subwoofer itself (obviously). Make sure the enclosure matches the driver’s specifications – a sealed box for tight, punchy bass or a ported box for louder, boomy tones.
– Power wire, usually 8‑ or 10‑gauge, depending on the amp’s RMS rating. Too thin and you’ll lose power; too thick and the wire is a hassle to route.
– Ground strap (same gauge as the power wire) and a clean metal spot on the chassis – a bolt near the sub’s mounting location works well.
– An in‑line fuse holder and a fuse sized to the amp’s maximum current draw (most amps call for a 30–60 A fuse).
– RCA cables or speaker‑level inputs, depending on whether you’re using a line‑output converter or a powered sub with built‑in amp.
– Mounting hardware: brackets, bolts, and rubber grommets to isolate vibration.
– Optional: a short length of zip‑tie or Velcro strap to tidy up excess wire.
Need a quick reference to make sure you haven’t missed anything? Check out this detailed car audio installation checklist that walks through tools and parts step by step.
Once your toolbox is organized and the parts are laid out, you’ll notice how much smoother the actual mounting process feels. You won’t be fumbling for a screwdriver mid‑install, and you’ll be able to focus on positioning the sub for optimal sound rather than hunting for a missing bolt.
Finally, give yourself a quick “dry run”: pretend you’re already installing, walk through each step, and verify you have a spot for the power wire, a place to secure the ground strap, and enough slack for the RCA cables. If anything feels cramped, now’s the time to rearrange before you start drilling or tightening bolts. With your checklist checked twice, you’re ready to move on to the next phase – actually mounting and wiring the subwoofer.
Step 2: Disconnect Battery and Prepare Wiring
Before you even think about running power to the amp, the safest thing you can do is cut the power. Pulling the negative terminal off the battery eliminates the risk of a short that could fry a brand‑new subwoofer or, worse, set your car on fire.
Why disconnecting matters
Imagine you’re tightening a bolt with a live 12‑volt line dangling next to it. One slip and you’ve got sparks, blown fuses, and a ruined day. That’s why we always start by removing the negative cable – it’s the simplest safety net.
Gather the right tools
Grab a 10 mm socket or a wrench that fits your battery terminal bolt, a pair of insulated pliers, and a small flat‑head screwdriver. A multimeter is handy if you want to double‑check that the circuit is dead.
Tip: label the negative terminal with a red‑orange sticker before you pull it off. When you’re ready to reconnect, you’ll know exactly where it goes.
Step‑by‑step: disconnect the battery
1. Turn off the ignition and remove the key. This tells the car’s computer to shut down all accessories.
2. Pop the hood and locate the battery. In most sedans it’s on the left side, but a few hatchbacks hide it under a plastic cover.
3. Using your 10 mm socket, loosen the nut on the negative (usually marked “‑” or black). Don’t yank; turn it slowly until the clamp releases.
4. Pull the negative cable away from the post and set it aside where it can’t accidentally snap back.
5. Press the multimeter’s probes against the battery terminal and the chassis ground. The reading should be zero volts. If you see any voltage, something’s still live – re‑check your work.
Now you’ve got a dead car, which is exactly what you want before you start pulling wires through the firewall.
Preparing the power wire
Most amps for subwoofers need 8‑ or 10‑gauge power wire. The gauge you choose depends on the amp’s RMS current draw; a 500‑watt amp typically calls for 8 gauge, while a 300‑watt unit can get away with 10 gauge.
Cut a length that runs from the battery to your planned amp location with a few extra inches for routing around corners. Strip about ½‑inch of insulation from each end – clean, copper‑exposed strands make a solid crimp.
Install a ring terminal on each stripped end. Crimp it firmly with a ratcheting crimp tool; a loose terminal can cause resistance and heat buildup.
Running the wire through the firewall
The firewall is that metal barrier between engine bay and cabin. Most cars have pre‑drilled grommet holes for factory wiring. If you can’t find one, you’ll need to drill a ¾‑inch hole and install a rubber grommet to protect the wire from sharp edges.
Push the wire through from the engine side, then pull it into the cabin. Keep the wire as short and straight as possible – every extra inch adds resistance.
Pro tip: route the power wire alongside existing chassis grounds. You’ll see a thick black cable going to the engine block; hugging that path keeps the wire hidden and reduces the chance of it getting snagged later.
Adding the in‑line fuse
Safety isn’t just about disconnecting the battery; it’s also about protecting the circuit once you power it back up. An in‑line fuse should be placed within 12‑18 inches of the battery positive terminal.
Slide the fuse holder onto the positive wire, insert a fuse sized to the amp’s maximum current (most amps recommend 30‑60 A), and secure the holder with a zip‑tie. If the fuse blows on the first power‑up, you’ve caught a short before it can damage anything expensive.
Ground strap basics
Grounding is just as important as the power feed. Find a solid metal point on the chassis – a bolt near the subwoofer mounting location works great. Clean any paint or rust with sandpaper so the strap makes metal‑to‑metal contact.
Attach a ring terminal to the end of the ground strap, crimp it, and bolt the strap down securely. A good ground will keep the amp’s noise floor low and prevent humming.
Final checklist before you reconnect
- Negative terminal removed and safely stored.
- Power wire cut to length, stripped, and terminated with ring terminals.
- Wire routed through a grommeted firewall hole.
- In‑line fuse installed, correct amperage.
- Ground strap attached to clean chassis point.
- All connections double‑checked with a multimeter for continuity.
When that list is all green, you’re ready to reconnect the battery and move on to the amp wiring stage. This careful prep makes the rest of the how to install subwoofer in car process smoother, safer, and far less frustrating.
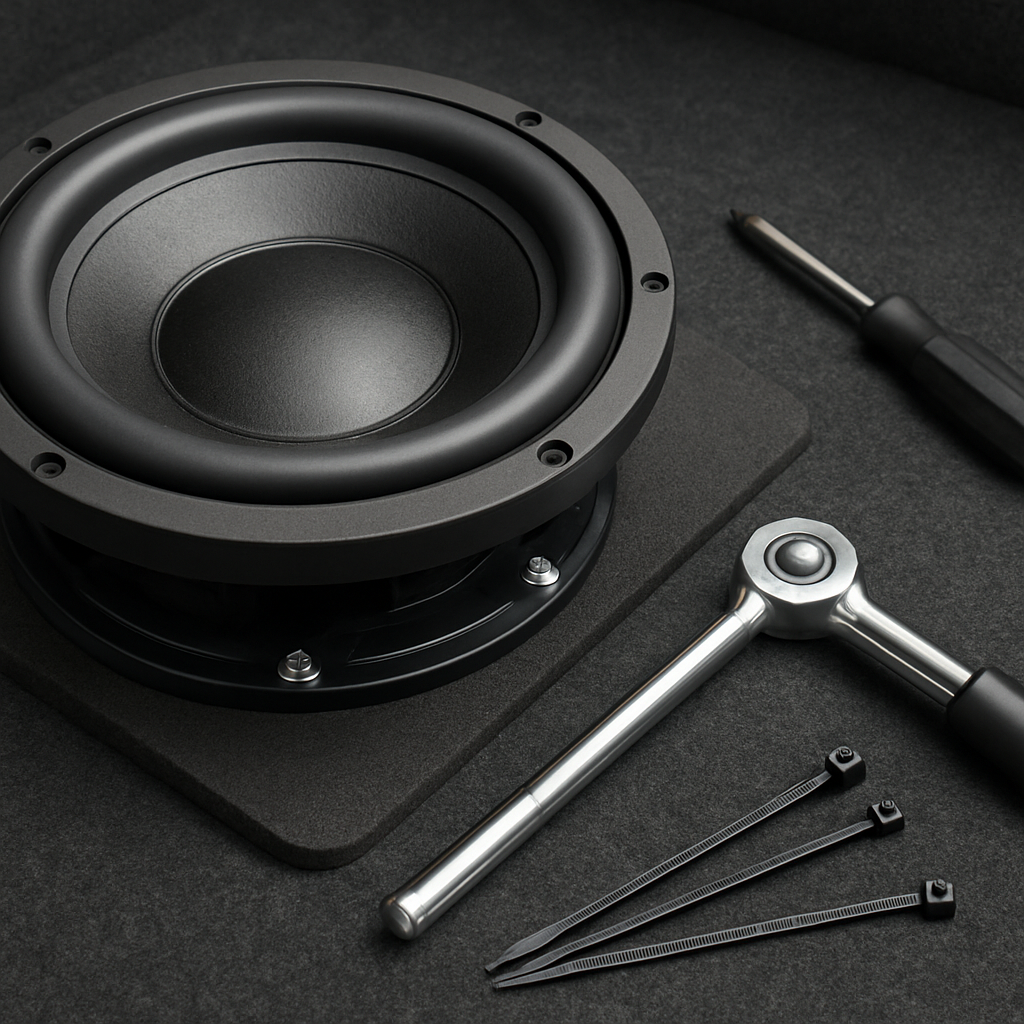
Step 3: Choose Subwoofer Location and Mounting
Okay, you’ve got power and ground sorted – now the fun part: where does that sub actually live? The spot you pick will decide how tight the bass feels, how safe the box is, and whether you’ll spend the rest of the drive listening for rattles.
Why placement matters more than you think
Think about the last time you felt a thump from a speaker and the cabin vibrated just right. That’s the magic of getting the driver close to a solid mounting surface and away from heat sources. Too close to the exhaust and you’ll bake the cone; too far back and you’ll lose punch because the sound has to travel through a ton of air and interior panels.
In our experience with both hobbyists and pro installers, the sweet‑spot usually lands within a few inches of a sturdy metal point – the seat rails, the trunk floor, or a spare‑tire well bracket.
Common real‑world locations
Under‑seat (front passenger side) – Perfect for hatchbacks or sedans where the rear seat folds down. The sub sits low, the chassis is solid, and you’re only a foot from the amp, which reduces voltage drop. Just make sure the box doesn’t rub against the seat cushion when you sit down.
Spare‑tire well – Classic choice for SUVs and trucks. The well is already a recessed cavity, so the sub is hidden and protected. Keep the enclosure a couple of inches away from the tire to avoid heat transfer, especially on long trips.
Trunk floor corner – If you have a large trunk, the far‑corner floor can hold a bigger box. Use a reinforced mounting plate to spread the load; otherwise the box could flex and distort the cone.
Picture this: a friend of ours installed a 12‑inch sealed sub under the driver’s seat of a compact hatchback. He used a rubber isolation pad and a simple 10 mm bolt into the seat frame. The result? Tight, controlled bass that didn’t bounce around when he took sharp turns.
Step‑by‑step mounting guide
1. Mark the spot. Lay the sub on the floor where you think it belongs. Use a pencil to outline the bolt holes on the chassis or seat rails. If the box has pre‑drilled holes, line them up with existing factory mounting points – that saves you drilling.
2. Check clearances. Measure the distance to the nearest heat source (exhaust, brake lines) and to any moving parts (seat tracks, fuel lines). Aim for at least 2‑inches clearance on all sides.
3. Prep the surface. Scrape any paint or rust off the mounting area. A clean metal‑to‑metal contact ensures the bolts hold tight and the ground strap stays solid.
4. Drill if needed. If you can’t use a factory bolt, drill a 10‑mm pilot hole and insert a rubber grommet to protect the sub’s frame from metal edges. A 3/8‑inch hole works for most 8‑mm bolts.
5. Install isolation. Slip a thin rubber mat or neoprene pad between the box and the chassis. This damps vibration, prevents the sub from transmitting rattles to the interior, and protects the enclosure from scratches.
6. Tighten the bolts. Use a torque wrench set to about 5‑6 Nm (or “hand‑tight” if you don’t have a wrench). Over‑tightening can crush the box; under‑tightening lets it wobble.
7. Route the wiring. Run the power and speaker cables through the same grommet you used for the firewall. Keep them tidy with zip‑ties and make sure there’s a little slack for future adjustments.
8. Test for movement. Sit in the driver’s seat, slam the door, and give the sub a gentle push. Nothing should shift more than a millimeter.
Tips from the pros
• Don’t ignore the amp’s heat. If you’re using a separate amp, mount it near the sub but give it its own ventilation space.
• Use a stud finder. In unibody cars, the metal frame may be hidden under plastic panels. A stud finder helps you locate a solid anchor point.
• Consider future upgrades. Leave a few extra inches of wire length and a spare mounting hole. You might want to add a second sub down the line.
Once the box is firmly seated, you’re ready to move on to connecting the amp and fine‑tuning the crossover. The right location and a solid mount are the foundation for that deep, clean thump you’ve been chasing.
Step 4: Install Wiring Harness and Amplifier
Alright, the sub’s snug in its new home – now it’s time to give it the juice it craves. If you’ve ever tried to power a grill with a flashlight, you know why a solid wiring harness and a well‑ventilated amp are non‑negotiable. Let’s walk through the wiring dance so you end up with clean, thunderous bass instead of a melted fuse.
1. Choose the right wiring harness
Most DIYers reach for an 8‑gauge power cable when the amp is 500 W RMS or more. Why? The lower resistance means less voltage drop, which translates to tighter bass. If you’re running a 300 W amp, 10‑gauge is usually enough, but don’t skimp – a thin wire is the silent killer of power.
Pro tip: grab a harness that includes a dedicated ground wire, a fused power lead, and pre‑crimped RCA connectors. It saves you time and guarantees each segment is rated for the current you’ll draw.
2. Mount the amplifier securely
Heat is the enemy of any amp. Pick a spot under a seat or in the trunk where airflow isn’t blocked by plastic panels. We like to mount the amp on a metal plate with a few ventilation slots – it acts like a heat‑sink and keeps the enclosure from turning the cabin into a sauna.
Once you’ve found the sweet spot, drill pilot holes, bolt the amp down, and double‑check that the mounting surface is flat. A wobbly amp will vibrate, creating unwanted noise that can sound like a rattling soda can.
3. Connect the power side
Start at the battery. Slide the in‑line fuse holder onto the positive lead and install a fuse sized 125 % of the amp’s maximum current draw (a 40 A fuse for a 30 A amp, for example). Place the fuse within 12‑18 inches of the battery – that’s the safety window that protects the rest of your wiring.
Run the power cable through the firewall grommet you installed earlier, then zip‑tie it to an existing chassis ground wire for a clean look. When you reach the amp, strip about ½ inch of insulation, crimp a ring terminal, and bolt it to the amp’s power terminal.
4. Grounding – the unsung hero
A good ground is as important as the power feed. Find a bare‑metal bolt near the amp’s location, sand away any paint or rust, and attach a matching ring terminal on the ground wire. Tighten to about 5‑6 Nm; too loose and you’ll hear a constant hum, too tight and you risk stripping the bolt.
In our shop, we often add a second ground strap if the first one feels a bit distant – the extra path lowers resistance and keeps the amp’s noise floor low.
5. Hook up the signal side
If you’re using a line‑output converter (LOC), run RCA cables from the head unit to the LOC, then from the LOC to the amp’s input. Keep the RCA run away from power wires – parallel runs can introduce interference. A quick trick is to use a zip‑tie to bundle the RCA cable on the opposite side of the power harness.For a powered sub, you can often feed speaker‑level signals directly into the sub’s built‑in amp. Just double‑check the polarity: positive to positive, negative to negative, otherwise you’ll get a weak, “phase‑canceled” bass.
6. Double‑check everything before firing up
Before you reconnect the battery, run a continuity test on each wire with a multimeter. Look for any shorted strands or loose crimps. Re‑attach the negative battery terminal, turn the key to the “on” position (don’t crank the engine), and listen for a clean click from the amp’s power LED.
If the amp stays dark, re‑inspect the fuse and the power connection. Most issues are just a loose ring terminal or a stray piece of wire touching the chassis.
Quick reference table
| Component | Recommended Spec | Why it matters |
|---|---|---|
| Power wire | 8 AWG for ≤500 W amp, 10 AWG for ≤300 W amp | Minimizes voltage drop, keeps bass tight |
| In‑line fuse | 125 % of amp’s max current (e.g., 40 A for 30 A amp) | Protects wiring from overloads |
| Ground strap | Same gauge as power wire, secured to bare metal | Prevents hum and ensures stable amp operation |
Need a deeper dive into wiring diagrams and troubleshooting? Our Complete Car Audio Installation Manual: Professional Guide walks you through every connection with pictures.
And if you’re curious how a lab‑grade protocol keeps things tidy, check out this detailed walk‑through from a different field: Step‑by‑Step ELISA Procedure Steps for Reliable Results. It’s a good reminder that precision matters, whether you’re measuring proteins or bass.
Step 5: Mount the Subwoofer and Connect
Alright, the box is in place – now it’s time to actually bolt it down and get those cables talking. If you’ve ever felt a thump and thought “that could be tighter,” you’re about to fix it.
Secure the enclosure
First, double‑check the mounting holes you marked earlier. Align the sub’s pre‑drilled brackets with the chassis bolts or seat‑rail studs. A common mistake is tightening the bolts before the rubber isolation pad is fully seated, which can cause the box to vibrate against metal.
Place a thin 1‑mm neoprene sheet between the box and the mounting surface. It acts like a cushion and prevents that annoying rattling you hear when you hit a pothole. Then hand‑tighten each bolt, walk around the box, and give each bolt a final 5‑6 Nm turn with a torque wrench. Over‑torquing can deform the enclosure and distort the cone.
Here’s a quick checklist:
- All bolts snug, not stripped.
- Isolation pad centered and flat.
- Clearance of at least 2 inches from heat sources (exhaust, brake lines).
- Box sits level – use a small level if you’re unsure.
Once the sub feels rock‑solid, you can move on to the wiring stage.
Wire the subwoofer
The wiring part is where many DIYers get tripped up. You already have a power feed and ground strap from Step 4, so now you just need to hook up the speaker leads.
If you’re using a passive sub, you’ll have two thick speaker‑level wires (usually 12‑ or 14‑gauge). Strip about ½ inch of insulation from each end, twist the strands, and insert them into the sub’s binding posts. Most Audio Intensity subwoofers use a “+” and “–” label – match polarity with the amp’s output. Swapping them results in a weak, “out‑of‑phase” bass that feels thin.
For a powered sub, the process is even simpler: run the RCA cables from the amp’s line‑output (or from a line‑output converter) into the sub’s RCA inputs, then connect the power lead to the sub’s internal amp. Make sure the power lead is also fused – most powered subs come with a built‑in fuse, but adding an extra in‑line fuse near the battery gives you a safety net.
Tip: keep the speaker wires away from the power cable by at least 2 inches. Parallel runs can induce hum. If you have to cross them, do it at a 90‑degree angle and secure with zip‑ties.
Need a visual reference? Check out this step‑by‑step subwoofer mounting video that walks you through the exact same connection points we’re describing.
Final checks and power‑up
Before you reconnect the battery, run a quick continuity test on each speaker lead with a multimeter. You should see zero ohms between the amp’s output terminal and the sub’s corresponding post. Any resistance above a few ohms indicates a bad crimp or a stray strand.
Now re‑attach the negative battery terminal, turn the key to the “on” position (don’t start the engine), and listen for the amp’s power LED to light. If it stays dark, double‑check the in‑line fuse and the ring terminals on the power feed.
When the amp lights up, crank the volume low, play a bass‑heavy track, and gradually increase until you feel the sub respond without distortion. If you notice any rattling, loosen the mounting bolts by a half turn, add another layer of isolation, and retest.
Finally, tidy up the wiring: bundle excess length with zip‑ties, route the cables behind the trim panels, and secure the power line with a clamp to the chassis. A clean install not only looks professional; it also reduces the risk of wires chafing against sharp edges over time.
Congratulations – you’ve just taken the biggest hurdle out of “how to install subwoofer in car.” With the sub firmly mounted and the connections double‑checked, you’re ready for the final tuning steps that will turn your ride into a moving concert hall.
A quick tip for long‑term reliability is to apply a small amount of dielectric grease to each crimped connection. It repels moisture, which is especially useful in humid climates or if you ever drive through a car wash. Check the connections after the first week of use; a snug retightening can prevent a sudden loss of bass later on.
Step 6: Test and Fine-Tune Audio Settings
Now the sub is snug, the wires are tidy, and you’ve got power flowing. It’s time to sit in the driver’s seat, fire it up, and make sure every thump lands where you want it.
Power‑up the system safely
Turn the key to the “ON” position without cranking the engine. Keep an eye on the amp’s LEDs – green means power, red flags a protection mode. If you see red, double‑check the fuse and the polarity of your power and ground wires.
Once the amp’s green, start with the volume knob on the head unit all the way down. You’ll be tweaking the amp’s gain, crossover, and bass‑boost knobs, so you want a clean slate.
Use a test tone or familiar bass track
Grab a song you know well – maybe that bass‑heavy track you blast on road trips – or fire up a 30 Hz sine‑wave tone from a phone app. Play it at a moderate level and listen for three things: clarity, punch, and any distortion.
Do you hear the sub “talking” to the rest of the system, or is it shouting over everything? That’s your first clue whether the gain is too high or too low.
Adjust the gain knob
Start with the gain at its lowest setting. Gradually turn it up in small increments (about a quarter turn each). The sweet spot is when the bass feels full but the speaker cone isn’t whining or clipping.
If you notice a fuzzy edge on low notes, back off a notch – you’re probably feeding the amp more voltage than the sub can handle.
Set the crossover frequency
The crossover tells the amp which frequencies to send to the sub. For a typical 10‑inch sealed box, aim for a low‑pass around 80 Hz. If you’ve got a ported enclosure, you can push it a little higher, say 100 Hz, to keep the mids clean.
Listen again after each tweak. The goal is a seamless blend where the sub fills in the “rumble” without muddying the midrange.
Play with the bass‑boost and phase
Many amps, like the one on the Seventour ST‑800 subwoofer, have a bass‑boost knob and a phase switch. Boost gives you that extra punch at the very low end – start with 2‑3 dB and increase only if you need more thump.
The phase switch (0°/180°) matters if the sub is mounted away from the main speakers. Flip it and listen; whichever setting makes the bass feel tighter and more centered is the right one.
Check for rattles and vibrations
Give the car a quick “door slam” test. If the sub or its mounting bolts shift, loosen them a half‑turn, add another rubber pad, and retest. A solid mount eliminates unwanted resonance that can mask your fine‑tuned settings.
Don’t forget to re‑tighten any zip‑ties after you’ve routed the wires – a loose zip‑tie can vibrate and create a faint buzz.
Document your settings
Take a quick photo of the amp’s control positions or jot them down in a notebook. You’ll thank yourself next time you swap a head unit or move the sub to a new spot.
Pro tip: after a week of driving, revisit the gain and crossover. Temperature changes and fuel‑level weight shifts can subtly affect the system’s response.
Quick fine‑tuning checklist
- Power LED green, no protection red.
- Gain set just below the point where distortion appears.
- Crossover around 80‑100 Hz depending on enclosure type.
- Bass‑boost modest (2‑3 dB) unless you need extra thump.
- Phase set for tightest integration with main speakers.
- No rattling when doors slam or bumps hit.
- All wiring secured, zip‑ties tightened.
If you want a visual walk‑through of these tweaks, check out this short fine‑tuning tutorial on YouTube. It walks you through gain, crossover, and phase adjustments step by step.
When everything sits right, turn the volume up, feel the bass roll through the chassis, and enjoy the concert‑hall vibe you just built yourself.
FAQ
What is the first thing I should check before I start how to install subwoofer in car?
Before you even reach for a wrench, make sure the battery’s negative terminal is disconnected and the fuse holder is ready. A quick voltage check with a multimeter will confirm there’s no stray power lurking in the wiring harness. This safety step saves you from accidental shorts that could scorch a new amp or melt a wire – and it only takes a minute.
How do I choose the right gauge for the power wire when I’m installing a subwoofer?
Pick 8 AWG for amps that pull 500 W RMS or more, and drop to 10 AWG if your amp stays under 300 W. The thicker the wire, the less voltage drop you’ll see, which translates to tighter bass and less heat in the connector. And remember to keep the run as short as possible; every extra foot adds resistance that can mute the low end.
Where is the best place to mount a subwoofer to avoid rattles?
Most car‑audio enthusiasts find the sweet spot on a solid metal surface – think seat‑rail brackets, trunk‑floor crossbars, or a spare‑tire well. Slip a thin rubber or neoprene pad between the box and the chassis, then hand‑tighten the bolts before giving each a final 5‑6 Nm turn. But if you hear any vibration when you slam a door, loosen the bolts a half turn and add another isolation pad.
What should I do if the amp’s protection light stays on after I reconnect the battery?
First, double‑check that the in‑line fuse matches the amp’s recommended rating – a 30 A fuse for a 20 A amp, for example. Then verify polarity on both power and ground wires; a reversed ground will trigger protection mode instantly. If the fuse looks good, use a multimeter to test continuity from the battery positive to the amp’s input terminal. Any break in the circuit will keep the amp shut down.
Do I really need a separate ground strap, or can I share the chassis ground?
Sharing a chassis ground works in a pinch, but a dedicated ground strap of the same gauge as your power wire gives you a cleaner signal and eliminates hum. Find a bare‑metal bolt near the sub’s mounting point, sand away paint, and clamp the strap securely. And tighten it to about 5 Nm – too loose and you’ll hear a constant buzz, too tight and you risk stripping the bolt.
How often should I revisit the gain and crossover settings after the install?
We recommend a quick check after the first week of driving, then again after any major temperature swing or fuel‑level change. Those factors can shift the amp’s output by a few decibels, especially in sealed boxes. Grab your favorite bass‑heavy track, turn the gain up until you hear the first hint of distortion, then back off a notch. That gives you a reliable baseline for future tweaks.
Can I use the same wiring kit for both a passive and a powered subwoofer?
Yes, as long as the kit includes a heavy‑gauge power lead, a fused power section, and a ground wire. For a passive sub you’ll need speaker‑level wires (12‑14 AWG) from the amp’s output, while a powered sub only needs the power feed and a fused connection near the battery. Just keep the power and signal wires at least two inches apart to avoid interference, and you’ll be good to go.
Conclusion
So there you have it—by now the subwoofer sits snug, the wiring is tidy, and the amp sings the low end just the way you imagined.
Think back to that moment when you first heard the first thump after the power‑up. That little surge of excitement is what all the prep work paid off for, and it proves that “how to install subwoofer in car” isn’t magic, it’s a series of simple, repeatable steps.
What matters most is staying disciplined: double‑check every torque spec, keep power and signal cables apart, and give the mounting bolts a final 5‑6 Nm turn. Those tiny details keep hum at bay and protect your gear when the road gets rough.
For car‑audio enthusiasts, pros, or weekend hobbyists, the real win is confidence. The next time you roll out of the garage, you’ll know exactly where to look if the gain drifts or a fuse pops—no guesswork, just a solid checklist you’ve built yourself.
So, what’s the next move? Grab your favorite bass‑heavy track, crank it up a notch, and let the cabin vibrate. If everything feels tight and clear, you’ve nailed the install. If not, revisit the gain, re‑tighten a bolt, or add another rubber pad—tiny tweaks make a big difference.
Remember, a well‑installed subwoofer not only sounds better, it lasts longer. Keep an eye on the connections after the first week, and you’ll avoid the dreaded “it worked yesterday” surprise. Happy listening, and enjoy the deeper soundtrack you’ve earned.


