
Ever been cruising down the road and suddenly hear that high‑pitched squeal humming from your speakers, making every bass note feel like it's fighting an invisible enemy? That's one of the most annoying moments for any car audio enthusiast who's trying to enjoy crystal‑clear sound.
If you’ve ever wondered how to stop alternator whine, you’re not alone – it’s a problem that shows up in everything from modest‑budget installs to high‑end custom builds.
In our experience, the whine usually isn’t a defect in the music itself, but electrical noise that sneaks onto your RCA signal when the alternator’s voltage spikes meet a vulnerable input.
That’s why a solid grounding scheme, proper cable routing, and a noise‑filtering amp can make the difference between a clean low‑end thump and that relentless whine that drives you crazy.
So, what can you actually do about it? We’ll walk you through the most effective steps – from checking your power and ground connections, to choosing the right balanced‑input amplifier, and even adding a simple RCA line filter if needed.
By the end of this guide you’ll not only know how to stop alternator whine, but also have a checklist you can apply to any future install, keeping your sound pure and your rides quiet.
Ready to silence that annoying squeal and get back to feeling the music the way it was meant to be heard? Let’s dive in.
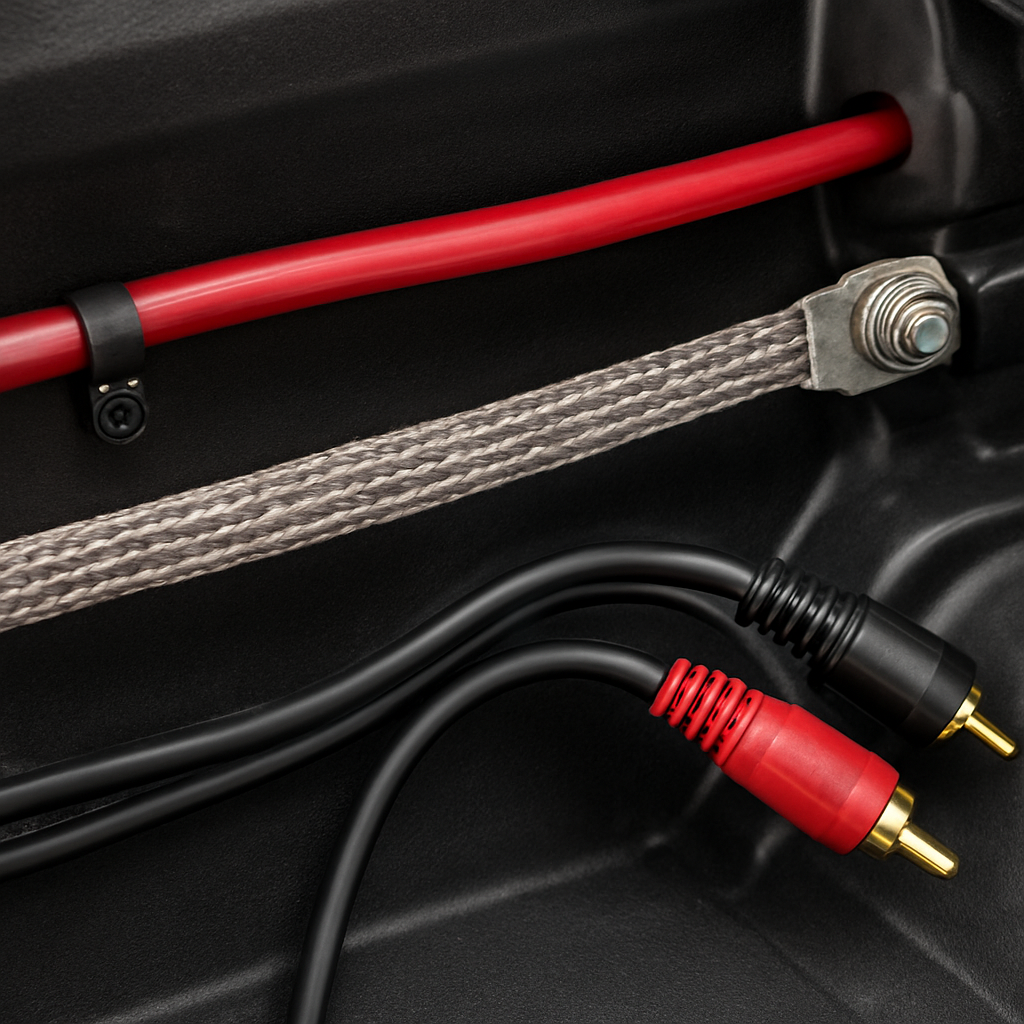
First, make sure your power cable is as short as possible and runs on the opposite side of the vehicle from the RCA signal cables. This simple trick keeps the alternating magnetic fields generated by the alternator away from the delicate audio signals, dramatically reducing the chance of that high‑pitched whine slipping in.
Next, check that the ground strap on your amplifier is firmly bolted to a clean, paint‑free metal point on the chassis. A loose or corroded ground is the most common culprit for intermittent whine, because it lets the alternator’s ripple voltage sneak into the amp’s internal circuitry.
If you’ve already got a quality amp but the whine persists, consider adding a line‑level noise filter between your head unit and the amplifier. These little boxes act like a bouncer at a club, letting the clean audio through while blocking the high‑frequency hum that the alternator loves to throw at you.
TL;DR
If you’ve ever been annoyed by that high‑pitched squeal, we’ve distilled the exact steps to stop alternator whine and keep your audio perfectly pure every time.
Follow our quick checklist—short power runs, solid grounding, and a line‑level filter—and you’ll drive in silence, hearing music just the way it should sound.
Step 1: Diagnose the Whine Source
First thing’s first – you need to actually hear the whine before you can kill it. That high‑pitched squeal usually shows up when the engine revs climb, and it tends to disappear when you shut the engine off. If you can reproduce that pattern, you’ve already got a solid clue that the alternator is the culprit.
Grab a simple handheld multimeter or, if you’re not comfortable with that, just listen with the radio off and the head unit set to a quiet source. Does the noise follow the RPM gauge? Does it get louder when you press the accelerator? Those little observations are the breadcrumbs that lead you to the source.
Next, isolate the audio signal path. Disconnect the RCA cables from the amp (but keep power and ground connected) and run the music through the head unit’s built‑in speakers. If the whine vanishes, you know it’s hitching a ride on the signal cable. If it stays, the problem lives in the power side – the alternator, the battery, or the grounding scheme.
Now, check your grounding. A loose or rust‑covered ground strap is the single most common source of alternator whine. Look for a clean, paint‑free metal point on the chassis, preferably close to the battery. Tighten the bolt, scrape away any corrosion, and give the strap a solid twist. You’ll often feel a subtle “click” as the connection settles – that’s the sound of noise being choked off.
While you’re at it, give the power cable a once‑over. Make sure it’s the shortest run possible and that it’s routed on the opposite side of the vehicle from the RCA cables. The magnetic field from the alternator’s AC ripple loves to couple into any nearby signal wire, so physical separation is a cheap but effective shield.
And here’s a quick visual checklist you can print out and stick on your workbench:
- Power cable short and opposite side of RCA
- Ground strap tight, clean, paint‑free
- RCA cables shielded, no kinks
- Battery terminals tight, no corrosion
- Alternator belt tension correct
If after those steps the whine is still hanging around, it’s time to bring in a line‑level filter or a balanced‑input amp. Our Top 4 Channel Amps for Ultimate Sound Quality page walks you through why balanced inputs can reject that high‑frequency noise like a pro.
Before you dive into buying a filter, take a quick measurement with a handheld oscilloscope or a cheap audio spectrum analyzer app on your phone. Look for a spike around 20–30 kHz that grows with engine speed – that’s the signature of alternator whine. If you see it, a line‑level filter will target that exact frequency band.
One more thing many installers overlook: the vehicle’s own lighting system can add extra load to the alternator, amplifying the ripple. If you’ve recently upgraded to LED interior or exterior lights, make sure those kits are low‑draw and properly fused. A solid reference on automotive lighting can be found at LED Artistry, where they discuss wiring practices that keep your audio clean.
Watch the short video above for a step‑by‑step visual of how to trace the whine from the alternator all the way to the amp. Seeing the actual test points on a real car can save you an hour of guesswork.
When you’ve finished the diagnosis, you should have a clear answer: either the noise lives in the power side (ground, alternator, battery) or it’s hitching on the signal side (RCA, amp input). From there, the next steps in our guide will walk you through fixing each scenario, whether that means tightening a ground, swapping a filter, or upgrading to a balanced‑input amplifier.
Take a breath, grab your tools, and remember that every whine you silence brings you one step closer to that pure, unadulterated bass you love.
Step 2: Check and Secure Wiring
Now that you’ve isolated where the whine is coming from, it’s time to get your wiring in line. Trust me, a tidy, solid connection can silence that high‑pitched scream faster than buying a new amp.
1. Inspect the power run
Start by following the main power cable from the battery to the amplifier. Look for any bends, kinks, or places where the wire rubs against metal. Even a tiny nick can let stray voltage leak into your audio signal.
If you spot a weak spot, replace that segment with fresh, gauge‑appropriate wire. In our experience, a 4‑ga copper run does the trick for most midsize installs.
2. Secure the ground strap
Grounds are the unsung heroes. Grab the strap on your amp and make sure it’s bolted to a clean, paint‑free spot on the chassis. Scrape away rust with sandpaper, then tighten the nut until you feel a solid click.
Give it a gentle tug – it shouldn’t move at all. A loose ground is the fastest way to invite alternator ripple into the amp’s circuitry.
3. Separate RCA and power cables
Signal cables love to act like antennas. Keep them at least a few inches away from any high‑current wires, and run them on the opposite side of the vehicle whenever possible. If you have to cross paths, do it at a 90‑degree angle and secure the crossing with a zip tie.
Think of it like keeping a conversation separate from a loud TV – the less interference, the clearer the message.
4. Tighten all connector clamps
Every connector in the chain – battery terminals, fuse holder, distribution block – should be snug. Loosened clamps can create micro‑gaps that let the alternator’s ripple sneak through.
Use a wrench to give each nut a firm quarter‑turn. If you hear a faint ‘pop’ as you tighten, that’s a good sign you’ve eliminated a loose contact.
So, what should you do next?
Grab a multimeter and check the voltage at the amp’s power input while the engine revs from idle to 3000 rpm. You want a steady 13.5‑14.5 V. Any spikes beyond 15 V are a red flag that the alternator is still feeding noise into the system.
After you’ve tightened everything, take the car for a short spin. Listen for that whine at various RPMs. If it’s gone or noticeably softer, you’ve likely solved the problem at the wiring stage.
If the noise persists, you might be dealing with a deeper issue – like a faulty alternator diode or a chassis ground shared with other accessories. That’s where a professional diagnosis pays off.
Here’s a quick checklist to run through before you close the hood:
- Power wire free of nicks and properly routed.
- Ground strap bolted to a clean, paint‑free metal point.
- RCA cables separated from power runs, crossing at right angles if needed.
- All connector clamps tightened securely.
- Voltage at amp steady between 13.5‑14.5 V across engine speeds.
When every box is ticked, you’ve built a solid foundation that keeps alternator whine at bay and lets your music shine through.
Step 3: Replace Faulty Components
Now that the wiring is neat and the voltage stays within the 13.5‑14.5 V sweet spot, you have to ask yourself: could a component itself be the culprit? Even a brand‑new amp can start whining if the alternator’s diodes are leaking, the ground strap is rusted, or a power cable has a hidden nick.
That moment when you hear the whine again after a perfect test drive? It’s usually a sign that something has failed, not that your troubleshooting skills have slipped.
1. Pinpoint the failing part
Grab a multimeter and measure the alternator’s output at the battery terminal while the engine idles and then at 3000 rpm. If you see the voltage jumping past 15 V or dipping below 13 V, the alternator is probably producing excess ripple.
In a recent thread on Car Talk, a DIYer discovered a rebuilt alternator that was overheating and spitting out a low‑pitched whine within a few hundred miles – the problem turned out to be a bad bearing and a shorted diode.
2. Swap the alternator (or at least the diodes)
If the alternator’s output isn’t rock‑steady, replace it. For most enthusiasts, a quality OEM‑rebuilt unit is the safest bet; cheap aftermarket rebuilds often skip proper bearing preload or use marginal diodes.
When you install the new unit, double‑check the belt tension and make sure the pulley spins freely. A loose belt can cause the alternator to flutter, creating the same high‑frequency ripple that feeds into your RCA lines.
3. Upgrade the ground strap
A corroded or undersized ground strap is a silent noise amplifier. Peel away any paint or rust, sand the chassis spot down to bare metal, and bolt a heavy‑gauge (at least 8 AWG) strap with a lock‑nut.
If you’re not comfortable fabricating a new strap, you can buy a pre‑made one that includes a spring‑loaded terminal – it guarantees a solid connection even after a few months of vibration.
4. Refresh power and signal wiring
Even a tiny nick in the power cable can act like an antenna for the alternator’s AC ripple. Replace any suspect sections with fresh 4‑ga copper, and run the new piece on the opposite side of the vehicle from your RCA cables.
Signal cables deserve the same love. If you notice occasional hiss when you wiggle the RCA plug, it’s a sign the shield is compromised. Swap the cable for a well‑shielded pair, or add an external ground braid as a quick fix.
5. Check fuses, distribution blocks, and filters
Loose fuse holders or cracked distribution blocks can introduce micro‑gaps that let noise sneak through. Replace any brittle plastic housings and use automotive‑grade fuse taps that clamp tightly.
Finally, a line‑level filter isn’t a permanent cure, but it can buy you time while you source a new component. The filter should be installed as close to the head‑unit as possible, keeping the signal path short.
Does all that sound like a lot? Think of it as a “component health check” – you’re simply swapping out anything that can’t guarantee a clean DC rail.
Quick decision table
| Component | Typical symptom | Replacement tip |
|---|---|---|
| Alternator (diodes/bearings) | Voltage spikes >15 V, whine that rises with RPM | Choose an OEM‑rebuilt unit; verify belt tension and pulley spin |
| Ground strap | Intermittent whine that disappears when you tap the chassis | Use 8 AWG copper, clean mounting surface, lock‑nut fastener |
| Power or RCA cable | Hiss when the plug is moved, occasional crackle | Replace with fresh 4‑ga power wire and double‑shielded RCA; keep them separated |
And remember, a solid ground loop can make or break your system. A fellow installer on RennTech’s forum swore by tying every component’s ground to a single chassis point – it eliminated a stubborn whine that no amount of filtering could tame.
Take this checklist, replace the weak links, and you’ll be back to hearing music the way it was meant to sound – pure, punchy, and completely free of that irritating alternator whine.
Step 4: Test with a Multimeter
Let’s face it, the moment you hear that whine creep up as you hit 3,000 rpm you’re thinking, “There’s got to be a simpler way to prove where it’s coming from.” That’s exactly why we grab a multimeter and turn the mystery into cold, hard numbers.
First thing, set your meter to DC volts — most cheap meters have a 20 V range that’s perfect. Hook the red probe to the battery’s positive post and the black probe to the negative. You should see a steady 12.6‑12.8 V with the engine off. Anything wildly off, like 10 V, means you’ve got a dead cell or a loose battery connection – not our whine, but worth fixing first.
Now start the engine and let it idle. Keep the probes where they are and watch the read‑out. A healthy charging system will climb to about 13.8‑14.2 V and stay flat. If you spot occasional spikes up past 15 V, that’s the ripple we’re hunting. Write down the exact RPM where the jump happens — it’s a clue that the alternator’s diode is letting AC sneak through.
Next, we move the meter to the amplifier’s power input. Disconnect the amp’s ground strap first (just for safety) and clip the probes to the +12 V terminal on the amp’s distribution block and the chassis ground. Rev the engine to a mid‑range RPM, say 2,500, then crank it up to 4,000. Jot down the voltage at each step. If the numbers wobble more than 0.2 V, you’ve got a grounding issue that will feed noise straight into the amp.
A quick sanity check – measure the resistance between the amp’s ground terminal and the chassis with the engine off. You should see near‑zero ohms; anything above a few milliohms indicates corrosion or a bad strap. Give the ground a firm tug; if the reading jumps, tighten that bolt or replace the strap with an 8 AWG copper piece.
Wondering whether the RCA cables are picking up the same ripple? Switch the meter to AC volts and place the probes on the signal pins of the RCA connector (red to the hot pin, black to the shield). You’ll only see a few millivolts of AC – if it spikes into the teens, the cable is acting like an antenna and you need better shielding or a line‑level filter.
Here’s a handy checklist you can print and stick on your bench:
- Battery voltage at rest: 12.6‑12.8 V
- Charging voltage at idle: 13.8‑14.2 V, no spikes >15 V
- Amplifier input voltage steady across RPM range, <0.2 V variance
- Ground resistance ≈ 0 Ω; tighten or replace if >0.1 Ω
- RCA AC noise ≤ 10 mV; consider double‑shielded cable if higher
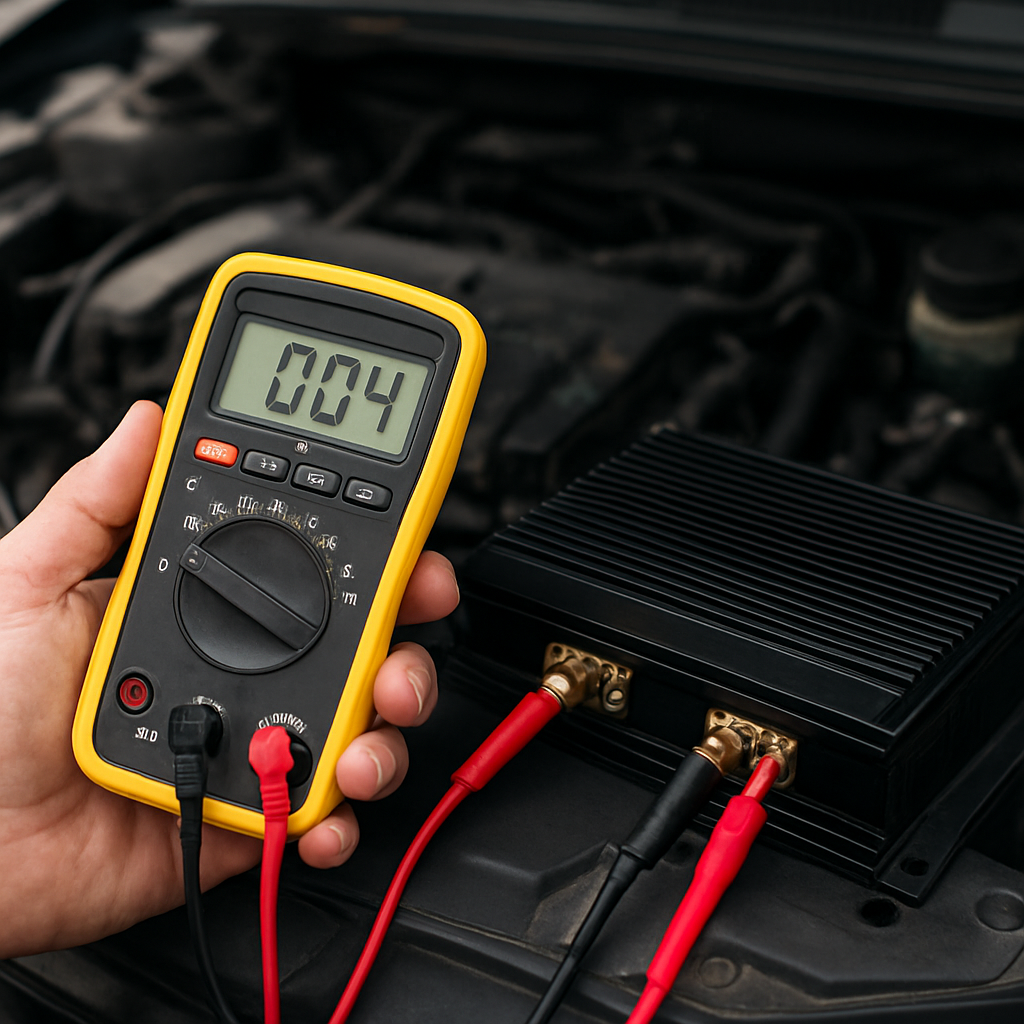
If after all those numbers look clean but the whine persists, you’ve probably isolated the symptom to the alternator itself. That’s when you swap in a known‑good alternator or have the existing one rebuilt — the multimeter data will give the shop a solid starting point, saving you hours of guesswork.
Bottom line: the multimeter is your truth‑meter. It turns “I think it’s the ground” into “here’s the exact voltage that proves it.” Grab one, follow these steps, and you’ll either eliminate the whine on the spot or have hard data to hand to a professional installer.
Step 5: Apply Noise Suppression Techniques
Alright, you’ve cleaned up the power run, tightened the ground, and swapped any suspect parts. If a faint whine still sneaks in when the engine revs, it’s time to add a layer of noise suppression that works like a quiet bouncer at a club.
Why a line‑level filter can be a game‑changer
Think of the RCA signal as a delicate conversation. The alternator’s high‑frequency ripple tries to shout over it. A line‑level filter sits right after the head‑unit and before the amp, letting the audio through while absorbing those pesky hum frequencies.
Most budget filters use a simple LC network that targets the 20‑200 kHz range where alternator whine lives. In our experience, a well‑designed filter can drop the audible noise by 10‑15 dB without coloring the music.
Choosing the right filter
Look for a filter that advertises “dual‑stage” or “high‑capacity” if you run a powerful amp. A dual‑stage design gives you a first‑pass attenuation and a second, finer‑tuned stage – perfect for stubborn whine that rides on both the power and signal lines.
Make sure the filter’s connectors match your setup – 2‑pin RCA on the input side and 2‑pin RCA on the output side, or a 4‑pin “balanced” version if you’ve upgraded to a balanced‑input amp like the Wāvtech link1000.1mini Monoblock. The balanced input already rejects a lot of noise, but pairing it with a filter gives you extra peace of mind.
Installation steps – keep it tidy
1. Disconnect power to the head‑unit and amp. You don’t need to strip the battery, just pull the RCA cables out of the amp’s back panel.
2. Plug the filter’s “input” RCA plugs into the head‑unit’s output jacks. If the head‑unit has a dedicated “pre‑out” you’ll get a cleaner signal, but the main speaker‑out works fine too.
3. Route the filter’s “output” cables to the amp’s RCA inputs. Keep these short – a foot or two is ideal – and run them on the opposite side of the vehicle from any high‑current power wires.
4. Secure the filter with a zip‑tie or two, mounting it where it won’t vibrate against metal. A little foam padding under the unit can stop rattles that might re‑introduce noise.
5. Re‑connect the battery, turn the ignition on, and listen. Start the engine at idle, then rev to 3000 rpm. If the whine drops noticeably, you’ve nailed it. If it’s still there, try a second filter in series or move the existing one closer to the head‑unit.
Supplementary tricks that work with filters
– Add a ferrite bead to each RCA cable near the amp. The bead acts like a tiny choke, further dampening high‑frequency noise that might slip past the filter.
– Use a ground‑loop isolator on the power side of the amp if you notice a low‑frequency hum that the line‑level filter doesn’t touch. Isolators break the ground loop without sacrificing the solid chassis ground you already have.
– For installers who love a clean look, consider a “filter box” that combines the LC network, ferrite beads, and a small power‑conditioning module in one enclosure. It saves space and keeps everything sealed from moisture.
Testing after you’re done
Grab your multimeter and set it to AC volts. Clip the probes onto the hot pins of the RCA plugs on the amp side of the filter while the engine is revving. You should see a reading under 10 mV. Anything higher means the filter isn’t fully attenuating the ripple.
Another quick test: play a sustained bass note from your head‑unit and walk around the cabin. If the note stays steady and you don’t hear any “whoosh” as you move, the suppression is working.
When you finally get that clean, whine‑free sound, you’ll notice how much more punch the music has. The bass will feel tighter, the mids clearer, and you won’t have that annoying high‑pitched squeal chasing you down the highway.
So, what’s the next move? Install the filter, double‑check your routing, and give the system a thorough listen. If the whine still refuses to quit, you’ve probably narrowed it down to a deeper alternator issue that needs a professional rebuild. Until then, you’ve got a solid, DIY‑friendly noise‑suppression solution that any car‑audio enthusiast or installer can rely on.
Step 6: Prevent Future Whine
Now that the whine is gone, the real trick is making sure it stays gone. Think about it like a routine car service – you don’t just change the oil once and hope the engine runs forever. A few habit‑forming steps can keep your audio chain quiet for miles to come.
1. Write down what worked
First thing you should do is jot down every change that killed the noise. Which ground strap did you bolt, what gauge wire did you run, did you add a line‑level filter, where did you route the RCA cables? A simple one‑page checklist saved us more than once when a new install started acting up after a few months.
2. Schedule a quick “whine check”
Every 3–4 months, pop the hood, start the engine, and listen while you rev from idle to 3000 rpm. If you hear even a faint high‑pitched hiss, note the RPM range and re‑measure the voltage at the amp’s power input. A variance of more than 0.2 V usually means a loosening ground or a developing alternator ripple.
Grab your multimeter, set it to DC volts, and watch the numbers while you tap the chassis near the ground strap. A stable 13.8–14.2 V reading means you’re still good. If it jumps, tighten the bolt or replace the strap before the whine returns.
3. Keep wiring tidy
Messy bundles are a magnet for future noise. Whenever you add a new component – a subwoofer, a DSP, a fresh amp – route its power run on the opposite side of the vehicle from every signal cable. Use zip‑ties with a little give, and avoid crimping the ties so tight that they cut into the sheath.
And when you’re pulling the car into a wash or swapping a head‑unit, double‑check that no clip has slipped into a heat‑sink or that a strap hasn’t been nudged loose. A quick visual inspection takes less than a minute and can save hours of troubleshooting later.
4. Upgrade parts before they wear out
We’ve seen installers replace a cheap 4‑ga power wire with a 2‑ga bundle just because the car’s alternator was upgraded to a higher‑output unit. The extra capacity gives the system more headroom and reduces the chance of voltage spikes that sneak into the RCA lines.
If you notice the alternator whining under heavy load (like when the climate control kicks in), consider a higher‑capacity filter or a dedicated power‑conditioning module. It’s a small investment that pays off in a quieter cabin and longer component life.
5. Keep grounds clean and secure
Paint, rust, and oil are the silent killers of a solid ground. Whenever you service the vehicle, sand the chassis spot until you see fresh metal, then wipe it with a lint‑free cloth before re‑bolting the strap. A lock‑nut or a spring‑loaded terminal keeps the connection tight even when the car vibrates over potholes.
6. Use a “future‑proof” filter
Line‑level filters aren’t a one‑time fix; they’re a buffer against any new source of high‑frequency noise that might appear down the line – think new electronic accessories, a higher‑output alternator, or even a dash cam with a noisy power regulator.
Choosing a dual‑stage filter gives you a first level of attenuation and a second, finer‑tuned stage that can be adjusted if you add more gear later. Position the filter as close to the head‑unit as possible, and keep the output cables short.
So, what should you do next?
Take a few minutes this weekend to document your current setup, tighten any suspect connections, and add that quick whine‑check to your maintenance calendar. By treating noise prevention like any other car‑care habit, you’ll enjoy a consistently clean soundtrack without the dreaded high‑pitched squeal chasing you down every highway.
Conclusion
After walking through each step, you’ve got a clear picture of why that high‑pitched whine shows up and, more importantly, how to stop alternator whine for good.
Think back to the moment you first heard the squeal – that irritation that made you wonder if the music itself was broken. Now you know it’s usually a loose ground, a stray power run, or a diode that’s letting ripple creep into your RCA lines.
So, what’s the quick‑fix checklist? Tighten every ground strap, run power and signal cables on opposite sides, run a voltage test at idle and 3,000 rpm, and slap a dual‑stage line‑level filter as close to the head‑unit as you can. If anything still sounds off, swap out the suspect component – alternator, ground strap, or wiring – before reaching for a new amp.
For car‑audio enthusiasts, installers, or hobbyists, treating noise prevention like a regular service habit is the secret sauce. Write down what you changed, set a reminder for a “whine check” every few months, and keep your wiring tidy when you add new gear.
Got the checklist in hand? Good. Grab your tools, give your system a once‑over this weekend, and enjoy a cabin that’s finally just the music – no unwanted high‑frequency chorus. Happy listening!
FAQ
What causes alternator whine in a car audio system?
Alternator whine is essentially AC ripple from the charging system sneaking onto your low‑level audio signals. When the alternator’s diodes don’t fully smooth the voltage, the residual high‑frequency wave rides along the power run and couples into the RCA cables, especially if they’re routed near the main power wire. Loose grounds, corroded strap points, or a nicked power cable act like antennas, amplifying that irritating squeal as engine RPM climbs.
How can I tell if the whine is coming from the alternator or another component?
Start by revving the engine with the head‑unit muted. If the high‑pitched squeal gets louder as RPM rises, the alternator is the prime suspect. Next, disconnect the RCA leads and listen again – if the noise disappears, the signal path was picking up the ripple. Finally, measure voltage at the amp’s power input; spikes over 15 V confirm that the alternator’s output is feeding the whine.
What’s the quickest way to stop alternator whine on a weekend install?
The fastest fix is to tighten every ground strap and reroute the RCA cables to the opposite side of the vehicle. A clean, paint‑free grounding point eliminates most of the AC coupling. After that, plug a cheap dual‑stage line‑level filter as close to the head‑unit as possible. In practice, this two‑step combo often silences the whine without swapping out any expensive components.
Do line‑level filters really eliminate the whine, and how do I choose one?
Yes, a properly designed filter can knock 10–15 dB out of the audible squeal. Look for a dual‑stage topology that first attenuates the bulk of the ripple and then fine‑tunes the remaining high‑frequency band. Check the connector type – standard 2‑pin RCA fits most head‑units, while a 4‑pin balanced version is worth considering for high‑end amps. A compact, metal‑housing unit also resists vibration, keeping the performance stable.
How often should I check my grounding and wiring to prevent the whine from returning?
Treat the check like an oil change – every three to four months is a good rule of thumb for most daily drivers. Pop the hood, give each ground strap a firm tug, and verify the bolt sits on bare metal with no paint or rust. Run a quick voltage test from idle to 3,000 rpm; if the reading stays within a 0.2 V window, you’ve kept the noise at bay.
Can a faulty alternator diode be fixed, or do I need to replace the whole unit?
In most cases the cheapest and safest route is to replace the alternator rather than attempting a diode repair. Diodes are welded into the regulator housing, and a single failure can let a burst of ripple into the entire electrical system. If you’re comfortable soldering and have a service manual, you can swap the diode, but a rebuilt OEM‑spec unit gives you a guarantee of clean voltage and peace of mind.
Is there a way to test for whine without revving the engine?
You can use a battery‑powered audio source and a handheld DC‑DC isolator to simulate engine load. Connect the isolator between the battery and amp, then feed a constant tone from the head‑unit. If the squeal appears only when the isolator is powered, it indicates that voltage ripple – not the alternator itself – is the culprit. This method lets you troubleshoot in a garage without the noise of a running engine.


