
Picture this: you're cruising down the motorway, the bass thumps just right, and you think, "Did I really nail the perfect sound?"
Most of us have been there – a sweet spot of excitement that fizzles out when the speakers start sounding flat or the amp just can't keep up. That's the moment you realize you need to get serious about matching your amplifier to your car speakers.
So, how do you choose an amplifier for car speakers without drowning in tech jargon? Let's break it down together, step by step, as if we're sitting over a coffee in the workshop and swapping stories about our latest builds.
First, think about the power handling of your speakers. Every driver knows the numbers on the box – RMS wattage, peak rating – and those figures are the baseline. If your speakers are rated for 100 W RMS, you want an amp that can comfortably deliver around 75‑125 % of that, giving you headroom without risking distortion.
Next up, consider the type of amp: Class A, AB, or D. Class A sounds pure but runs hot; Class AB balances efficiency and sound quality; Class D is lightweight and perfect for tight spaces under the seat. In our experience, many car‑audio enthusiasts opt for a Class AB unit when they want that warm, detailed tone without sacrificing power.
But power and class aren't the whole story. Impedance matching matters just as much. Most speakers run at 4 Ω, so you’ll need an amp that’s stable at that load. A mismatch can cause the amp to overheat or the speakers to sound thin.
And don't forget about features like adjustable crossover, built‑in low‑pass filters, and remote level controls. Those tools let you fine‑tune the system for your vehicle's acoustics – whether it's a hatchback, a sports coupe, or a rugged 4×4.
Finally, think about your installation environment. Limited space under the dash might push you toward a compact, high‑efficiency unit, while a custom‑built trunk enclosure can accommodate a larger, beefier amp. At Audio Intensity, we've helped installers pick the right size so the system fits like a glove.
Now that you’ve got the basics, you’re ready to dive deeper into each factor and make a confident decision. Let’s keep the conversation going and get that soundtrack of your ride just right.
TL;DR
Choosing the right amp for your car speakers means matching power, class, and impedance so the music stays punchy without overheating or distortion.
Follow our quick checklist—verify speaker RMS, pick a stable 4 Ω Class AB or D amp, and consider space and features—to get crystal‑clear sound that easily fits any vehicle.
Step 1: Determine Your Power Requirements
First thing’s first – you need to know how much juice your speakers actually crave. Grab the spec sheet, find the RMS wattage, and write that number down. If your mids are rated at 80 W RMS, you’re looking for an amp that can comfortably push about 60‑100 W per channel. That little buffer keeps the music punchy without the amp screaming.
But here’s the thing: most people eyeball the peak rating and end up with an over‑kill amp that just heats up and distorts. Think of it like buying a 3‑horse‑power motor for a tiny go‑kart – it’s overkill and you’ll waste fuel. Instead, aim for roughly 75‑125 % of the speaker’s RMS. That rule of thumb gives you headroom for those dynamic peaks when the bass drops.
Now, how do you actually calculate that? Grab a calculator (or just do the math in your head). Multiply the RMS by 0.75 for the lower bound, and by 1.25 for the upper bound. For an 80 W RMS speaker, you get 60 W minimum and 100 W maximum. Anything in that range will let you crank the volume without clipping.
And don’t forget to check the impedance. Most car speakers sit at 4 Ω, so you need an amp that’s stable at that load. If you accidentally pair a 2 Ω‑only amp, you’ll end up with overheating, and the system could shut down mid‑track. A quick glance at the amp’s spec sheet will tell you which impedances it can handle.
While you’re at it, think about the environment under the dash. A compact Class D amp might be perfect for a tight hatchback, whereas a larger Class AB unit can live happily in a spacious sedan trunk. The physical size matters just as much as the power numbers.
Want a quick way to visualize the right power band? Check out this short video that walks you through the math with real‑world examples.
After the video, take a moment to actually measure the RMS of your current setup. If you don’t have a multimeter handy, a simple bench test with a known‑good amp can give you a ballpark figure. That measurement will confirm whether your planned amp sits comfortably in the sweet spot.
Once you’ve nailed the RMS range, it’s time to browse options. Our catalogue of car amplifiers is filtered by power output, so you can instantly see which models sit inside your calculated window. Look for units that list RMS output at 4 Ω – that’s the sweet spot for most factory‑type speakers.
One tip many installers forget: factor in the speaker’s sensitivity. High‑sensitivity speakers (90 dB+ SPL @ 1 W/1 m) need less power to hit loud levels, so you can stay on the lower end of the range. Low‑sensitivity drivers (below 85 dB) will benefit from the upper end, giving you that extra oomph without distortion. And if you’re juggling multiple speaker sets – say, tweeters, mids, and a sub – remember each may have a different RMS requirement. In that case, a multi‑channel amp with independent gain controls is worth the extra cost; it lets you tailor the power to each driver.
Now, let’s talk about future‑proofing. If you think you might upgrade to a more demanding subwoofer later, choose an amp with a little extra headroom. It’s easier to dial down than to live with an under‑powered system that never quite reaches the thunder you want.
For those running a small shop or handling several installs, managing power specs can become a paperwork nightmare. A practical guide like A Practical Guide to Help Desk Outsourcing for SMBs shows how delegating technical support can free up time to focus on these calculations instead of answering endless “why won’t my amp work?” emails.
Finally, if you’re venturing into the crypto‑powered world of car‑audio startups, you might need legal counsel to navigate new regulations. NeosLegal specializes in crypto‑related compliance and could be a useful ally if you ever sell custom‑tuned amplifiers as a blockchain‑backed product.
Bottom line: determine the speaker’s RMS, apply the 75‑125 % rule, double‑check impedance, and match those numbers to an amp that physically fits your vehicle. Follow those steps and you’ll avoid the dreaded “amp overheating” nightmare while getting crystal‑clear, room‑shaking sound every time you hit the road.
Step 2: Match Amplifier Class to Speaker Impedance
Alright, you’ve got your power numbers sorted – now it’s time to make sure the amp’s class and its impedance rating play nice with your speakers. If you skip this step, you’ll either end up with a hot‑running amp that cuts out or a wall‑flower speaker that never reaches its potential.
Ever wondered why a Class D amp feels so cool under the dash while a Class AB unit can sound a bit warmer? The answer isn’t just about efficiency; it’s also about how each class handles the current drawn by different impedances.
Take a breath and picture this: you’re wiring a pair of 4 Ω component speakers into a compact Class D amp that’s rated for 4‑8 Ω. Everything looks fine on paper, but if you accidentally wire them in parallel and drop the load to 2 Ω, that same amp could start to overheat fast. That’s why we always start by checking the amp’s impedance range.
Notice how the video walks through a real‑world install – you’ll see the same little details we talk about in this step, like double‑checking the amp’s spec sheet before you even pull the wires.
Why the amp class matters for impedance
Class A amps deliver pristine sound but waste a lot of power as heat, so they’re usually paired with higher‑impedance speakers (8 Ω or more) that don’t demand huge current. Class AB strikes a middle ground – it can handle 4 Ω loads without breaking a sweat and still sounds warm enough for most enthusiasts. Class D, the most efficient, can drive low‑impedance loads (even 2 Ω) because it switches the power on and off really fast, keeping the chassis cool.
In practice, if you’re fitting a tight‑space hatchback, a Class D amp is often the sweet spot: small, cool, and ready for a 4 Ω speaker pack. If you prefer that classic “rich” feel and have room for a bigger heat‑sink, a Class AB unit will give you that extra musical depth.
Step‑by‑step: matching class to impedance
1. Grab the amp’s spec sheet. Look for a line that reads something like “Stable at 4‑8 Ω” or “2 Ω minimum”. If it only lists “8 Ω”, stay away from low‑impedance drivers.
2. Note your speakers’ nominal impedance. Most car speakers sit at 4 Ω, but some high‑end components or sub‑woofer pairs can be 2 Ω. You’ll find this number on the speaker label or in the product manual.
3. Decide on wiring topology. Parallel wiring halves the impedance (two 4 Ω speakers become 2 Ω), while series wiring doubles it. Choose the configuration that keeps the final load inside the amp’s stable range.
4. Cross‑check with an impedance matching guide. That page walks you through the math and even flags common mistakes like accidentally creating a 2 Ω load on a 4‑Ω‑only amp.
5. Test before you seal. Plug the speakers in, power the amp, and listen for any signs of strain – excessive heat, distortion, or the amp’s protection light flickering. If anything feels off, re‑evaluate your wiring or step up to a more flexible amp class.
Common pitfalls and quick fixes
One mistake I see a lot is assuming “any amp will work because it’s Class D”. Not true – cheap Class D units sometimes hide a 4 Ω‑only limitation behind a vague spec sheet. Another is forgetting that a sub‑woofer’s low‑frequency demand can pull more current, effectively lowering the system’s impedance under heavy bass.
If you’re already on the edge, consider a bi‑amp setup: run your tweeters and mids through a stable Class AB channel at 4 Ω, and let a dedicated Class D mono channel power the sub at 2 Ω. It gives you the best of both worlds without overtaxing a single amp.
Finally, remember that temperature is a silent killer. Even a perfectly matched amp‑speaker pair can overheat if the vehicle’s interior gets too hot. A small ventilation slot or a heat‑sinking fan can extend the life of a high‑power Class AB amp in a summer‑packed SUV.
Take a minute now to write down your speaker impedances, the amp class you’re eyeing, and the wiring plan you’ll use. When you compare that checklist against the amp’s spec sheet, you’ll feel a lot more confident that the combo will stay cool, loud, and distortion‑free on every drive.
Step 3: Evaluate Key Features (Crossover, Bass Boost, DSP)
Now that you’ve nailed power and impedance, it’s time to look at the little knobs that turn a good system into a great one. The crossover, bass boost, and any built‑in DSP are the three features that let you shape the music to fit your car’s cabin, your favorite tracks, and your personal taste.
Crossover basics – why it matters
Think of a crossover as a traffic cop for frequencies. It tells the highs to go to the tweeters, the mids to the mid‑range drivers, and the lows to the sub‑woofer. Without a proper split, you’ll end up with the sub trying to “grunt” out a treble line, which sounds muddy and can even damage the driver.
Most modern amps let you set a low‑pass filter for the sub and a high‑pass for the mids/tweeters. The sweet spot usually sits between 80 Hz and 120 Hz for a typical 4‑inch component set, but if you’ve got a larger sub you might push the low‑pass up to 150 Hz.
How to set the crossover
Start by playing a familiar song with a steady bass line. Turn the low‑pass knob up until you hear the sub start to “bleed” into the mids – you’ll notice a slight loss of clarity around the vocal range. Dial it back a few hertz and you should have a clean separation.
If your amp has independent high‑pass controls, set those just above the low‑pass point – maybe 20 Hz higher. That tiny gap prevents overlap, which is the main cause of “boxy” bass in many installs.
Remember, every vehicle cabin is different. A compact hatchback with hard‑sided doors will need a tighter crossover than a roomy SUV where the sound can wander.
Bass boost – a tempting shortcut?
Many amps ship with a bass‑boost switch that adds a few decibels to the low end. It’s tempting to crank it up for that extra thump, but the boost often comes with increased distortion and higher current draw.
If you’re chasing more punch, try raising the sub’s gain first and then fine‑tuning the crossover. Only reach for bass boost if you’ve already maxed out gain and still feel something’s missing – and even then, stay under 6 dB to keep the sound clean.
For professional installers, we’ve seen bass‑boost overuse lead to blown sub‑woofer cones in high‑power setups. A disciplined approach saves you money and headaches down the road.
DSP – the digital sculptor
Digital Signal Processors give you far more precision than a simple knob. With a DSP you can set multiple crossover points, apply phase correction, and even create time‑alignment curves so the sound from each driver reaches your ears at the same moment.
Here’s a quick way to start: pick a preset that matches your speaker layout (most DSPs have “2‑way” or “3‑way” templates). Then, listen to a track with strong transients – a drum hit is perfect. Adjust the phase until the hit feels tight, not echoey.
Don’t forget the EQ band. A modest 2‑3 dB cut around 300 Hz can tame that boxy mid‑range resonance many hatchbacks develop. Small tweaks add up, and you’ll notice a cleaner, more balanced sound without turning up the volume.
Quick checklist before you seal the install
- Set low‑pass for the sub between 80 Hz‑150 Hz, high‑pass for mids/tweeters 20 Hz above that.
- Adjust gain so the sub hits its peak without clipping; keep bass boost under 6 dB.
- If you have a DSP, run a preset, then fine‑tune phase and EQ for your vehicle’s acoustic quirks.
- Listen for any distortion at high volume – if you hear it, back off the gain or raise the crossover point.
- Take a final note of all settings; a simple spreadsheet helps when you revisit the system later.
By treating the crossover, bass boost, and DSP as a connected trio rather than isolated knobs, you’ll end up with a system that feels both powerful and musical – exactly what any car‑audio enthusiast wants when they’re cruising down the road.
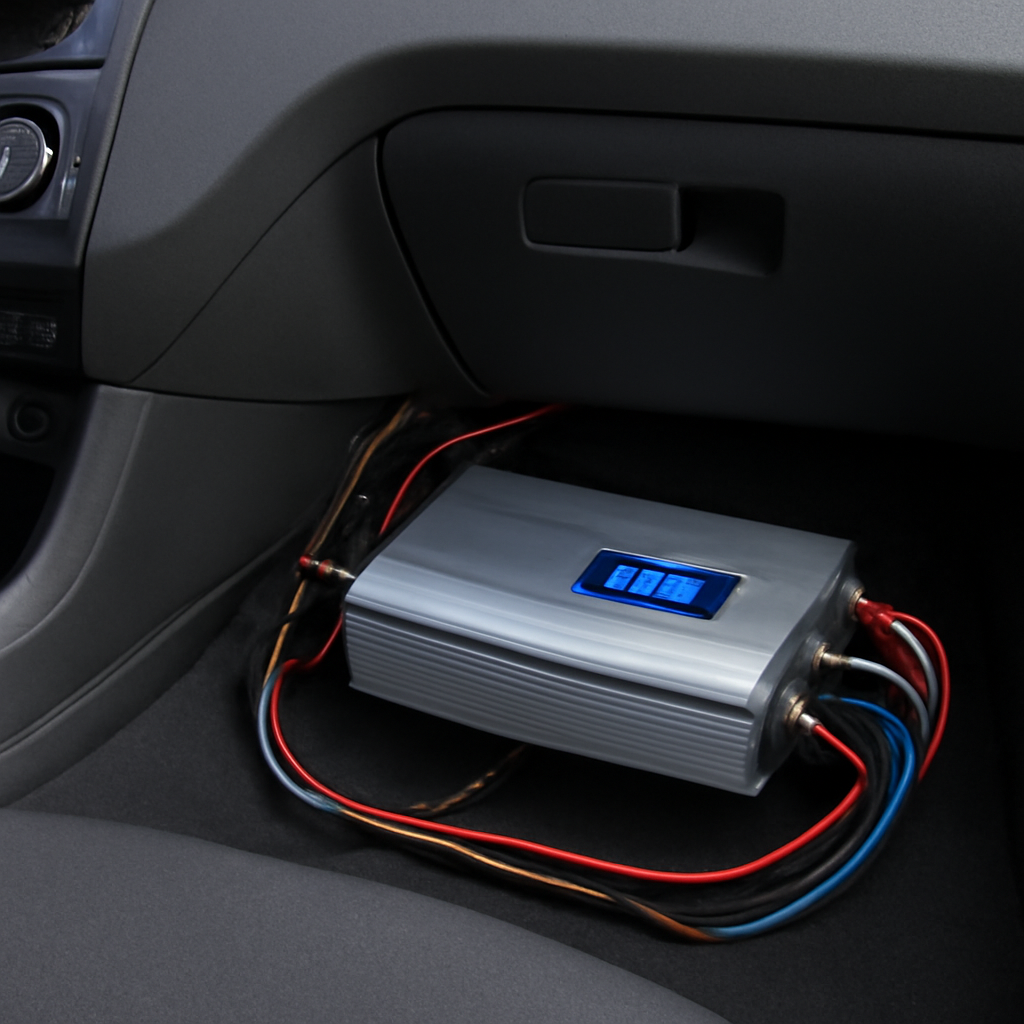
Step 4: Check Installation Constraints (Size, Wiring, Cooling)
Now that you’ve sorted power and impedance, the next thing most installers overlook is whether the amp will actually live happily in the space you’ve given it.
Measure the physical envelope
Start by opening the trunk or dash and measuring length, width and depth of the spot where you plan to mount the unit.
A typical 4‑channel Class AB amp is about 200 mm tall, 150 mm wide and 120 mm deep. If you’re fitting a high‑output mono amp for a sub, expect a bulkier chassis – often 250 mm × 200 mm × 150 mm.
Does the space have any protruding brackets, fuel lines or airbags? Those are deal‑breakers you’ll notice only after you’ve already wired the amp.
In our experience, a simple cardboard template cut to the exact dimensions saves a lot of back‑and‑forth.
Select the right gauge for your wiring
Wire gauge is the silent hero of a clean install. The rule of thumb is: the higher the current, the thicker the wire.
For a 4‑channel amp delivering up to 80 W RMS per channel into 4 Ω, 16 AWG is usually fine for runs under 1 m. If you’re pushing a 300 W sub into 2 Ω, you’ll need 8 AWG for the power feed and at least 12 AWG for the ground.
Here’s a quick check‑list you can print:
- Calculate total amp current: I = (Total RMS Power) / (12 V × Efficiency). A 300 W Class D amp at 90 % efficiency draws ~28 A.
- Match that current to the AWG chart (28 A → 10 AWG is safe for longer runs).
- Use a dedicated power distribution block with fused outputs – it keeps voltage drop low and protects each channel.
Don’t forget the ground strap. A solid 8 mm² (approximately 10 AWG) copper braid clamped directly to a clean, paint‑free metal point will keep the amp from drifting into protection mode on a hot day.
Cooling: keep the amp from turning into a grill
Heat is the enemy of longevity. Even the most efficient Class D unit can generate 30‑40 W of waste heat when you’re cruising at highway speeds. If the amp sits tucked under a seat without airflow, that heat builds up fast.
What can you do? First, check if the amp has a built‑in fan – many high‑power models do, and they usually need a vent on the opposite side. If you’re using a fan‑less unit, create a ventilation slot at the rear of the mounting location. A 10 mm gap, covered with a mesh screen, lets hot air escape while keeping dust out.
For installers in hot climates or for trucks that sit in the sun all day, an extra cooling fan powered from the same distribution block can drop the chassis temperature by up to 15 °C. It’s a small cost that pays off in years of quieter operation.
Power distribution and fusing – safety first
Never run an amp straight off the head‑unit wire. Use a dedicated 12 V line from the battery, protected by a fuse that matches the amp’s maximum current draw (usually 1.5 × the calculated current). For a 300 W sub, a 60 A fuse is common.
Install a short‑circuit protection relay if you’re wiring multiple amps. It isolates a failure to a single circuit, keeping the rest of the system alive.
Real‑world example: the compact hatchback
Imagine you’re fitting a 4‑channel Class AB amp into a 2019 Mini Cooper. The available space behind the glove box is only 130 mm tall. You choose a low‑profile 125 mm tall amp, cut a cardboard template, and verify the wiring path fits 16 AWG speaker wire without tugging.
Next, you run a 12 AWG power line from the battery to a distribution block, add a 40 A fuse, and attach a 10 mm vent to the rear of the amp’s mounting bracket. The result? A clean install that stays under 45 °C on a July afternoon, and the speakers hit their sweet spot without the amp cutting out.
Final checklist before you seal the install
- Measure the mounting cavity; confirm amp dimensions with a cardboard mock‑up.
- Determine total current draw; choose wire gauge accordingly (AWG chart).
- Secure a solid ground strap to a clean metal point.
- Provide at least a 10 mm ventilation slot or active fan if the amp runs hot.
- Install a dedicated, appropriately fused power line and a distribution block.
- Test for voltage drop with a multimeter – it should stay above 11.8 V under load.
Following these steps ensures your amp not only sounds great but also lasts for years, no matter whether you’re a weekend tinker or a professional installer.
Step 5: Compare Top Amplifier Options
Now that you’ve got the numbers nailed down and you know what will fit under the dash, it’s time to line up a few real‑world amps and see how they stack. Think of it like a tasting menu – you want to sample the flavor, the size, the finish, and then decide which one hits the sweet spot for your build.
First, pull out the specs sheet for each candidate. Look for three things that matter most in a car‑audio install: power output that matches your RMS target, the class that suits your space and heat‑budget, and any extra tools (crossover knobs, DSP, remote level) that save you a separate box later.
What to compare at a glance
Instead of scrolling through endless pages, jot down the numbers in a quick table. Here’s a simple format that works for any installer – whether you’re a weekend hobbyist or a professional shop owner.
| Amplifier Model | Power (RMS @ 4Ω) | Key Feature |
|---|---|---|
| Compact Class AB 4‑ch | 80 W per channel | Low‑profile chassis, built‑in high‑pass/low‑pass knobs |
| High‑output Mono Class D | 300 W into 2 Ω | Efficient cooling, ideal for sub‑woofer in tight spaces |
| Feature‑rich DSP‑enabled 4‑ch | 100 W per channel | Integrated digital signal processor, time‑alignment, customizable EQ |
Notice how each row tells you three decision points in one glance: does the power line up with the RMS you calculated, does the physical size fit your mounting envelope, and does the amp give you any extra bells‑and‑whistles that might replace a separate crossover or DSP?
So, which one should you pick? Ask yourself three quick questions as you compare:
- Will the amp stay cool in the location you’ve measured? A Class AB unit may need a vent or fan, while a Class D often runs fine with a simple 10 mm slot.
- Do the built‑in controls cover the tuning you need, or will you have to add external modules? If you’re already planning a DSP, the integrated‑DSP amp can simplify wiring.
- Is the price gap justified by the features you actually use? In many builds, a solid 4‑channel Class AB gives more than enough headroom and costs less than a DSP‑heavy model.
In our experience working with installers across the UK, the most common pitfall is grabbing the highest‑output amp without checking the chassis height. You’ll end up with a unit that overheats because there’s no room for airflow – and then you’re back to square one.
Here’s a quick checklist to run through as you compare options:
- Confirm RMS output matches 75‑125 % of your speaker’s RMS rating.
- Verify the amp’s stable impedance range includes your speaker load (4 Ω or 2 Ω as applicable).
- Measure the amp’s height, width, and depth against your cardboard template.
- Look for built‑in crossover or DSP if you want to keep the wiring tidy.
- Check the recommended wire gauge in the spec sheet – don’t skimp on the power feed.
- Read user reviews for real‑world heat performance; a unit that runs 45 °C in a summer‑packed hatchback is a safe bet.
When you’ve ticked those boxes, you’ll have a clear favorite. Maybe it’s the compact Class AB that slips under the glove box, maybe it’s the mono Class D that powers a 12‑inch sub in the trunk, or perhaps the DSP‑enabled 4‑ch that lets you fine‑tune every driver from a single screen.
Whatever you choose, the goal is the same: a stable, powerful amp that fits your vehicle, stays cool, and gives you the control you need without extra gadgets. That’s how you turn a good sound system into a great one, and it’s the final piece of the puzzle before you start wiring.
Step 6: Budget, Warranty, and Brand Reputation
Now that you’ve nailed power, impedance, features and fit, the next question most of us ask is: “How much should I actually spend?” It’s easy to get dazzled by glossy ads, but a sensible budget keeps the whole build from blowing up later.
Budget planning without the guess‑work
Start by writing down the total RMS wattage you need – that number you calculated in Step 1. Multiply it by the amp’s efficiency (Class D ≈ 90 %, Class AB ≈ 60 %). The result gives you a rough idea of the continuous current draw, and from there you can estimate a safe price range.
For example, a 4‑channel Class AB amp delivering 80 W RMS per channel into 4 Ω will pull about 40 A at 12 V. A quality unit that can handle that draw and still stay cool usually lands in the £150‑£250 bracket in the UK market. Anything dramatically cheaper often skips critical protection circuits or uses sub‑par components.
Don’t forget the ancillary costs: a proper wiring kit, a fused power distribution block, and a dedicated ground strap. Those items can add another £30‑£70, but they’re non‑negotiable for reliability.
So, what should you do next? Write a simple spreadsheet: amp cost + wiring kit + fuse + ground strap = total install budget. If the sum pushes you over your comfort zone, revisit the power numbers – maybe a lower‑output Class D amp will meet your needs for less cash.
Warranty – your safety net
A solid warranty is the real price‑breaker. Look for at least a two‑year guarantee that covers the amp’s internal electronics and the heatsink. Anything less, and you’re gambling on the manufacturer’s goodwill.
Read the fine print: does the warranty require you to register the product? Is the coverage void if you use non‑OEM wiring? In our experience, brands that ask you to keep the original packaging and serial number are usually the ones that stand behind their gear.
If you’re eyeing a budget‑friendly model like the BOSS 470B, note that it ships with a 12‑month warranty and a clear return policy – a decent safety net for a sub‑£100 amp, but you’ll want to double‑check the replacement process before you buy BOSS 470B specifications.
Brand reputation – the long‑term factor
Brand reputation isn’t just about flashy logos. It’s about how quickly a company responds to a faulty unit, how easy it is to source spare parts, and whether there’s an active community sharing real‑world install tips.
Ask yourself: do you see regular forum threads about the amp you’re considering? Are there YouTube tutorials from reputable installers? A brand that cultivates a supportive user base usually means fewer headaches down the road.
For UK‑based installers, we’ve found that local distributors often provide better post‑sale support than overseas sellers. A quick phone call to the distributor can reveal whether they stock replacement heatsinks or offer a loan‑unit while yours is being serviced.
And remember, a higher price tag doesn’t automatically equal a better reputation. Some premium brands have stellar sound but a patchy warranty track record. Conversely, a mid‑range brand with a solid warranty and active community can be a smarter investment.
Quick checklist before you sign the invoice
- Confirm the amp’s RMS output matches your calculated target.
- Calculate the expected current draw and ensure your budget includes proper wiring and fuses.
- Verify the warranty length and any registration requirements.
- Research the brand’s after‑sales support – look for active forums, dealer networks, and spare‑part availability.
- Check for any hidden costs – shipping, taxes, or optional accessories that aren’t bundled.
When you tick all these boxes, you’ll have a clear picture of whether you’re getting value for money or just paying for a name. That confidence is what turns a good amp purchase into a hassle‑free upgrade you’ll enjoy for years.
FAQ
What factors should I consider when figuring out how to choose amplifier for car speakers?
First, look at the amp’s RMS power and make sure it sits in the 75‑125 % sweet‑spot of your speakers’ RMS rating. Then check the impedance range – the amp must stay stable at the load your speakers present, whether it’s 4 Ω or a 2 Ω parallel pair. Next, think about class (A/AB vs D), physical size, cooling needs, and any built‑in features like crossovers or DSP. Finally, weigh budget, warranty length and how easy it is to get spare parts from the dealer.
How do I match the amp’s RMS power to my speakers without over‑ or under‑driving them?
Start with the speaker’s RMS rating, then multiply by 0.75‑1.25. That gives you the target amp RMS per channel. For example, an 80 W RMS component driver would pair nicely with an amp that delivers roughly 60‑100 W RMS. If the amp’s RMS is much higher, you’ll have to dial the gain back a lot, which can introduce noise. Too low and the amp will clip as soon as you crank the volume.
Is impedance stability more important than total power rating?
Stability wins the day because a mismatched load can force the amp into protection mode or overheat, regardless of how much power it claims. Make sure the amp lists a stable range that includes your speaker’s nominal impedance after you decide on wiring topology (series vs parallel). Once you’re sure the load is safe, you can then fine‑tune the power rating to hit your RMS target.
What role does the amp class (A, AB, D) play in the selection process?
Class A sounds pristine but burns a lot of juice, so it’s usually overkill for a car where space and heat are at a premium. Class AB gives a warm character and handles 4 Ω loads well, but you’ll need a vent or fan for higher outputs. Class D is the most efficient – it stays cool in tight enclosures and can drive low‑impedance loads, making it a solid choice for sub‑woofers or high‑power builds.
Do I really need built‑in crossovers or DSP, or can I add them later?
If you’re happy tweaking external modules, you can skip built‑in crossovers and add a separate DSP later. The advantage of an amp with integrated high‑pass/low‑pass knobs is a cleaner wiring harness and fewer cables under the dash. For installers who love a tidy job or hobbyists who want a plug‑and‑play solution, the built‑in option saves time. Otherwise, a dedicated DSP gives you far more precision.
How can I test an amp before I commit to buying it?
Ask the retailer for a bench‑test demo or bring a portable power source to the shop. Play a test tone at around 80 % volume and watch the heat sinks – they should be warm, not scorching. Check the protection LED; it should stay off unless you deliberately overload the unit. Finally, listen for any hiss or distortion; a clean amp will stay transparent even at high gain.
What warranty or brand support should I look for when buying an amp?
Aim for at least a two‑year warranty that covers the internal electronics and the heatsink. Look for brands that require registration – that usually means they’ll honour repairs more smoothly. A responsive UK distributor is a bonus; they can ship replacement parts or loan you a unit while yours is serviced, which cuts downtime for both installers and enthusiasts.
Are there any common installation pitfalls that could ruin an otherwise perfect amp choice?
Yes – using undersized speaker wire is a silent killer; match the gauge to the amp’s current draw (16 AWG for short runs, 10‑12 AWG for high‑power subs). Forgetting a solid ground strap can make the amp trip protection on hot days. Also, don’t block airflow; a 10 mm vent or a small fan can keep a Class AB amp from overheating in a cramped trunk.
Conclusion
By now you’ve walked through the whole process of how to choose amplifier for car speakers, from matching impedance to fitting the chassis.
If you’ve ever felt stuck wondering whether a Class D unit will stay cool in a cramped boot, remember the simple rule: size, cooling and wire gauge win over raw wattage.
In practice, jot down the RMS target, verify the amp’s stable load range, measure the mounting pocket and pick a gauge that keeps voltage drop below 0.2 V.
A two‑year warranty and a responsive UK distributor are the safety nets that turn a good purchase into a hassle‑free upgrade – we’ve seen installers save hours by swapping a faulty heatsink thanks to prompt support.
So, what’s the next step? Grab the spec sheet of the shortlist, compare dimensions against a cardboard template, and run a quick voltage test with a multimeter before you bolt anything down.
When everything checks out, you’ll hear that clean, distortion‑free tone that tells you the amp and speakers are finally speaking the same language.
Enjoy the drive, tweak the crossover or DSP if you have one, and remember that a well‑chosen amp keeps the music alive for years to come.
Happy listening and safe installing!


