
Ever sat in your car, pressed play, and felt the bass disappear like a whisper when the factory stereo hits that low‑end rumble?
You're not alone. Most stock systems are tuned for clarity, not the deep thump that makes a road‑trip feel like a concert. That's why many of us wonder how to add subwoofer to factory stereo without turning the whole dash into a custom shop.
Think about the first time you heard a solid sub‑boom in a friend's ride – that sudden, chest‑vibrating punch that makes the whole vehicle hum. It’s the kind of feeling that turns a routine commute into an experience you actually look forward to.
So, what’s the secret sauce? In most cases it boils down to three things: a compatible subwoofer enclosure, an amplifier that talks to your factory head unit, and a clean wiring path that doesn’t fry any electronics. When those pieces click, you get that booming low end while the factory speakers keep handling the mids and highs.
We’ve seen car audio enthusiasts struggle with two common roadblocks. First, the factory stereo’s line‑level output often lacks the power to drive a dedicated subwoofer directly. Second, space is a premium – you don’t want to sacrifice trunk cargo or compromise safety.
Here’s a quick mental checklist: Does your vehicle have a spare‑size location for a sub box? Does the factory head unit offer pre‑amp or line‑level outputs? And do you have a reliable power source and grounding point? If you can answer “yes” to most, you’re already halfway there.
Imagine swapping out that flat‑out feeling for a rumble you can feel through the seat. Picture cruising down the highway, the bass syncing with the rhythm of the road, while the factory speakers still deliver crisp vocals. That’s the sweet spot we aim for.
In the coming sections we’ll walk through choosing the right enclosure for specific makes, wiring the amplifier safely, and fine‑tuning the crossover so the bass blends seamlessly. Stick around – the journey from stock to sound‑stage quality is easier than you think.
TL;DR
If you want to add subwoofer to factory stereo without sacrificing cargo space or risking electrical damage, focus on a compact enclosure, a line‑output converter, and a properly fused power connection.
Following our quick checklist—spare box location, pre‑amp output, solid grounding—lets you enjoy deep bass that blends with stock mids and highs, turning every drive into a soundtrack.
Step 1: Assess Your Factory Stereo Compatibility
First thing’s first – does your stock head unit even speak the language of a subwoofer? Most factory stereos only hand you a low‑level pre‑amp signal, which is great for the tweeters but not enough juice for a dedicated bass amp. If you’re scratching your head wondering where to find that little RCA pair, you’re not alone. We’ve seen plenty of car‑audio enthusiasts hit a wall at this exact point.
Grab your vehicle’s manual or pop the dash (if you’re comfortable) and look for terms like “pre‑amp out,” “line‑level out,” or “sub‑out.” Some newer models hide a 4‑pole connector under the glove box – that’s a gold mine. Others simply give you speaker‑level wires, meaning you’ll need a line‑output converter (LOC) to step down the signal.
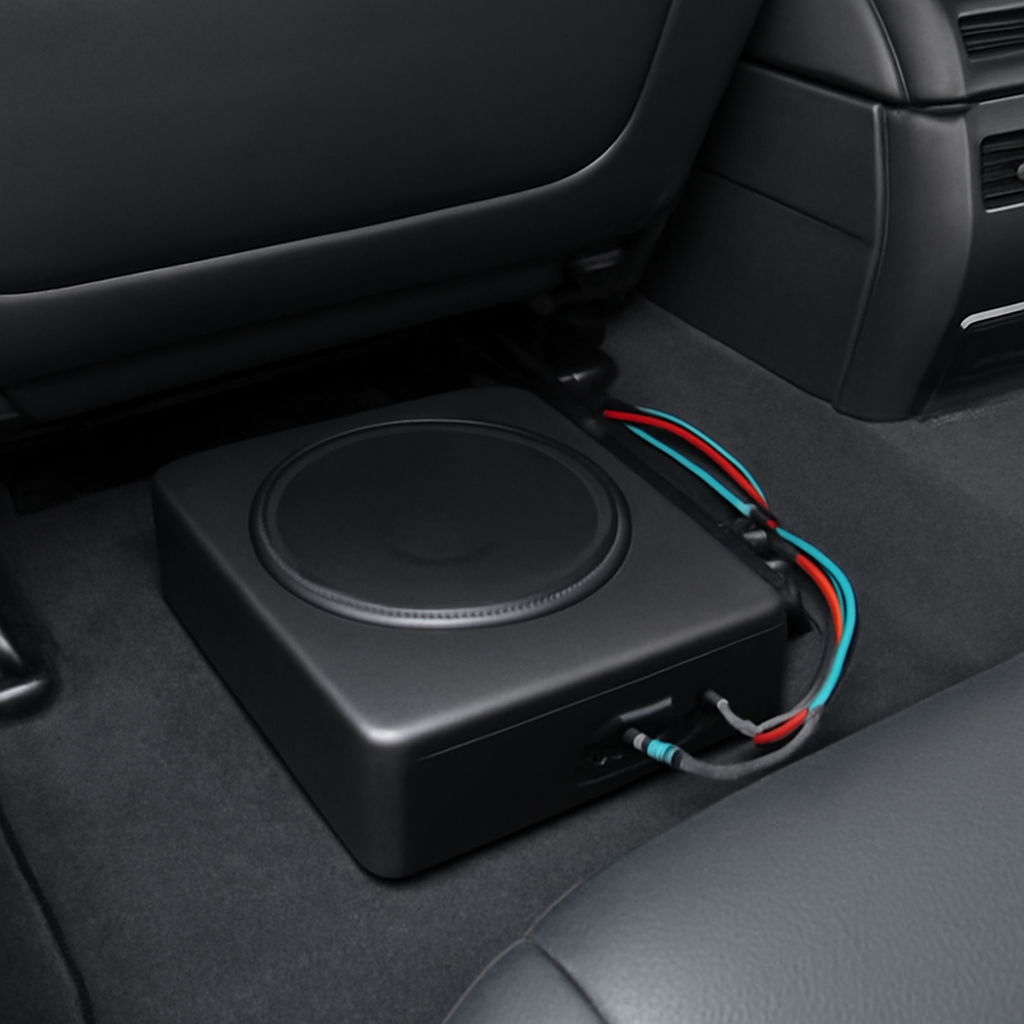
And here’s a quick sanity check: locate the spare‑size space you mentioned earlier. Can you actually fit a modest‑sized enclosure there without compromising cargo? If you can, you’re already past the biggest hurdle. If not, consider a shallow under‑seat box – we’ve got a whole range of those in our vehicle‑specific subwoofer enclosures that slide right under the seat without eating trunk space.
Check the Power Supply
Next, trace the power wiring. Your factory stereo draws from the vehicle’s fuse box, but a subwoofer amp will need a solid 12 V source with its own fuse – ideally a 30 A or 40 A inline fuse close to the battery. Look for an existing amplifier harness; many newer cars include one for optional upgrades. If you don’t see one, you’ll have to run a new power line, and that’s where a tidy installation sheet comes in handy.
Does the chassis have a reliable ground point near where you plan to mount the amp? A loose ground will manifest as hiss or random shutdowns. Tighten any existing bolts, scrape away paint, and make sure the metal-to‑metal contact is clean.
Signal Compatibility
Now, match the output type to your amp. If the factory head unit only offers speaker‑level outputs, a line‑output converter will turn that high‑power signal into a low‑level line signal your amp can understand. Our step‑by‑step LOC guide walks you through wiring it without a hitch.
But what if your stereo already has a dedicated sub‑out? Great! Just run that RCA cable straight to the amp’s input and you’ve saved yourself a converter. Remember to set the head unit’s bass level to zero – you don’t want the stock amp fighting your new sub.
So, does your factory stereo check these boxes? If you’re nodding, you’re ready to move on to choosing the right amp and enclosure. If you’re still unsure, a quick call to an installer can save you hours of trial‑and‑error.
Before you start snipping wires, think about the paperwork. Professional installers love keeping things tidy, and custom printed service orders or warranty stickers make a big impression. JiffyPrintOnline offers affordable labels and forms that you can slap on your work order folder – a small touch that says you mean business.
And if you’re the type who likes a splash of visual flair, why not add some LED accent lighting to highlight your new sub’s location? LED Artistry curates colour‑changing strips that sync with your music, giving that extra wow factor for clients or friends cruising by.
Step 2: Choose the Right Subwoofer and Amplifier
Now that you’ve verified signal, power and space, the next big decision is what actually makes the bass boom – the subwoofer and its amplifier.
First things first: you need a driver that fits the enclosure size you measured and can handle the RMS power you plan to feed it. In our experience, a 12‑inch sealed box is a sweet spot for compact installs because it delivers punchy low‑end without hogging trunk space.
But if you’ve got a bigger pocket of volume under a seat or in the rear cargo, a 10‑inch vented box can unleash that rumble you hear in a concert hall. The key is matching the sub’s power handling (RMS) to the amp’s continuous output – aim for the amp’s RMS rating to be within 10 % of the sub’s RMS rating.
So, how do you pick the right amp? Look for a monoblock that offers enough wattage at the sub’s impedance (usually 2 Ω or 4 Ω). A solid‑state amp with a built‑in high‑level input can save you a separate Line Output Converter, which is handy when the factory head unit only gives speaker‑level signals.
If your factory radio lacks a dedicated pre‑amp, you’ll still need an LOC to step down the high‑level speaker signal. The engineerfix guide explains how a good LOC protects the amp and preserves low‑frequency detail – a must‑read before you commit to a particular amp model.
Here’s a quick checklist to keep in your back pocket:
- Subwoofer size fits measured enclosure space
- RMS power handling matches amp’s RMS output
- Impedance matches amp’s stable range
- Amp has high‑level inputs or you have an LOC ready
- Amp includes gain control and low‑pass filter for fine‑tuning
Once you’ve narrowed the field, compare specs side‑by‑side. For a Ford F‑150 we’ve seen the 12‑inch direct‑fit sealed box paired with a 300 W RMS monoblock deliver booming bass without stealing cargo room. That combo is a good reference point even if you drive a different make.
After the hardware is selected, double‑check the wiring gauge. A 4‑gauge power wire is standard for amps up to 500 W RMS; the ground should be a short, bare‑metal strap no longer than 18 inches. Keeping the power and signal runs on opposite sides of the vehicle helps prevent the dreaded hum you hear when you brake.
Finally, set the amp’s gain correctly. Turn the head‑unit volume to about 75 % and increase the gain until you see a clean sine‑wave reading on a multimeter, or simply listen for the point where the bass starts to sound tight instead of mushy.
When everything is wired and the gain is dialed in, you’ll hear that low‑frequency thump you’ve been missing – proof that you chose the right sub and amp to add subwoofer to factory stereo.
Step 3: Wiring the Subwoofer – Tools & Safety
Alright, you’ve got the box and the amp ready – now it’s time to get those wires talking. Before you even think about clipping anything together, grab a quick safety checklist. The worst thing you can do is power up a half‑wired sub and end up with a blown fuse or a singed seat cover.
Disconnect the battery first
Sounds obvious, but we see it skipped more often than we’d like. Pull the negative terminal from the battery and keep it away from any metal parts. That single step eliminates the risk of a nasty short while you’re routing power, ground, and signal wires.
Does that feel like a hassle? Think of it as the “pause before the punch” – a few minutes of peace of mind that saves you a costly repair later.
Essential tools you’ll need
Grab a wire‑stripper (the kind with a built‑in cutter), a multimeter, a crimping tool, and a set of metric sockets for the chassis bolts. A good pair of needle‑nose pliers makes squeezing tight connectors a breeze. If you’re working in a cramped trunk, a flashlight with a magnetic base keeps your hands free.
Pro tip: a self‑adhesive zip tie holder sticks to the interior of the trunk lid. It saves you from hunting for a place to stash ties while you’re already under the dash.
Choosing the right gauge and fusing
The power wire should match your amp’s wattage – a 4‑gauge wire is standard for up to 500 W RMS, as we mentioned earlier. Run that wire from the battery, through the firewall, and right up to the amp. The key is to place an in‑line fuse within 18 inches of the battery. The fuse rating should be 1.25 × the amp’s maximum current draw. This tiny component is the guardian that stops a fire before it starts.
Need a quick reference on fuse sizing? The Improved Stereo guide walks through the math in plain language.
Grounding – the silent hero
A clean ground is what keeps the bass tight and the hiss at bay. Find a solid, unpainted metal spot on the chassis, sand away any rust or coating, and bolt a short ground strap (no longer than two feet) directly to the amp’s ground terminal. Many installers forget to tighten the bolt enough; a loose ground can introduce that dreaded hum when you brake.
And remember: keep your power and signal runs on opposite sides of the vehicle. This simple routing trick reduces interference and keeps your bass sounding pure.
Signal wiring – RCA and remote turn‑on
If you’re using a line‑output converter, run the RCA cables from the factory head‑unit’s speaker‑level outputs to the converter, then into the amp’s RCA inputs. Keep those cables away from the power wire – run them under the carpet or along the door panels. The remote turn‑on (usually a blue wire) hooks to an ignition‑switched 12 V source so the amp powers up when the key turns.
Double‑check each connection: red to positive, black to negative, and make sure the pins are fully seated. A loose RCA can cause intermittent sound or total silence.
Final safety sweep
Before you slap the battery back on, run a quick visual inspection. Verify that no wires are pinched, that all clamps are tight, and that the fuse is snug in its holder. Then reconnect the negative terminal, start the engine, and turn the factory stereo up to about 75 % volume. You should hear a clean, controlled thump from the sub – that’s the green light.
If anything sounds off, power down, re‑check your connections, and remember that a methodical approach beats a rushed one every time.
Step 4: Mounting the Subwoofer – Placement Tips
Now that the wiring is tidy and the amp is humming, the real magic happens when you decide where the sub lives. A good spot can turn a modest thump into a chest‑rattling pulse, while a poor one leaves you with rattling metal and weak bass.
So, where should you actually put the box? The answer isn’t one‑size‑fits‑all – it depends on the vehicle’s geometry, your cargo habits, and how you want the sound to interact with the factory speakers.
1. Under‑seat mounting
Most installers love the “under‑seat” trick because it keeps the sub out of sight and frees up trunk space. If you have a rear seat that folds flat, you can slide a sealed 12‑inch enclosure into the cavity. The chassis metal behind the seat acts as a natural acoustic reflector, which often gives a tighter, more controlled low‑end.
But watch out for heat. The seat area can get warm after a long drive, so make sure there’s at least a half‑inch clearance for airflow. A small vent or a perforated liner can keep the amp from overheating.
2. Trunk corner placement
Placing the box in a corner of the trunk is the classic “bass cannon” approach. The three walls act like a mini‑room, boosting output and giving you more headroom. This works especially well with vented enclosures that need space for the port.
Just remember: you’ll sacrifice a bit of cargo capacity, and you’ll need a sturdy mounting bracket to prevent the box from shifting during hard braking.
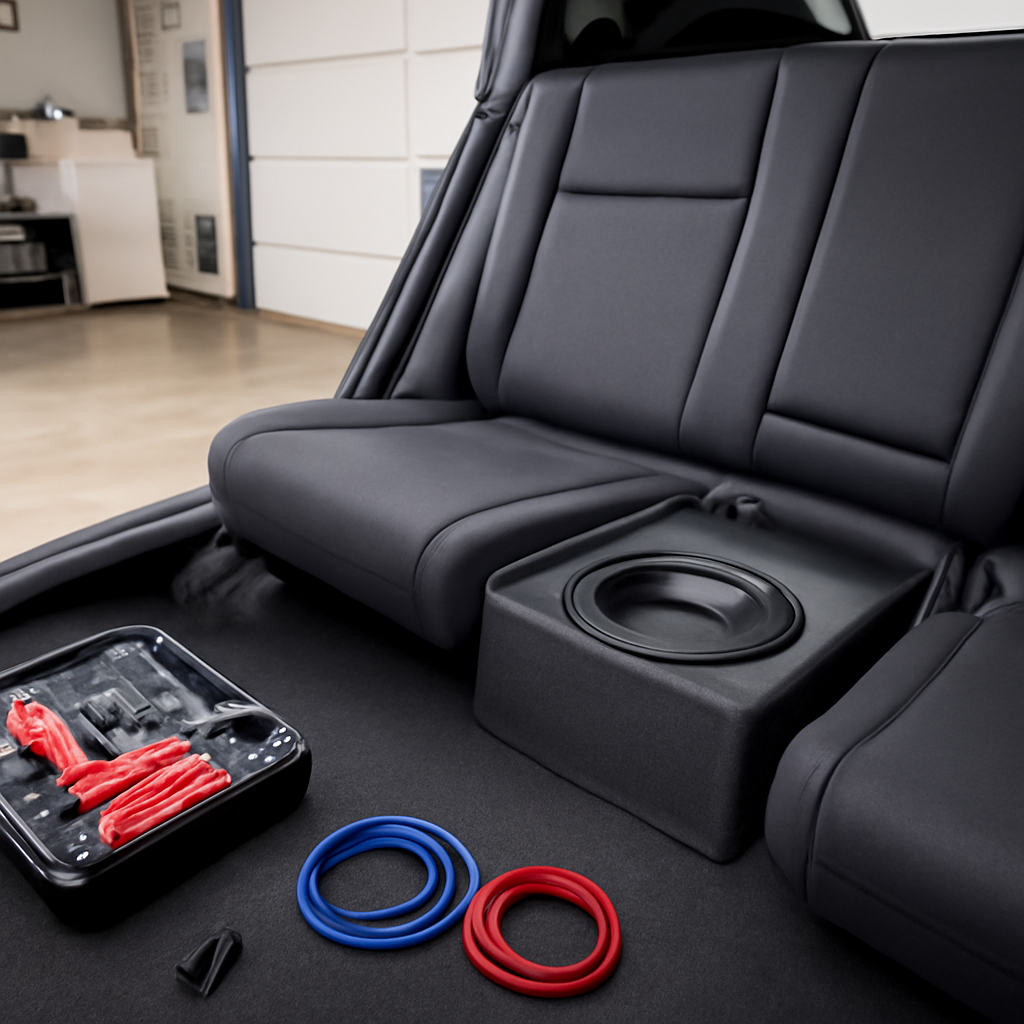
3. Spare‑size custom fit (e.g., Ford F‑150)
When you’re dealing with a model that has a factory‑designed sub‑box slot – like the 2024‑2025 Ford F‑150 – the direct‑fit enclosure slides right into the factory‑reserved space. You get a seamless look, no extra brackets, and the OEM mounting points keep vibration under control.
If you’re not in an F‑150, look for any unused cavity (e.g., behind a console or under a dash panel) that can accommodate a compact sealed box.
4. Front‑footwell (for low‑profile subs)
Some hobbyists mount a shallow sub under the driver’s side footwell. The proximity to the driver can create an immersive feel, but you’ll need to route power and signal carefully to avoid interference with airbags or steering components.
Generally, this is an advanced option – only attempt if you’re comfortable with deeper vehicle disassembly.
Here’s a quick decision‑making table to help you pick the best spot for your setup:
| Location | Pros | Cons |
|---|---|---|
| Under‑seat | Hidden, saves trunk space, tight bass | Heat buildup, limited to sealed boxes |
| Trunk corner | Maximum output, works with vented boxes | Consumes cargo room, needs sturdy brackets |
| Factory‑fit slot | Seamless look, OEM mounting, no extra hardware | Only available on specific models |
Once you’ve chosen a spot, mark the mounting holes with a pencil, double‑check clearance for the amp’s heat sink, and use rubber isolation pads to decouple the box from the chassis. This reduces rattles that can travel through the vehicle’s body panels.
Don’t forget to run a quick “bass test” before you bolt everything down. Play a low‑frequency sine wave at 50 Hz and walk around the cabin – if you hear a consistent thump without dead spots, you’re golden.
If you need more visual guidance, see the detailed placement guide on CarAudioHunt. Their step‑by‑step photos show how to secure a box in both under‑seat and trunk scenarios.
Bottom line: the best placement balances acoustic performance, heat management, and practicality for your daily driving needs. Take a moment to measure, test, and secure – the payoff is a bass response that makes every drive feel like a live concert.
Step 5: Tuning the Sound – EQ & Crossover Settings
Now that the box is snug and the amp is humming, it’s time to shape that low‑end so it feels natural instead of a rattling boom. Think of EQ and crossover as the fine‑tuning knobs on a guitar – you’ve got the instrument, now you need the right tone.
Why a crossover matters
If you’ve ever heard a sub try to play mid‑range notes, you know it can sound muddy. A crossover tells the sub to stay in its comfort zone (the deep bass) while the factory speakers handle everything above.
Most installers start with the classic 80 Hz/24 dB/octave setting because it’s a safe default, but that’s not always the sweet spot for a car’s interior. In our experience, a slightly higher crossover – say 100 Hz with a 12 dB slope – often blends better with factory mids, especially when you’re using a sealed 12‑inch enclosure.
Choosing the right slope
Steep slopes (24 dB/octave) cut off frequencies quickly, which can make the transition feel abrupt. Shallow slopes (6‑12 dB/octave) give a smoother hand‑off but may let a bit of overlap slip through.
We like to start at 12 dB and listen. If the bass feels thin, tighten the slope a notch. If it sounds “boxy,” loosen it a bit. The goal is a seamless bridge where the sub’s low‑pass meets the speaker’s high‑pass without a dip or peak.
EQ: The final polish
Even a perfect crossover can leave a slight hump or dip in the 60‑120 Hz range – that’s where the car’s cabin resonances love to hide. A gentle parametric EQ boost of 2‑3 dB at the “room null” can bring life back to the bass without blowing the amp.
Most amps have a built‑in EQ band; if yours doesn’t, a small external DSP module works just as well. Keep the Q narrow (around 0.7) so you only touch the offending frequency.
Step‑by‑step tuning checklist
- Set the amp’s low‑pass to your chosen crossover frequency (e.g., 100 Hz).
- Adjust the slope – start at 12 dB/octave, listen, then fine‑tune.
- Play a familiar track with solid bass (think “Billie Jean” or a movie trailer).
- Walk around the cabin; note any dead spots or boomy areas.
- Use the amp’s EQ or an external DSP to boost or cut the exact frequency that feels weak.
- Re‑check gain – you should be at about 75 % head‑unit volume when dialing the amp gain.
And remember: the car’s interior changes with passengers, cargo, and even temperature. A quick “bass test” after each major change can save you from an unexpected wobble later.
Pro tip from the pros
A recent deep‑dive on subwoofer integration highlights that the most musical results come from treating the crossover as a flexible tool, not a set‑in‑stone rule. The article walks through five popular crossover strategies and explains why a low‑slope, low‑frequency crossover often wins for car installs. Check out the full breakdown for more ideas: detailed crossover strategies.
Bottom line: you’ve already added the subwoofer to your factory stereo – now let the EQ and crossover do the heavy lifting. With a few tweaks, the bass will feel like it’s coming from the road itself, not just the box under your seat.
Step 6: Testing and Troubleshooting Common Issues
Now the subwoofer is wired, mounted, and tuned – but how do you know it’s really working the way you want? That moment when you press play and nothing moves is the worst. Let’s walk through a quick test routine and a handful of the most common hiccups you might hit after you add subwoofer to factory stereo.
1. Power‑up sanity check
First thing’s first: reconnect the battery and turn the key to ACC. Do you see the amp’s power LED glow? If it stays dark, double‑check the inline fuse, battery‑side connection, and that the ground strap is firmly bolted to bare metal. A loose ground is the silent killer of many installs.
2. Signal verification
Put the head‑unit volume at about 75 % and listen for a faint thump. No thump? Grab a multimeter and probe the RCA inputs – you should read a few hundred millivolts when a bass track plays. If the voltage is flat, trace the high‑level wires back to the LOC (or speaker outputs) and make sure you haven’t mixed up polarity.
3. Gain and crossover sanity
Turn the amp’s gain knob down low, then slowly raise it while a bass‑heavy song plays. The sub should start to “talk” around the midpoint, then become tight and controlled. If it screams or distorts, you’re either over‑driving the amp or the crossover is set too high. Drop the crossover frequency a notch (e.g., from 100 Hz to 80 Hz) and re‑listen.
4. Listening test checklist
- Walk around the cabin with the doors closed; note any dead spots or boomy corners.
- Play a sine‑wave sweep (40 Hz‑120 Hz) and watch the amp’s VU meter. Peaks that flatten out may indicate a wiring bottleneck.
- Check for unwanted humming when you brake – that’s usually a ground loop or a power wire hugging an RCA cable.
5. Common issues and quick fixes
No sound at all. Usually a fuse, a missed remote‑turn‑on connection, or a mis‑wired RCA. Swap the remote wire with a known good 12 V source and listen again.
Buzz or hiss that gets louder with engine RPM. Move the signal cables away from the power harness, or add a small piece of ferrite bead onto the RCA leads.
Sub sounds boomy or “muddy.” Lower the crossover frequency by 10‑20 Hz and tighten the slope to 12 dB/octave. If the box is sealed, consider adding a little damping material inside the enclosure.
Intermittent cut‑outs. Inspect all crimped connections; a cold splice will lose contact when the car vibrates. Re‑crimp or solder the offending joint.
6. When to call in the pros
If you’ve walked through every step and still can’t get a clean bass response, it might be time to let a seasoned installer look at the wiring harness. A professional can run a line‑level analysis with a scope and pinpoint hidden impedance mismatches that are impossible to see with a multimeter alone.
Bottom line: testing isn’t a chore, it’s the safety net that turns a good install into a great one. Keep this checklist in your glove box, run it after any major change (new speakers, added cargo, or a fresh battery), and you’ll spend less time troubleshooting and more time feeling that low‑end thump you wanted when you decided to add subwoofer to factory stereo.
FAQ
Can I add a subwoofer to a factory stereo without using a line‑output converter?
If your factory head unit only gives speaker‑level outputs, you’ll need a high‑level input on the amp or a line‑output converter (LOC) to drop the voltage down to RCA level. Most modern amps include a built‑in high‑level input, so you can hook the speaker wires directly and avoid a separate LOC. The key is matching the amp’s input type to what the stock radio supplies, otherwise you’ll end up with distortion or no sound at all.
What size subwoofer enclosure gives the best balance of space and bass in a compact car?
For a sedan with limited trunk space, a sealed 12‑inch enclosure is the sweet spot. It delivers tight, punchy low‑end without needing a large port, and it fits in most spare‑size cavities under a seat or in a corner of the trunk. If you have a bit more room, a 10‑inch vented box can add a bit more rumble, but be prepared to allocate extra volume for the port and airflow.
How should I wire power to the amplifier to keep the install safe?
Run a dedicated 4‑gauge power cable from the battery to the amp, and place an inline fuse within 18 inches of the battery. Use a solid chassis ground strap that’s no longer than two feet and attach it to bare, sanded metal. Keep the power run away from the signal cables to prevent hum, and always disconnect the negative battery terminal before you start pulling wires.
Where is the optimal mounting location for the subwoofer in a typical sedan?
Most installers favor the under‑seat location because the seat frame acts like an acoustic reflector, giving tighter bass and keeping cargo space free. Make sure there’s at least a half‑inch clearance for airflow and that the amp’s heat sink isn’t blocked. If under‑seat isn’t possible, the rear‑corner of the trunk works well for vented enclosures, but you’ll need sturdy brackets to stop the box from shifting during hard stops.
What crossover frequency and slope should I start with when I add a subwoofer?
Begin with a low‑pass setting around 80‑100 Hz and a slope of 12 dB per octave. This range lets the factory speakers handle the mids while the sub stays in its comfort zone. After you’ve listened, you can fine‑tune the frequency up or down by 10 Hz and adjust the slope steeper if the bass sounds muddy, or shallower if the transition feels abrupt.
Why does grounding matter and how can I test it?
A poor ground introduces hiss, buzz, and can even cause the amp to shut down under heavy loads. To check, disconnect the ground strap and use a multimeter to measure resistance between the strap and the battery negative – it should read under 0.1 Ω. If you see higher resistance, sand away paint or corrosion, tighten the bolt, and re‑measure until the reading is solid.
What steps should I take if the subwoofer is silent after the install?
First, verify the battery is connected and the fuse is intact. Then confirm the remote‑turn‑on wire has 12 V when the key is in ACC. Next, check the RCA or high‑level input for voltage with the head unit at 75 % volume; you should see a few hundred millivolts. Finally, double‑check polarity on the speaker wires and make sure the amp’s gain is turned down low before you raise it gradually.
Conclusion
So you’ve made it through every step – from checking the factory head‑unit signals to fine‑tuning the crossover. By now you probably feel the thrill of turning a plain ride into a bass‑rich experience.
Remember, the secret isn’t in splurging on the biggest box; it’s in matching the enclosure, amp, and wiring to the space you have and the power you can safely deliver. A clean ground, a correctly sized fuse, and a little patience while you dial the gain will save you headaches later.
What’s the next move? Grab your checklist, double‑check every connection, and fire up a familiar track. If the low end feels tight and sits nicely with the factory speakers, you’ve nailed it. If something sounds off, revisit the crossover frequency or ground strap – the fix is almost always a small tweak.
For car‑audio enthusiasts, installers, or hobbyists, the biggest payoff is hearing that thump you’ve been chasing every time you hit the accelerator. It’s proof that you can add subwoofer to factory stereo without compromising safety or cargo space.
Need a quick reference? Keep the “Signal, Power, Space” mantra handy and you’ll keep future builds on track. Happy listening, and enjoy the ride.
And remember, every great sound starts with a solid foundation.


