
Ever feel like your bass is just… shy? Like it’s stuck behind a wall of silence and you’re left listening to a dull thud instead of that gut‑rushing boom you crave? That’s a common pain for car audio enthusiasts who love a ported subwoofer box but can’t get the low end to pop just right.
Let’s face it: tuning a ported subwoofer box isn’t magic. It’s science, a bit of trial and error, and the right tools. When you hit the sweet spot, you’ll hear that deep rumble reverberate through the cabin, not just a muffled thump.
First, you need to understand what the port actually does. Think of it as a vent in a car’s trunk that lets air flow out and in at the right frequency. If the port’s too short, the bass will be tight and restricted; too long, and it will feel like a wind instrument that never quite hits the right note.
What’s the playbook? Start by measuring the port’s dimensions and the box’s volume. Use a Subwoofer Port Area Calculator to crunch the numbers and get a target port length. Many installers skip this step and guess, which leads to off‑key results.
Next, tune the tuning frequency. The rule of thumb for a 6.5″ sub is to aim for a Q of 0.8–1.0 and a tuning frequency around 45–55 Hz, but the exact numbers vary with your sub’s SPL rating and your vehicle’s acoustics.
Now, let’s get hands‑on: 1. Use a flexible ruler or a calibrated tape measure to check the port’s actual length. 2. Adjust the port stop or insert a shroud to tweak the length until you hit the target frequency on a frequency sweep. 3. Test in the car, not a studio—your cabin’s resonances matter.
Think you’re stuck? One trick I’ve seen work time after time is to add a small foam piece at the port’s opening. It dampens harsh overtones without killing the bass. It’s like placing a muffler on a sub, giving you cleaner, more controlled lows.
Once you feel that sweet spot, seal the port with a snug, acoustically inert cover. That prevents any leakage that could throw off your tuning.
And if you’re wondering about branding your box or labeling the tuning port clearly, a custom sticker or decal can help keep everything organized. Check out JiffyPrintOnline for high‑quality, durable labels that will survive the heat of a subwoofer box.
So, are you ready to bring your bass to life? Grab your calculator, roll up your sleeves, and let the tuning begin.
TL;DR
Unlock the full punch of your car’s bass by mastering the art of tuning a ported subwoofer box—measure, calculate, tweak, and test until the cabin hums with depth. Follow our step‑by‑step guide, use reliable calculators, and remember a well‑tuned port turns ordinary tunes into soundscapes that feel like a concert.
Step 1: Assess Your Box’s Existing Tuning
Before you even think about swapping in a new port or tweaking the length, sit down with your box and ask it a few questions. What’s the current tuning frequency? How big is the internal volume? These answers set the baseline for every tweak you’ll make.
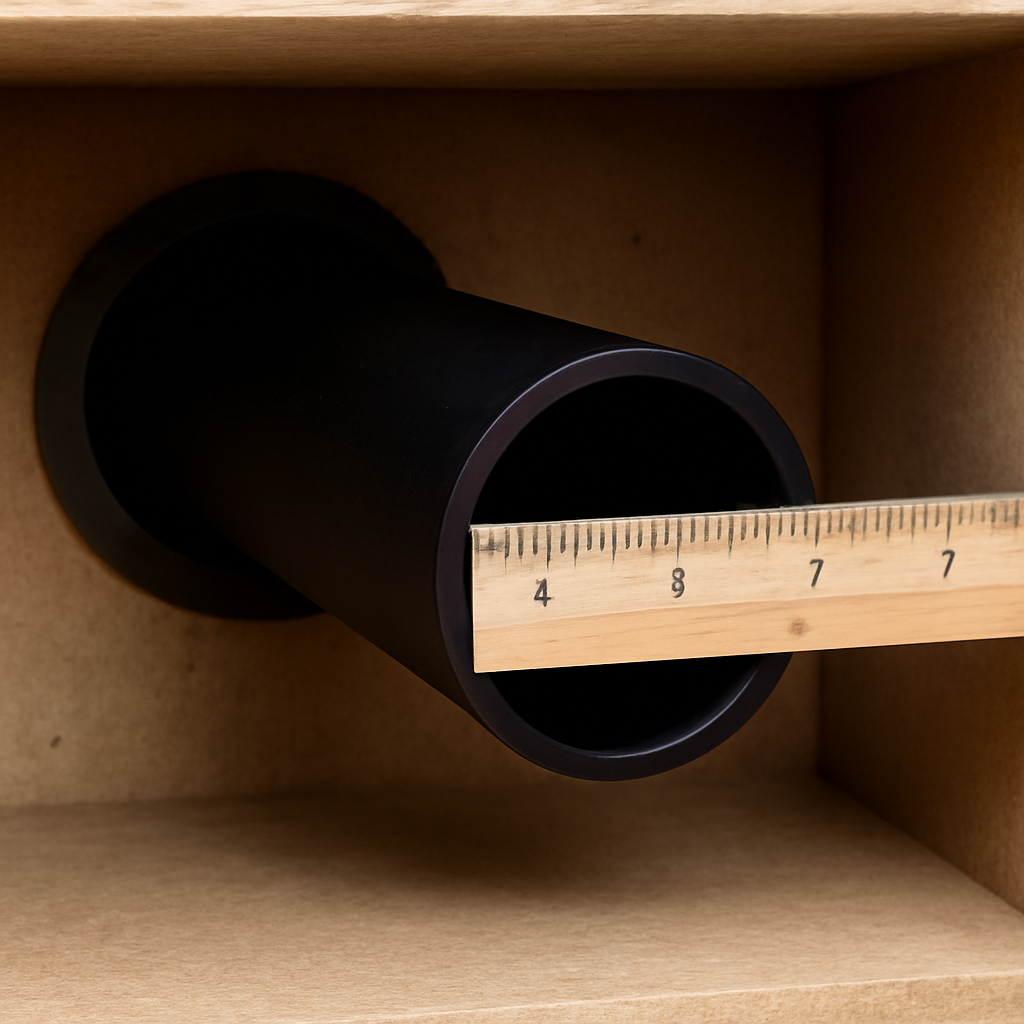
First, grab a flexible ruler or a calibrated tape measure and lay it along the port. Measure from the mouth to the nearest stop. That’s your raw length. If you’re unsure, look for the metal or plastic lip that anchors the port.
Use a reliable port calculator to translate that measurement into a target tuning frequency. At Audio Intensity, we prefer the free Subwoofer Port Area Calculator because it’s quick and asks for only what you already have. Plug in the port diameter, the measured length, and the box’s volume to see the frequency that will give you that punchy, open‑thrust bass.
But raw numbers aren’t enough. You need a feel for how the box behaves in the real world. Drive the car with a simple 20‑Hz sine wave. If the box feels tight and the sound is compressed, the port is probably too short. If it sounds like a wind instrument that never quite hits the right note, the port is too long.
Listen for the “dead spot” in your cabin. It’s the spot where the bass is weakest. Move around it while playing a low‑frequency track. That spot often points to an imbalance in the port tuning or a mismatch between the box volume and the subwoofer’s resonant frequency.
At this stage, don’t rush to the shop or buy a new enclosure. Instead, map out what’s wrong. Write down the current tuning frequency, the measured port length, and the perceived bass quality. Make a note of the volume and any observed resonances today. That checklist will be your guide when you start tweaking.
We’ve seen installers skip this diagnostic step and end up with a box that’s either under‑tuned or over‑tuned. It’s a common pain point, and it’s why many end up with a “shaky” low end that never feels solid.
If the port is already close to the target length but you’re still off, add a small foam patch at the mouth. It dampens harsh overtones without killing the depth, giving you cleaner, more controlled lows.
Before you go home to tweak, check the box’s seams and flanges. A leaky port will throw off your tuning entirely. Seal any gaps with acoustically neutral tape or silicone. We’ve found that a snug, acoustically inert cover keeps the tuning steady during long drives.
Once you’ve logged all the data, you’ll have a clear picture of where you need to move. That’s the real power of assessment—turning guesswork into a precise plan.
Now let’s get hands‑on.
Remember, tuning is a balance of science and feel.
Need a quick way to keep your tuning notes organized? Check out high‑quality labels for durable, heat‑resistant stickers that make it easy to mark your box’s dimensions and tuning data.
Step 2: Identify the Ideal Target Frequency
So, now that you’ve got your box measured and a baseline ready, it’s time to pick the sweet spot your sub should hit.
Think of the tuning frequency like a favorite song that just feels right in your ears.
If it’s too low, the boom feels like a distant thunderstorm. If it’s too high, you’re left with a whiny thump that doesn’t make the seat vibrate.
Most 6.5″ subs we see in the market love a range between 45 and 55 Hz. That sweet spot balances punch with clarity.
But your vehicle’s cabin, the sub’s power rating, and even the type of music you love can shift that sweet spot a few hertz.
Here’s a quick way to nail it: take the port length and diameter you measured, plug them into a port tuning calculator—many of our customers use the one on Audio Intensity’s website—and see what frequency pops out.
If the calculator tells you 48 Hz, that’s your target.
Now, pause for a second. Did you measure from inside the box to the port lip? That tiny difference can move the target up or down by 3–5 Hz.
A quick recalculation with the correct inside length gives you a more accurate target.
What’s the next step? Tune your box to that target. If your calculator says 48 Hz but your actual sweep lands at 52 Hz, your port is a bit too long. Add a small port stop or deepen your shroud to shave off a centimeter or two. Every millimeter counts.
Why stop at a single frequency? Consider your listening habits. If you’re all about that bass drop in EDM, aim a little lower—around 45 Hz—to make the floor shake. For jazz or vinyl, a higher 50–55 Hz keeps the lows tight and musical.
Think about the Q factor too. A Q around 0.8–1.0 gives you a clear, tight low end. A higher Q can make the bass feel boomy and muddy. So, once you have your target, tweak the port length until you hit both the right frequency and the right Q.
Do you want a quick checklist? Here’s one you can jot down:
- Port length & diameter measured inside the box.
- Target frequency from the calculator.
- Actual frequency from a sweep.
- Adjustments: port stop, shroud length.
- Re‑measure after each tweak.
- Confirm Q stays between 0.8 and 1.0.
- Seal the port once the target is met.
Remember, you’re not just chasing numbers—you’re chasing feel. When you play a track that has a clear bass kick, notice if the floor vibrates without feeling muddy. That’s your green light.

Now that you’ve hit that sweet spot, give it a test drive. Play a few tracks across genres; the low end should feel natural, not forced. Trust the numbers, trust the feel, and enjoy the ride.
Step 3: Adjust Port Size and Shape – A Comparison Table
Now that you’ve dialed in the tuning frequency, the next hurdle is making the port shape do exactly what the math tells it to do.
Think of the port as a tiny wind instrument that can be tweaked with a stop, a shroud, or even a small diameter change.
You might wonder, "Which tweak gives the cleanest bass?" Let’s break it down with a quick comparison table.
| Feature | Option/Tool | Notes |
|---|---|---|
| Port Length | Port Stop / Shroud | Shortens air column, shifts tuning up 4–6 Hz |
| Diameter | Foam or Diameter Increase | Opens throat, reduces hiss, keeps airflow smooth |
| Shape | Lip Taper or Flare | Controls escape rate, prevents premature resonance |
The table above shows how each option nudges the tuning point a few hertz.
In practice, you’ll often find a half‑inch port stop change moves the frequency by 4–6 Hz, which is enough to bring a 52 Hz reading down to a solid 47 Hz.
If the port feels too narrow and the airflow sounds like a hiss, a quick diameter increase of a quarter inch can open the throat and tame that chuff.
Shape matters, too. A lip that’s too flat will let air escape too quickly; a slight lip flare keeps the energy in.
The trick is to tweak one variable at a time, retune, and re‑listen. That way you isolate the effect and avoid a runaway bass.
Here’s a step‑by‑step micro‑checklist you can keep in your pocket while you work on the port.
- Measure the current port length from the inside wall to the lip.
- Insert a port stop or shroud to shorten the air column.
- Run a quick frequency sweep on a reference track.
- Note the change in peak frequency.
- Adjust diameter if a hiss or choke appears.
- Check lip flare for airflow control.
- Seal the port once the target is met.
Do you ever hit a wall because the port length is already as short as it can get?
That’s when a shroud or a clever lip shape is your best friend.
If you’re working on a high‑SPL sub that likes to push, consider adding a ½‑inch foam sleeve at the lip. It’s a low‑cost, low‑risk tweak that smooths out harsh overtones.
Remember, the goal is to feel the bass, not just hear a number.
So, after you’ve tuned the port, hit the track you love, press play, and let the floor vibrate. If it feels tight, tighten the port stop; if it feels boomy, lengthen it a bit.
With a few fine‑tunes, you’ll have a port that feels like a hand‑picked instrument tuned for your cabin’s acoustics.
That’s the essence of step three: adjust the size and shape until the port sings with the same voice as the rest of your system.
Keep this table handy next time you open a box, and you’ll save hours of trial‑and‑error.
When you’re happy with the frequency and the Q sits in the sweet spot, double‑check the port’s physical integrity. Tighten any loose screws, ensure the seal is snug, and run a quick 30‑second play‑test to confirm nothing shifted during your tweaks.
Enjoy the richer, tighter bass in every drive.
Step 4: Fine‑Tune with a Video Tutorial
Now that you’ve nailed the basic tuning numbers, the next step is to bring everything together in a live environment. A video tutorial lets you see the exact motions of a pro—how they slide a shroud, tighten a stop, and listen for that perfect “pop” in real time. Think of it as watching a chef tweak a sauce while you taste it.
Why a video? Because tuning isn’t just math; it’s feel. The numbers tell you where to aim, but the feel tells you when you’ve hit it. Watching the process helps you internalise the rhythm of adjustments and the subtle cues—like a faint hiss or a sudden boost in volume—that signal you’re on track.
Step 1: Gather Your Gear
Before you hit play, make sure you’ve got the tools laid out: a ruler or caliper, the port stop or shroud, a tuning fork or frequency sweep app, and a playlist with a solid low‑end kick. If you’re on a budget, a phone app can replace the pricey analyzer. All you need is something that spits out a frequency number while you listen.
Step 2: Set the Stage
Open the box, place the camera or phone in a fixed position, and mount the speaker in the car. This ensures you’re seeing exactly what you’ll hear. If you can, set up a tripod so the view stays steady and the lighting is consistent.
Step 3: Follow the Demo
Play the video tutorial and pause at key moments. When the instructor shows how to insert a new stop, pause, note how the frequency shifts, and then resume. Repeat the process for each tweak. This split‑screen approach lets you compare the visual action with the audible change.
One useful trick: after each adjustment, run a quick 10‑second sweep and jot down the new peak frequency. It gives you a concrete reference point and keeps the process objective.
Step 4: Test Your Listening Thresholds
Once the video’s done, play a track you love and see if the bass feels right. Ask yourself: is the floor vibrating without sounding muddy? Is the low‑end punch coming through without blowing up the mids?
If it feels off, rewind to the part of the tutorial where the instructor tweaks a different aspect—maybe a diameter change or a lip flare. The visual cue will help you replicate the exact action.
Step 5: Lock It In
When the frequency and feel line up, seal the port with a snug cover. This step is crucial—any leakage can throw off your tuning. The video often shows a quick snap‑on cap; do the same and give it a light tap to ensure it’s tight.
Step 6: Document the Results
Create a small log: the final frequency, the exact stop size, and a note on the feel. This log is gold when you return to the system after months or when you swap to a new sub. Having a record means you can restore the perfect tune without guessing.
Remember, tuning is a mix of art and science. The video tutorial is your mentor, and the hands‑on practice is your teacher.
So, what’s the next move? Dive into a video tutorial that walks through each step, pause, replicate, and listen. Once you’re comfortable, the tuning process will feel less like trial and error and more like a well‑tuned recipe you can serve anytime.
For an in‑depth walkthrough that covers all the nuances—from measuring port diameter to sealing the finish—check out this guide on ported subwoofer box tuning.
Step 5: Verify and Lock the Settings
All the math, the tweaking, the fine‑tuning—now that you’ve dialed your port to the target frequency, it’s time to lock the groove. Think of it like setting a drum pad to the perfect beat before a live show.
Check the Numbers One More Time
Grab that handheld frequency meter or a quick smartphone app. Play a reference track with a deep kick, and let the meter spit out the peak frequency. If it sits right where your calculator said it should, you’re golden. If it drifts, maybe a small tweak is still needed—maybe a half‑inch stop is a hair too short.
Remember: a tiny change in port length can shift the tune by 7 Hz. That’s a noticeable jump in the bass realm. So, double‑check before you seal anything.
Listen for the Cleanest Pulse
Turn on a track you love—something with a clear, punchy low end. If the floor vibrates without any muddiness, you’ve nailed it. If the bass feels boomy or the mid‑range gets buried, that’s a sign your port might still be off‑beat.
Ask yourself: does the bass hit where you expect it to feel, not just where the meter reads? This is the difference between a theoretical score and a real‑world groove.
Seal the Deal (Literally)
Now, grab the port cover. If it’s a snap‑on cap, slide it on until you feel a solid click. If it’s a screw‑on, tighten just enough to avoid rattling—over‑tightening can crack the port or make the cover pop off later.
Give it a light tap. A proper seal should produce a firm “thunk” rather than a hollow thud. That tiny tap is your confirmation that the air column is sealed and the tuning will hold.
Document the Final Settings
Write down the final frequency, the stop size, the exact stop depth, and a quick note on the feel. This log is your safety net for months down the road, or if you ever swap the sub for a different model.
Example: “Final tune 48 Hz, ½‑inch stop, 2‑inch stop depth, feels tight and punchy.” Keep this in a small notebook or a note app. When you next test, you’ll instantly know if something has shifted.
Quick Checklist Before You Drive
- Is the frequency within 1–2 Hz of target?
- Is the port cover snug and free of leaks?
- Did a light tap confirm the seal?
- Is the log complete and accurate?
- Did the bass feel right on a track you love?
- Have you set the amplifier’s LPF to just above the tuning frequency?
Cross these off, then hit the road. If the bass still feels off, revisit the stop or consider a tiny foam insert at the lip to tame any lingering hiss.
Why This Matters
A port that’s not sealed can let hot air escape, which throws the tuning back out of whack. Think of it like a wind instrument that’s missing a key—no matter how good you play, the tone will be wrong.
By locking the settings now, you protect the work you’ve done. That’s why many pros keep a small wrench near the port for future tweaks—just in case a seat cushion moves or the car’s interior expands with heat.
Final Thought
When you finally step back, crank the volume up to a level you’d normally use, and feel that bass roll across the seats. That moment of pure satisfaction confirms you’ve mastered the art of tuning a ported subwoofer box.
Takeaway
Measure, listen, seal, and log. Repeat whenever you change a component or notice a shift. That routine keeps your bass tight, punchy, and ready for every track you love.
And hey, if you ever want a deeper dive into amplifier calibration—there’s a great guide on tuning amps using just a multimeter and test tones that you might find handy here.
Step 6: Optimize Surrounding Electronics
We’ve nailed the port, but the rest of the system still needs a tune‑up to keep that bass clean and punchy.
Think of the amplifier and wiring as the engine that drives your subwoofer.
A weak or poorly wired signal is like a car that never quite reaches top speed.
1. Get a clean head‑unit signal
Start by setting your stereo to a flat EQ and disabling any bass‑boost or loudness features.
That way, the amplifier gets a pure, uncluttered feed.
Next, turn the volume to just below the point where you hear distortion—usually between 75% and 85% of max on most units.
2. Check the ground and power wires
Make sure the amplifier’s ground is a short, solid connection to the car’s chassis.
A long, dangling wire can introduce hum and noise.
Use gauge‑appropriate power cables—4 AWG is common for 4‑ohm loads—but keep the run as short as possible to minimize voltage drop.
3. Set the crossover filters
The Low‑Pass Filter (LPF) should sit just above your tuning frequency, usually 10 Hz higher.
For a 48 Hz tuned box, set the LPF to 58 Hz.
The Subsonic Filter (high‑pass) protects the voice coil by cutting out frequencies below the port’s tuning point.
Set it around 5 Hz lower than the tuning frequency—so 43 Hz in our example.
4. Tune the amplifier gain with a multimeter
This step might sound fancy, but it’s simple: use a DMM to measure the voltage at the amplifier’s speaker terminals while playing a 40 Hz test tone from your head unit.
Calculate the target voltage: V = sqrt(P × R), where V = sqrt(P × R).
For a 500‑W, 4‑ohm amp, that’s about 44.7 V.
Slowly rotate the gain knob until the meter reads the target voltage.
Once you hit it, stop. Any higher and you’ll clip.
For a deeper dive into amplifier tuning, see this guide on how to tune an amplifier for subwoofers.
5. Fine‑tune phase and boost
Flip the phase switch to 0° or 180° and listen for the loudest bass on a familiar track.
The setting that makes the floor feel most solid is the one you want.
If your amp has a bass‑boost, keep it low or off.
Boosting close to the tuning frequency can introduce distortion and raise the risk of clipping.
6. Run a quick real‑world test
With everything set, play a few songs you love.
Notice if the bass feels tight, punchy, and free of muddiness.
If you hear a “hollow” sound, revisit the LPF or subsonic setting.
Take notes: final gain, LPF, subsonic, phase, and any audible quirks.
Store them in a small notebook or phone note for future reference.
Remember, the goal isn’t just numbers on a screen—it’s how the bass feels in the car.
By following these steps, you’ll ensure the electronics around your ported enclosure are perfectly matched. The result? A bass response that stays true to the tuning you achieved in Step 5 and delivers that deep, clean thump every time you hit play.
Conclusion
We’ve walked through every tweak you need to know when you’re figuring out how to tune a ported subwoofer box.
First, remember that numbers are a guide, not a prison. If your tuning calculator says 48 Hz but the floor still feels a bit flat, pause and listen again.
Second, keep a simple log. Write down the final frequency, the stop size, and a quick note on the feel.
Third, seal the deal. A snug port cover is the last line of defense against leakage, and that little tap can confirm it’s locked in.
And here’s the kicker: the real test is the moment the bass rolls across your seat and you hear that thump in your chest.
Do you feel the power yet? If not, revisit the LPF or try a half‑inch foam sleeve at the lip – it’s a quick fix that can smooth out harshness.
When you’re happy, lock the settings, run a quick play‑test, and enjoy a bass line that’s as consistent as your favourite playlist.
So, next time you hit play, know that the deep, clean thump you’ve engineered is the result of deliberate, thoughtful tuning – not a lucky guess. Keep rocking every drive.
FAQ
What are the first things to check before tuning a ported subwoofer box?
Start by opening the enclosure and inspecting the port lip for alignment. A crooked lip can throw off the airflow. Tighten any loose screws, then measure the internal port length with a ruler or caliper. Record the diameter, too—both dimensions drive the tuning calculation. Finally, check the box volume; a mis‑measured volume leads to a 5‑10 Hz error in the target frequency.
How do I determine the ideal tuning frequency for my car’s cabin?
Use a port tuning calculator that inputs your box volume, port length, and diameter. The calculator will spit out a target frequency—usually between 45 Hz and 55 Hz for a 6.5″ sub. If you love EDM, aim a tad lower; for jazz, pick a higher range. Once you have the number, match it with the sub’s SPL rating to avoid muddiness.
What is the best method for measuring port length and diameter accurately?
Measure from the inside wall of the box to the lip edge; that’s the true air column length. For diameter, slide a caliper across the throat. If you don’t have a caliper, a sheet of paper that fits snugly works—just note the gap. Accuracy matters because a half‑inch error can shift tuning by 4–6 Hz.
How can I tell if my port tuning is too low or too high?
Play a reference track with a clear kick. If the floor shivers but sounds thin, your tuning is likely too low—your box is amplifying the lowest frequencies. If the bass feels weak and the mids dominate, you’re tuned too high. A quick frequency sweep on a phone app gives you the exact peak; compare it to your target.
What are common signs of air leakage and how can I fix them?
A hollow thump when you tap the port cover signals a leak. Tighten the port cover with a snug snap‑on or screw‑on cap. If you hear a hiss when the sub runs, the lip may be too thin—add a small foam sleeve or a shroud to seal the opening. Small adjustments often resolve the leak.
How do I balance the crossover settings with my port tuning?
Set the low‑pass filter (LPF) about 10 Hz above your tuned frequency; for a 48 Hz box, set the LPF to 58 Hz. The high‑pass or subsonic filter should sit 5 Hz below, around 43 Hz. This spacing prevents the sub from fighting the amplifier and keeps the low end clean. Always double‑check the gain to avoid clipping.
What should I do if the bass still feels weak after tuning?
First, confirm the amp’s gain is properly set for the sub’s power rating. Next, ensure the crossover doesn’t cut too much low frequency. If the bass remains flat, consider adding a ½‑inch foam sleeve at the lip to dampen harsh overtones. Finally, re‑check the port seal and make sure the cable runs are short and solid.
How can I maintain my tuned box over time?
Store a quick log: final frequency, stop size, and seal status. Check the port cover annually; a loose cap can creep back over months. Re‑measure port length if you add or remove a sub or change the amplifier. Keeping a routine maintenance schedule ensures the bass stays punchy no matter how many trips you take.


