
Picture this: you’re on a long haul, the road stretches ahead, and the only thing that keeps your playlist alive is a thumping bass that seems to vibrate the truck’s frame. Ever wonder how to install subwoofer in truck and make that low‑end punch feel like a drumline in your cab? It’s not as daunting as it sounds, and a few smart choices can turn a plain ride into a personal concert hall.
Most enthusiasts hit a wall at the first step: the truck’s interior layout feels like a maze, and the wiring looks like a tangled skein of spaghetti. The frustration? You’ve invested in a high‑quality subwoofer that deserves room to breathe, yet you’re stuck staring at a blank dashboard and a dusty trunk. The good news is, with a methodical approach, you can sidestep the common pitfalls and keep the focus on sound.
At Audio Intensity, we’ve seen the same confusion play out time after time. That’s why we created a dedicated, no‑fluff playbook that walks you through each phase—from selecting the right enclosure to routing the power cable safely. If you want a quick reference, check out our step‑by‑step guide for a visual roadmap that’s easy to follow even on a first try.
Take the example of Jake, a long‑haul driver who swapped his factory speaker system for a 10‑inch subwoofer behind the driver seat. He reported that the bass was so pronounced it felt like a rumble under his seat, but he also noted that the enclosure had to be sealed tightly to avoid rattling in high‑speed turns. He followed the exact steps we recommend and now enjoys a bass line that’s both punchy and distortion‑free.
Before you even touch a bolt, do a quick inventory: 1) Confirm the subwoofer’s power rating; 2) Pick an enclosure type—ported or sealed—based on your truck’s interior volume; 3) Measure the available space behind the seat or in the cargo bed; 4) Plan the wiring path so you can keep it hidden under the carpet or along the frame. These small checks save you a lot of time and headaches later on.
And let’s not forget the power supply. A subwoofer needs steady, clean current, especially on long drives where your truck’s alternator might wobble. That’s where a good portable charger or a reliable in‑vehicle power bank can make a difference. If you’re on the move, consider checking out Glassology Tech for compact, high‑capacity power solutions that keep both your music and your phone charged.
So, are you ready to turn your truck into a mobile concert hall? Grab your toolbox, hit the guide, and remember that the first step—choosing the right enclosure—is where the magic begins. A little planning now means more room to groove later, and trust me, the feel of a deep, clean bass will make every mile worthwhile.
TL;DR
Installing a subwoofer in your truck can turn every mile into a bass‑rich experience, but it starts with picking the right enclosure and wiring plan. Follow our guide—measure space, secure the box, route power, and test levels—to ensure a distortion‑free, punchy sound that feels like a drumline in your cab.
Step 1: Choose the Right Subwoofer
Choosing a subwoofer is like picking a paint color for a room—you need to match it to the space and your style. For truck audio, the aim is a low‑end that feels like a drumline, not a clunky thud. Ask yourself: what bass character do you want?
Start by visualizing the cab’s acoustics. Sit in the driver seat, shut the windows, and imagine a single low note. Does the sound bounce off the dash, or does it settle into the carpet? This simple test tells you how your truck will handle bass.
Next, check the sub’s power rating and impedance. Look at RMS and peak watts; a 500 W RMS unit pairs well with a 600 W amp at 4 Ω. Matching impedance keeps the amp humming and protects the sub from over‑stress.
Choose the enclosure type that fits your space. A sealed box gives tight, accurate bass but needs less volume, while a ported box pushes more low frequency for a deeper rumble—though it requires a larger cavity.
Size matters: a 10‑inch sub can fit behind the driver’s seat in most mids, whereas a 12‑inch model demands more room. Pick the diameter that balances fit and desired depth.
Frequency response is your bass’s playground. Aim for a sub that covers 30–200 Hz for full range, with a low‑end cut around 20 Hz if you crave that bone‑deep kick.
Brand trust matters. Audio Intensity’s lineup delivers clean, distortion‑free sound and solid warranty support, ensuring your investment stands the test of time.
Make sure the amp can handle the sub’s impedance. A 4 Ω sub works with most amps, but a 2 Ω version demands a more efficient amp to avoid distortion.
Budget wisely: a solid sub and amp combo might cost more upfront but saves on future upgrades and repairs. Allocate 10–15 % of your total audio spend to these core pieces.
For example, upgrading a 2024 F‑150 with a 10‑inch sealed sub that fits behind the driver’s seat, paired with a 600 W amp at 4 Ω, delivers tight, punchy bass that rides the road like a drumline.
Quick checklist before buying:
- Desired bass character (smooth, punchy, deep)
- Interior volume for enclosure
- Sub power vs amp output
- Impedance compatibility
- Budget allocation
Once you’ve nailed these fundamentals, you’re ready to tackle the enclosure, wiring, and calibration stages. The thrill of that perfect low‑end punch is worth the effort—so keep rolling. We’ve seen installers who start with these checks save hours of troubleshooting and end up with a bass that feels like a live drumline every mile.
If you’re looking to layer a custom synth line, check out Lord High Beat Producer. For LED lighting that complements your audio setup, contact LED Artistry.
Step 2: Locate and Prepare the Mounting Area (Video)
So you’ve decided to give your truck a bass‑boost makeover, and now you’re at the point where you have to pick a spot for the sub. It’s a bit like finding a quiet corner in a bustling café – you need space, stability, and a way to keep the noise at bay.
Start by pulling out your truck’s interior manual or, if you’re feeling adventurous, a quick Google image search of the model’s under‑seat layout. Measure the depth, width, and height where you intend to put the sub. If you’re looking at the behind‑seat area, remember that the driver’s footwell can be a tight squeeze – a 10‑inch sub can fit snugly, but a 12‑inch might be too tall unless you tweak the enclosure.
Why does that matter? Because the enclosure’s volume directly shapes how the sub responds. A sealed box gives you tight, punchy lows, while a ported design adds depth but demands precise tuning. The truck’s interior volume, plus any existing gear, dictates which option will feel natural and powerful.
Next up: the mounting method. Vibration‑isolated brackets are a favourite among truck audio pros. They keep the sub steady while dampening rattles that would otherwise turn a clean low into a buzzing background hum. If you’re not a DIY mechanic, we’ve seen installers attach the enclosure to the frame with a few bolts, then slip a rubber pad between the sub and the pad to absorb shock.
When you’re deciding between a direct‑fit enclosure and a custom box, think of your truck’s use. A long‑haul driver who spends hours on the road will appreciate a snug, direct‑fit design that keeps the sub in place during turns. A hobbyist who likes to swap gear might prefer a custom box that slides into the cargo bed and can be removed without a wrench.
Wiring is another critical piece. The sub needs a clean, shielded power cable to avoid interference. Run the cable along the frame rail, hidden beneath the carpet, or tucked inside the trunk’s existing wiring harness. A neat, protected run keeps your system sounding crisp and protects the wiring from the harsh truck environment.
We’ve seen folks use a simple “bridge” cable to combine the sub’s power supply with the existing amplifier’s output. It’s a quick fix, but make sure the bridge’s gauge matches the amp’s current rating. A mismatch can overheat the wire and turn your bass into a safety hazard.
Before you bolt anything down, test the sub’s placement with a temporary hold‑down. Slide the enclosure into position, then walk the truck’s cab while it’s powered on. Listen for any rattles, vibration through the seats, or air leaks. If something feels off, adjust the brackets or add a bit more isolation material.
Speaking of isolation, a foam pad on the back of the enclosure can help trap low‑frequency sound that would otherwise leak into the cabin. It also adds a layer of protection against metal‑on‑metal contact, which is the number one cause of sub rattling on trucks.
Once you’ve confirmed the fit and sound, tighten the bolts to the manufacturer’s torque spec. We’ve seen torque wrenches on the order of 10–15 ft‑lb for most truck sub installations. Don’t over‑tighten – you could strip the mounting holes or crack the enclosure’s plywood.
After securing everything, run a quick sound test. Start at a low volume, then gradually increase to your listening level. If the sub starts to distort, double‑check the amp’s gain setting and the power cable’s integrity. A distorted bass is a sign the system is being over‑driven or the wiring is compromised.
Now that the mount is ready, the next step is to route the signal cable. A shielded RCA cable from the head unit or amp to the sub will keep your signal clean. Keep the cable away from power wires to avoid electromagnetic interference.
Here’s a handy tip: label the end of each cable with a quick note – “Signal” or “Power” – so you can identify them during a future upgrade or if you swap components.
Before you finish up, do a quick walk‑around. Check that the enclosure doesn’t interfere with the driver’s legroom, that the cargo area stays clear, and that the sub’s ventilation isn’t blocked by a door or panel. Good airflow keeps the sub cool and prevents heat buildup that could degrade performance.
Finally, put the enclosure in its permanent position and double‑check all connections. Tighten any loose screws, confirm that the cable grommets are snug, and give the sub a gentle bump to make sure it feels solid.
Now you’re ready for the real test: a drive. Hit the open road and let the bass roll. If you’re satisfied, you’ve nailed the mounting area; if not, tweak the isolation or reposition the enclosure a few inches – small adjustments can make a big difference.
Want a deeper dive into how the sub’s placement impacts sound? This YouTube video walks through a similar truck installation, highlighting key mounting choices. For a quick visual reference on cable routing and isolation techniques, check out this video guide.
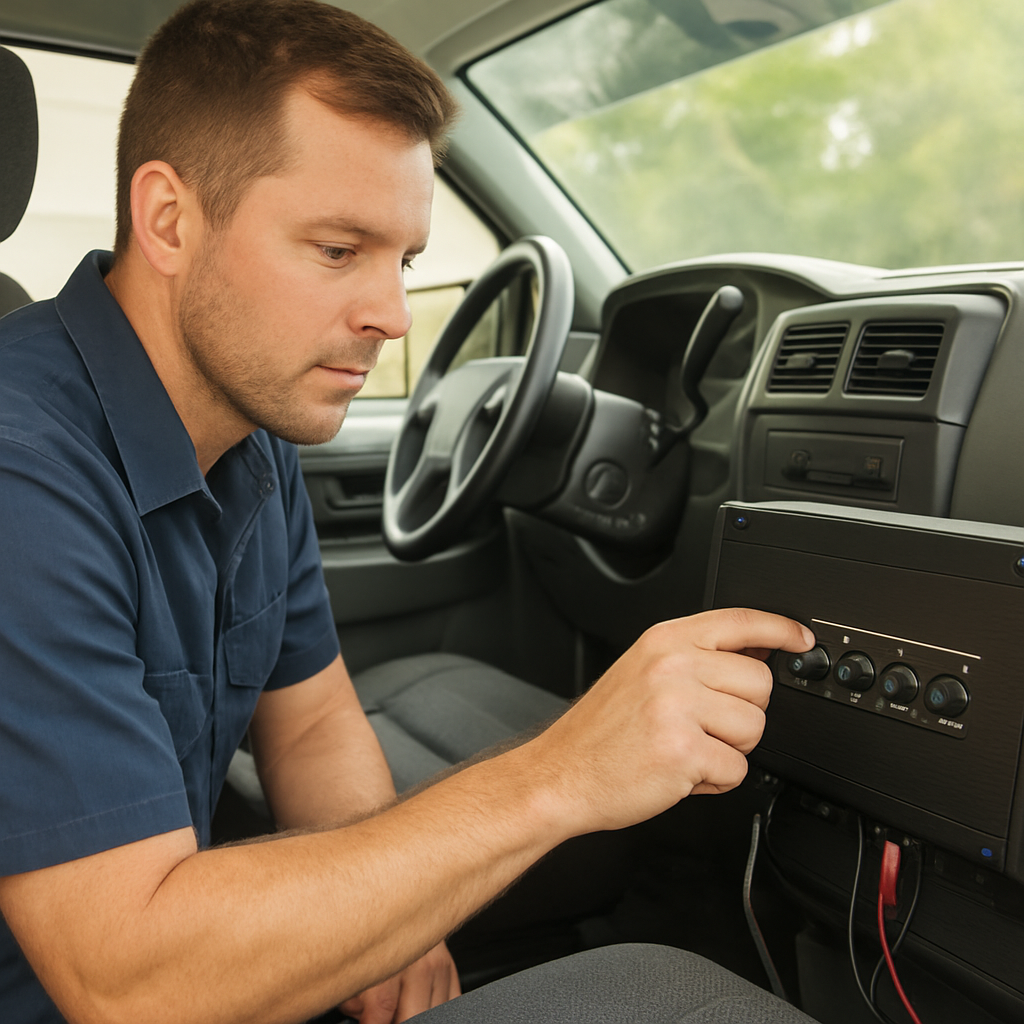
Step 3: Install Wiring and Amplifier
Gather Your Toolbox and Cables
Before you touch anything, make sure you have the right tools: a wire stripper, crimping tool, a 10‑15 ft power cable, an RCA or XLR signal cable, a fuse holder, a multimeter, and a heat‑shrink tube set.
Having everything on hand saves time and keeps the job stress‑free. Don’t skip the fuse; it’s your first line of defense if something goes wrong.
Run Power From the Alternator to the Amp
Start by identifying the best route for the 12‑volt power cable. Run it along the frame rail or under the carpet, staying away from high‑heat areas.
Use a 12‑AWG cable for a 200‑W amp and a 10‑AWG cable if you’re pushing 400 W or more. That gauge difference keeps voltage drop in check.
Once you reach the amplifier, install a fuse holder within 12 inches of the battery and pull a fuse that matches the amp’s max current. This step protects your truck’s electrical system.
Connect the Signal Path
Most subwoofers use an RCA cable from the head unit or a preamp. If your amp accepts a single‑ended signal, stick to one RCA connector; if it’s a stereo amp, use two and then combine them on the amp side.
Keep the signal cable short to reduce interference. Run it parallel to the power cable but maintain a gap of at least 2 inches to avoid electromagnetic noise.
Wire the Amplifier to the Subwoofer
Open your amp’s back panel and locate the speaker terminals. Depending on whether your sub is Single Voice Coil (SVC) or Dual Voice Coil (DVC), you’ll wire differently.
The SVC sub has one pair of terminals, so you’ll connect one positive (+) and one negative (−) wire. The DVC sub offers two sets, giving you the option to wire them in series or parallel to match your amp’s impedance.
Take a look at the wiring diagrams on the 12‑Volt website; they illustrate how to wire both SVC and DVC subwoofers safely, ensuring you stay within the amp’s impedance limits. subwoofer wiring diagrams can help you pick the right configuration.
Polarity Matters – Don’t Flip It
Polarity mismatch can turn your bass into a wall‑of‑noise situation. Make sure the positive terminal on the amp matches the positive terminal on the sub.
If you’re unsure, use a multimeter to check continuity between the amp and sub before powering anything up.
Secure and Protect All Connections
After crimping, slide heat‑shrink tubing over each joint and heat it with a lighter or shrink tool. This seals the connection against moisture.
Route cables through grommets where they pass through the truck’s panel. Grommets reduce wear and keep the cable from chafing.
Use cable ties to bundle related wires together. Label each cable—“Power,” “Ground,” “Signal”—with a small marker so you can troubleshoot later.
Ground the Amplifier
Attach the amp’s ground wire to a clean, bare metal spot on the truck’s chassis. Avoid rusty or painted areas; you need solid electrical contact.
A poor ground can cause a humming hiss that’s hard to eliminate.
Final Check and First Test
With everything wired, double‑check each connection, tighten all screws, and replace any loose clamps.
Turn on the truck, then the amp’s power switch. Let the amplifier run a few seconds without music to ensure it’s stable.
Listen for Issues and Adjust
Play a bass‑heavy track at a moderate volume. If you hear distortion or a crackle, check the wiring for loose connections or incorrect polarity.
For a DVC sub wired in series, the amp sees a higher impedance; if the amp is rated for 4 Ω, you might need to wire in parallel to drop back to 2 Ω.
Quick Wiring Checklist
- Fuse near battery
- Proper gauge power cable
- Polarity‑matched sub wiring
- Secure ground point
- Heat‑shrink on all crimps
- Label cables for future reference
Follow this checklist and you’ll have a clean, reliable power and signal path for your sub. That sets the stage for the next step—tuning the amp and testing the sound quality.
Need a visual walkthrough on how to wire a sub? A helpful video guide walks through the process step by step. Video guide on wiring subwoofers covers the essentials.
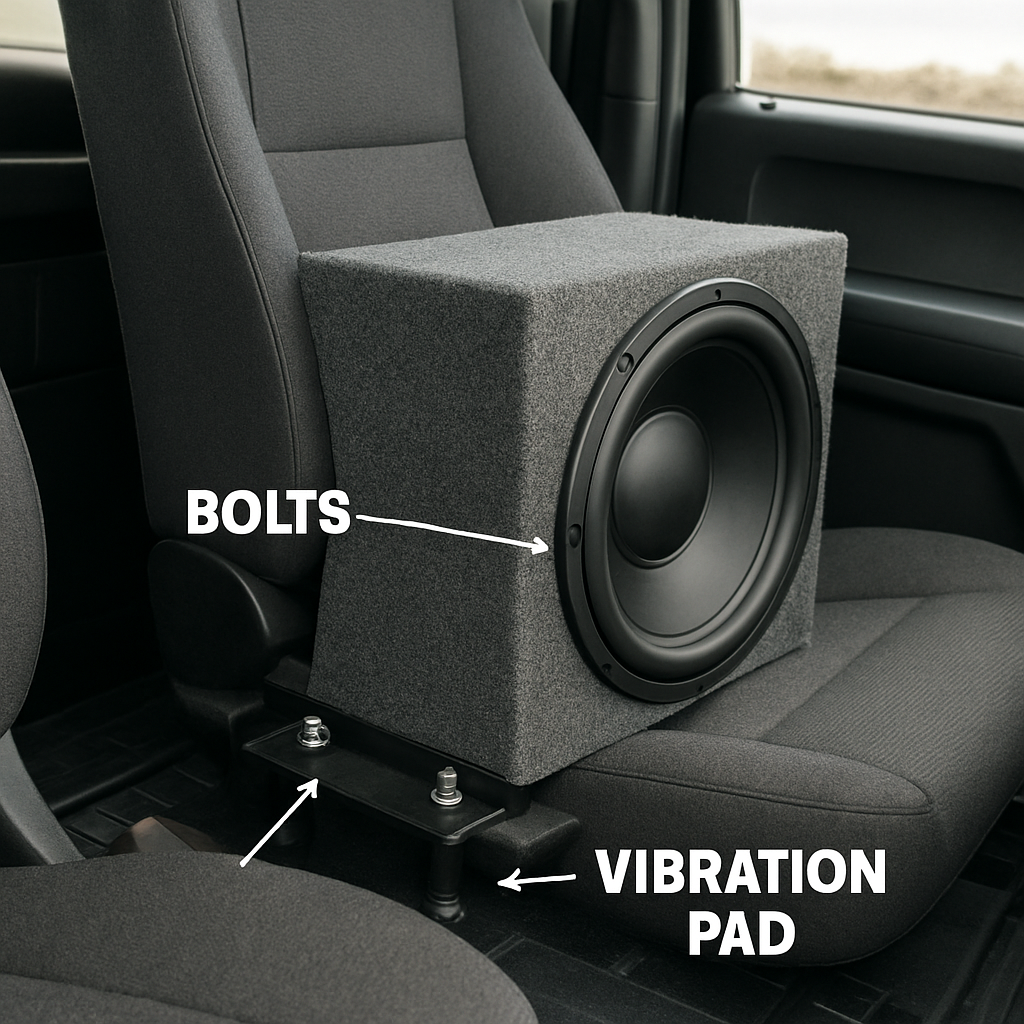
Step 4: Secure the Subwoofer
Now that the wiring’s all in place, it’s time to make the subwoofer a permanent part of your truck’s interior. Think of this step like anchoring a heavy piece of furniture—if it slips, the whole system feels shaky.
Pick a Solid Mounting Spot
Most installers opt for the area behind the driver seat because it’s close to the battery and keeps cables short. But if your truck’s cargo bed offers more room, you can mount the enclosure there and run a clean cable through the grille. Ask yourself: where does the sub feel the most “alive” when you play a low‑end track?
Prep the Surface
Clean the chosen spot with rubbing alcohol to remove dust and oils. A dirty surface can compromise the seal and let vibration bleed into the cabin. If you’re mounting under a seat, remove the trim panel first to get straight access.
Choose the Right Fasteners
Bolts are the most reliable, but you can also use heavy‑duty U‑clips if your enclosure has a metal backing. Tighten bolts to the manufacturer’s torque spec—usually between 10 and 15 ft‑lb for most truck subs. Over‑tightening can crack plywood or strip holes, while under‑tightening leaves the unit wobbly.
Apply a Vibration‑Isolating Pad
Even a well‑bolted enclosure will transmit truck‑body vibrations. Place a rubber or neoprene pad between the enclosure and the mounting plate. This dampens rattles and keeps the bass clean. If you notice the sub “booming” on a rough road, that pad is the first line of defense.
Seal the Edges
Gaps can let air leak, which hurts a sealed box’s response, and can also let dust and moisture seep in. Use a high‑temperature silicone sealant around the perimeter of the enclosure. Let it cure for 24 hours before reconnecting the power.
Secure the Power and Signal Cables
Route the power cable along the frame rail, securing it with zip ties every 12 inches. Use grommets when the cable passes through any panel holes to prevent chafing. For the signal cable, keep it at least 2 inches away from the power wire to avoid electromagnetic interference.
Check for Electrical Noise
Before final tightening, turn the truck on and listen for any hissing or hum. If you hear a faint buzz, the ground may not be solid—re‑attach the grounding strap to a clean, bare metal spot on the chassis. A good ground eliminates a lot of the “ghost” noise that creeps into low‑frequency reproduction.
Lock It In With a Quick Checklist
- Surface cleaned and prepped
- Bolts torqued correctly
- Vibration pad installed
- Sealant applied and cured
- Cables routed and secured
- Ground strap attached to a clean metal point
Do a quick walk‑around. Make sure the enclosure doesn’t interfere with your legroom or cargo space, and that the door or hatch remains operable. If you’re installing in a cargo bed, double‑check that the sub doesn’t block the rear view mirrors or rear‑view camera.
Finally, give the enclosure a gentle tap. If it’s solid, you should feel a firm hit with no wobble. That’s the feeling every truck audio enthusiast wants—stability that lets you crank up the bass without a hitch.
For a visual walkthrough on how to secure a subwoofer inside a truck, check out this guide from YouTube. It covers the mounting process step by step and includes a few quick tricks for keeping cables tidy.
YouTube video on securing a subwoofer in a truck
Step 5: Test and Adjust Settings with Comparison Table
After you've nailed the mount and wired everything up, it's time to bring the bass to life and make sure it behaves exactly how you want it to. Think of this as a lab session for your truck’s sound system. You’re not just checking for distortion—you’re shaping the sound that rides with you.
First, boot up the amp and let it idle for a minute. Hear the hiss? That’s the amplifier warming up. Let the amp settle before you pull any knobs. If it’s still buzzing, you’ve got a grounding issue to fix.
You can see a practical demo on YouTube here.
Next, play a reference track. Use something that hits a wide bass range, like “Take Five” by The Dave Brubeck Quartet or a classic hip‑hop beat. The idea is to have a consistent, predictable low‑frequency signal so you can spot changes in tone.
Set the Gain to the Right Level
Start with the amplifier’s gain knob at the lowest setting. Feed the reference track in and gradually increase the gain until you hear the first crackle. That crackle is the sweet spot—just before distortion starts. Mark that position mentally.
Why this matters: If you set gain too high, you’ll get that unpleasant “boom” that can make the cabin feel like a drum kit. Too low, and you’ll under‑use the sub’s potential. The sweet spot is a compromise between clarity and punch.
Fine‑Tune Frequency Cut‑off
Most amps have a low‑pass or high‑pass filter. Push the low‑pass to around 50 Hz to let the sub handle the deep thumps, and keep the high‑pass around 35 Hz to clean up sub‑sonic rumble that doesn’t translate well inside a cab.
Run the track again. If the bass still feels muddy, bump the low‑pass up a few dB. If it sounds thin, lower it. This is a dance—listen for balance with your mids and highs.
Check Phase Alignment
Phase problems can make the bass feel ghostly. Flip the sub’s phase switch if it has one, or swap the positive and negative leads. Play the reference track again. Do you hear a clearer, tighter thump? That’s a sign you’ve got the phase right.
If you’re in a truck with multiple subs, use a phase meter or a simple listening test by moving the sub to the back of the cabin and noting the change in bass feel.
Build a Comparison Table
When juggling different settings, a quick table helps you track what works and what doesn’t. Below is a minimal example you can copy into a note or a spreadsheet.
| Feature | Option | Notes |
|---|---|---|
| Gain Level | Low (1–2 dB above idle) | Baseline before crackle |
| Low‑Pass Filter | 50 Hz | Adjust by ±5 dB for clarity |
| High‑Pass Filter | 35 Hz | Reduces sub‑sonic rumble |
| Phase | Flip if bass feels thin | Check with a reference track |
Keep this table handy while you tweak. The key is to make small, incremental changes and note the perceived impact.
Run a Live Test Drive
Once the lab session feels solid, take the truck for a short drive. Use a playlist that includes your favorite bass‑heavy songs. Notice how the sound behaves on the highway versus city streets. Does the bass hold its punch when the engine revs?
If you notice any loss of depth at high speeds, revisit the gain or filter settings. In some trucks, the cabin’s airflow can push the sub’s lower frequencies out, so a slight increase in low‑pass can help.
Document Everything
Write down the settings that give you the best sound. Include the exact dB values, filter cuts, and phase position. This becomes a reference for future upgrades or when you swap to a different sub or amplifier.
Having a documented baseline also helps if you bring your truck in for a tune‑up or ask a pro for a quick tweak.
Step 6: Maintenance and Troubleshooting
Now that your truck’s soundstage is dialed in, the next big win is keeping that groove alive. Think of your subwoofer like a muscle; if you skip the warm‑up, it’ll fatigue fast.
We’ve seen the same rattles and hiss creep in months after a build, even when the install was flawless. A quick check‑in schedule can save you a trip to a shop and keep the bass steady.
Routine Checks
Every few weeks, pull out your truck, sit in the driver seat, and give the system a quick look‑over. You’re not hunting for faults; you’re just confirming everything’s still in place.
Power and Grounding
First, locate the fuse that feeds the amp. A blown fuse is the most common culprit when the sub suddenly goes dark. Check the fuse holder for a clean connection and replace if the metal contacts look corroded.
Next, confirm the ground strap is snug on a bare metal chassis spot. If the strap’s paint‑covered or rusted, a faint hum will seep through the low‑end. A solid ground eliminates that ghostly noise.
Signal Integrity
Run a quick visual scan of the RCA and power cables. Look for pinched, frayed, or kinked sections. If a cable is bent more than 90°, the insulation can break down and introduce interference.
Use a cable test light or simply unplug the sub, plug a different line from a known good source, and see if the hum disappears. Switching cables is a cheap way to rule out a bad connection.
Physical Condition
Check the enclosure for any loose panels or gaps in the sealant. A cracked seal can let air leak, making a sealed box feel airy and losing punch. If you spot a gap, re‑apply silicone sealant and let it cure overnight.
Also, inspect the vibration isolation pads. Over time, rubber can compress and lose effectiveness, turning the sub into a resonant speaker instead of a clean thumper.
Common Symptoms and Fixes
Ever notice a weird hum when you crank up the bass? That’s usually a grounding issue or a noisy power feed.
When you hear distortion at high volumes, double‑check the amp’s gain setting. Push the gain until you hear the first crackle, then dial back a few dB. The sweet spot is just before distortion starts.
If the bass feels thin or distant, it could be a phase mismatch. Flip the sub’s phase switch or swap the positive and negative leads, then test again. A tighter thump usually means the phase is correct.
Power loss during a drive often points to a loose connection at the alternator or a poor ground. Tighten all bolts on the power connector and ensure the ground strap is still snug.
Maintain a Log
Keeping a simple log sheet in your glove box helps you track trends. Note dates, observed issues, and any changes you made. Over months, you’ll see patterns—perhaps a specific weather condition triggers a hum, or a certain track causes distortion. Those clues guide future tweaks.
Include columns for:
- Inspection Date
- Fuse Status
- Ground Condition
- Cable Condition
- Sound Notes
This record turns a vague “the bass feels off” into actionable data.
When in Doubt, Watch a Quick Demo
Sometimes a visual refresher is all you need. Check out this video that walks through cleaning, cable inspection, and basic troubleshooting steps for truck subwoofers. https://www.youtube.com/watch?v=_w6G6OiQycA
Following this routine will keep your truck sounding like a concert hall for miles. Remember, a well‑maintained system is the key to a happy driver and a happy sound.
FAQ
How do I choose the right enclosure for my truck?
Think of the enclosure like a seat cushion—it shapes how the bass sits. A sealed box keeps the lows tight and punchy, great for small cabins. If you want a deeper boom, go ported and tune the port length to your sub’s resonant frequency. Measure the depth you have and pick a box that fits snugly; an oversized enclosure just turns a good sub into a loud, muddy mess.
What gauge power cable should I use for a 400 W subwoofer?
For 400 W you’ll want 12‑AWG to keep voltage drop low. If you’re pushing 600 W, drop to 10‑AWG. Always double‑check the amp’s current rating. A good rule: the cable gauge should handle at least 20 % more than the amp’s max current. That buffer keeps the cable from overheating on long drives.
How do I keep the sub from rattling during turns?
Vibration‑isolation pads are the hero. Place a neoprene or rubber pad between the enclosure and the mounting plate. Tighten bolts to the manufacturer’s torque spec—usually 10–15 ft‑lb for truck subs. If the bolts feel loose after a few weeks, re‑torque them. A solid mount means the bass stays in sync with your music, not the steering wheel.
What’s the best way to ground the amplifier?
Ground the amp to a clean, bare metal spot on the chassis. Avoid painted or rusted areas—use a grounding strap or a dedicated grounding screw. A poor ground will turn a crisp thump into a hiss. If you notice a steady hum, pull the ground wire free and re‑attach it to a fresh metal point.
How often should I check the phase of my sub?
Phase issues show up as thin or distant bass. Flip the phase switch or swap positive/negative leads and re‑play a bass‑heavy track. Do this during each new installation or whenever you swap subs. If the thump tightens, you nailed the phase. If it still feels ghostly, double‑check the wiring continuity.
What simple log should I keep to spot trends?
In a small notebook or a spreadsheet, log date, fuse status, ground condition, cable health, and a quick note on the sound (“thump was muddy, maybe port length off”). Over months you’ll spot patterns—maybe a certain highway makes the bass feel thin. That data turns vague “the bass feels off” into a concrete tweak list.
Conclusion
We’ve walked through every bolt, wire, and tweak you’ll need to get that punchy boom rolling in your cab. The trick is keeping things organized and testing as you go.
First, double‑check your grounding—one bad contact and that clean thump turns into a hiss that lingers on every track. Next, run a quick tone test after every change; a simple bass‑heavy clip will reveal if your gain or phase needs a tweak.
When you hit the road, notice how the bass feels in different conditions—city stops, highway stretches, or a quick spin around a corner. That real‑world feedback is the best indicator that your system is tuned right.
Don’t forget to log your settings. A few columns—date, gain, low‑pass, phase—turns a vague “it sounds off” into a clear action plan for future tweaks. Treat it like a tuning journal—small adjustments add up over time.
So, what’s the big takeaway? Install with precision, test often, and keep a simple log. Your truck will sound like a personal concert hall, and you’ll feel that bass in every turn. Ready to feel the groove? Let’s get that sub humming. Remember, a well‑grounded amp and a tidy cable run are the silent heroes behind every thump.


