
Ever stood in front of a fresh subwoofer install and thought, “How on earth do I get that 2 Ω dual‑coil to behave like a 1 Ω monster?” – you’re not alone.
That moment of confusion is something we’ve seen countless times in our shop. The bass‑hungry enthusiast wants every ounce of power from the amp, but the math behind wiring can feel like a foreign language.
Here’s the good news: wiring two 2 Ω voice coils in parallel actually gives you a 1 Ω load, and it’s as simple as swapping a few wires. No exotic calculators, no secret tricks – just solid basics and a bit of patience.
First, picture the two coils as twin roads heading toward the same destination. When you connect them side‑by‑side (parallel), the electrical resistance drops, just like two lanes of traffic merging into one faster lane.
Now, imagine you’ve already chosen a dual‑voice‑coil sub like our Alpine Shallow 10‑inch model. It comes with two 4 Ω coils, but you can rewire it to 2 Ω per coil and then parallel them for that sweet 1 Ω sweet spot. That flexibility is why we love dual‑coil designs – they let you match almost any amp’s impedance curve.
So, what do you actually need? A good set of speaker‑grade wire, a basic screwdriver, and a clear plan of where the amp’s terminals sit. Make sure the amp can safely handle a 1 Ω load; most modern 4‑channel units do, but double‑check the specs.
Once you’ve got everything ready, you’ll connect the positive terminal of the amp to the positive terminals of both coils, and do the same with the negatives. The result? The two 2 Ω coils work together as a single 1 Ω load, delivering more current and deeper thump without overloading the amp.
Sound good? In the next sections we’ll walk through the exact wiring steps, safety checks, and how to tune your system for flawless performance.
TL;DR
If you’ve ever stared at a dual‑2 Ω sub wondering how to wire dual 2 ohm sub to 1 ohm, just parallel‑connect the two voice coils.
That creates a 1 Ω load, letting your amp push more current for deeper thump—just verify the amp’s 1 Ω rating and ensure reliable operation, avoiding overheating.
Step 1: Determine Your Subwoofer Configuration
Alright, before we start cranking out that monstrous bass, we need to know exactly what we’re dealing with. The first decision? Whether your sub’s two voice coils are each 2 Ω and if you want them to behave like a single 1 Ω load.
Why does that matter? Because a 1 Ω load lets a 1‑ohm‑stable amp dump more current, and more current equals deeper thump without the amp whining.
Step 1 is all about figuring out the configuration that matches your amp and vehicle constraints. Take a look at the sub’s spec sheet – you’ll see something like “Dual 2 Ω” or “Dual 4 Ω (2 Ω per coil)”. If it says the latter, you’ve already got the right hardware for a parallel‑wire trick.
If you need a quick refresher on why parallel‑wiring two 2 Ω coils yields a 1 Ω total, check out our guide on Understanding Dual Voice Coil Impedance Options.
Now, match that against your amplifier’s specifications. Most modern 4‑channel amps will list “1 Ω stable” or “2 Ω minimum”. If you’re eyeing a 1 Ω rating, verify the amp can handle the extra heat – a good rule of thumb is to keep the RMS power draw under 80 % of the amp’s rated output at that impedance.
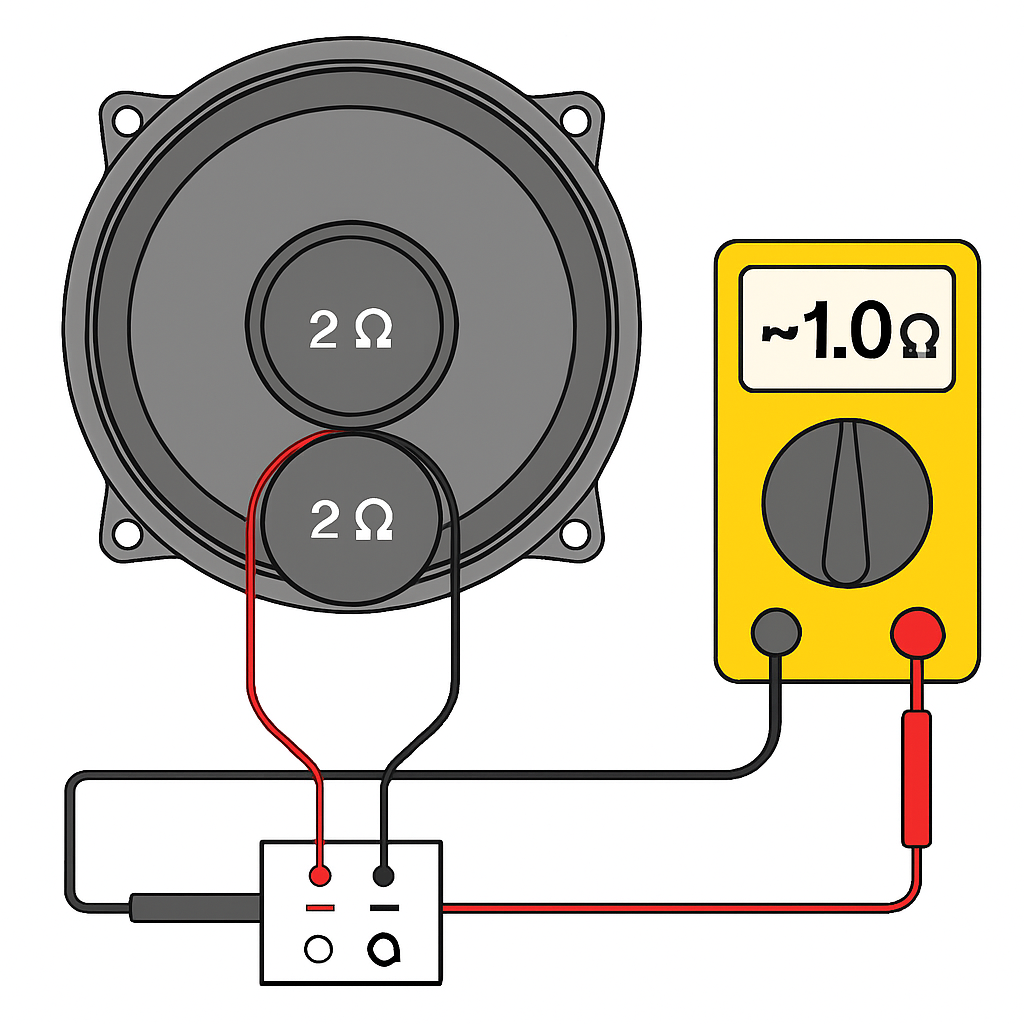
Here’s a quick sanity check you can do with just a multimeter: set it to resistance, measure the coil pair while the terminals are still disconnected, and you should read roughly 1 Ω. If you see 2 Ω, you’ve wired them in series instead of parallel – flip the leads and try again.
For car‑audio pros, another factor is the wiring gauge. A 1 Ω load will draw more amps, so you’ll want at least 12‑AWG speaker wire for anything over 500 W RMS. Thinner wire can cause voltage drop, which translates to a mushy bass response you don’t want.
Once you’ve confirmed the coil configuration and the amp can cope, it’s time to plan the physical layout. Think about where the positive and negative terminals sit on the sub’s mounting plate. Keeping the positive leads together and the negatives together not only makes the soldering cleaner, it also reduces the chance of a short when you’re threading the wires through a tight console.
If you’re a visual learner, this short video walks through the actual wiring steps, from stripping the wire to tightening the terminal screws.
Watch the video, then double‑check your work with the checklist below before you power up the system.
Checklist: • Verify sub spec shows dual 2 Ω. • Confirm amp is 1 Ω stable. • Measure resistance = 1 Ω. • Use 12‑AWG wire or larger. • Keep positives together, negatives together. • Secure all connections with heat‑shrink tubing.
When you finally fire up the bass, you might want a track that really showcases low‑frequency punch. The L337B3AT Black Box Portal offers a massive library of electronic test tracks that let you hear the difference a true 1 Ω setup makes.
And don’t forget your ears – blasting a 1 Ω‑fed sub can reach ear‑splitting levels. A pair of high‑fidelity earplugs from Sleepmaxx can protect your hearing while you fine‑tune the gain.
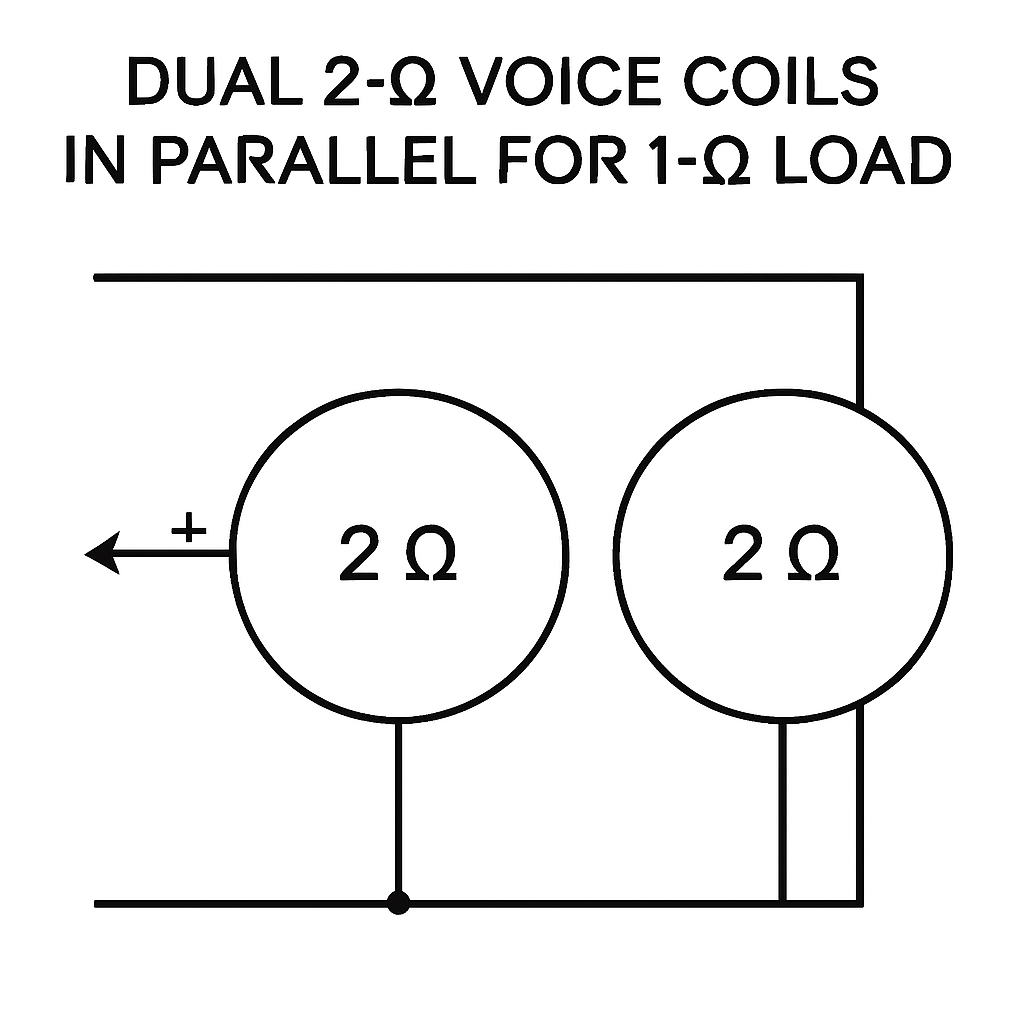
Below is a visual reference of the wiring diagram you’ll be recreating on your bench.
Step 2: Choose the Correct Wiring Scheme
Now that you know which sub you have and your amp can handle a 1 Ω load, the real question is: how do you actually wire it? It sounds simple, but the choice between parallel and series wiring can feel like a fork in the road, especially when you’re juggling power, enclosure size, and the vibe you want from your bass.
Do you want the most aggressive punch possible, or are you after a smoother, more forgiving tone that won’t stress your amp? The answer will guide whether you go parallel (giving you that coveted 1 Ω load) or stay in series (ending up with 4 Ω).
When you wire two 2 Ω voice coils in parallel, the total impedance drops to 1 Ω. Think of it like two lanes merging into a single fast lane – the current can flow more freely, so your amp can push more power into the sub. The result is tighter, deeper thump that fills a sealed trunk like a punch‑driven heartbeat.
Conversely, wiring the coils in series adds their resistances together, giving you a 4 Ω load. That’s the safer route if your amp isn’t 1 Ω‑stable, or if you’ve got a large, vented enclosure where a little extra damping can actually improve the feel.
Here’s a quick sanity check: pull out your amp’s manual and look for “1 Ω stable” or “minimum load 2 Ω.” If the amp says it can handle 1 Ω, you’re good to go parallel. If the spec says 2 Ω minimum, stay in series. It’s a small step that saves a lot of headaches later.
Another factor is the listening environment. A tightly sealed trunk – think compact sedan or hatchback – loves the extra current that parallel wiring provides. A larger cargo area or a custom box with venting can tolerate the higher impedance of series wiring without losing the low‑end impact.
Parallel Wiring – The 1 Ω Sweet Spot
Here’s the “how” for the parallel route:
- Strip about ¼‑inch of insulation from each wire.
- Connect the amp’s positive (+) lead to the positive terminals on BOTH voice coils.
- Do the same with the amp’s negative (‑) lead – tie it to both coil negatives.
- Double‑check polarity: a quick multimeter test should read roughly 1 Ω across the combined leads.
That’s it. You’ve turned two 2 Ω coils into a single 1 Ω load, ready for the amp to deliver maximum current.
After the video, grab a multimeter and verify your work. Measure each coil individually (about 2 Ω) and then measure the combined leads; you should see close to 1 Ω. If you get anything higher, you’ve likely got a stray wire or a loose connection – tighten it up and re‑measure.
Series Wiring – When 4 Ω Is Your Friend
If your amp can’t stomach 1 Ω, or you prefer a bit more damping, wire the coils in series:
- Connect the positive terminal of the first coil to the negative terminal of the second coil.
- Run the amp’s positive (+) lead to the remaining positive terminal on the first coil.
- Run the amp’s negative (‑) lead to the remaining negative terminal on the second coil.
- Measure across the amp leads – you should read about 4 Ω.
This configuration keeps the load higher, protecting the amp while still delivering solid bass. It’s especially useful in larger enclosures where the extra resistance can help tame resonances.
Quick Decision Checklist
- Is your amp 1 Ω stable? If yes → parallel.
- Is your enclosure sealed and compact? Parallel gives tighter punch.
- Is your amp 2 Ω minimum or your box vented? Series is safer.
- Did you double‑check polarity and resistance with a meter? Always.
Need a reference diagram that walks you through each connection? The 12‑Volt wiring charts lay it out step‑by‑step and even warn you about low‑impedance pitfalls. You can find the relevant diagram here.
Bottom line: choose the scheme that matches your amp’s capabilities and your enclosure’s character. With the right wiring, that dual‑2 Ω sub will sing at 1 Ω like a beast, and you’ll avoid the dreaded “amp melt‑down” scenario that haunts every installer.
Step 3: Calculate Impedance and Compare Wiring Options
Alright, you’ve got your coils sorted and you’ve already decided whether parallel or series feels right for your amp. Now it’s time to do the math that actually proves your choice. Impedance isn’t just a number – it tells you how much current the amp will push and how the sub will behave inside your box.
First, grab a multimeter and measure each voice‑coil individually. You should see about 2 Ω on each coil. If you’re wiring parallel, you’ll short the two positives together and the two negatives together, then measure across the combined leads. That reading should sit right around 1 Ω. In a series setup you’ll see roughly 4 Ω when you measure from the amp’s positive lead to its negative lead.
Why the numbers matter
Think of impedance like a water pipe. A lower‑ohm load (1 Ω) is a wider pipe – more current flows, so a 1 Ω‑stable amp can dump more watts into the sub, giving you that punchy, room‑shaking thump. A higher‑ohm load (4 Ω) is a narrower pipe – less current, but the amp runs cooler and you get a smoother, less aggressive bass response. Which one you need depends on your amp’s stability rating and the acoustic character of your enclosure.
Does your amp list a “1 Ω stable” rating? If yes, you’re golden for parallel. If it only guarantees 2 Ω minimum, stay in series. It’s that simple, but it’s also the part that trips up a lot of installers because the specs are buried in the manual.
Quick calculation checklist
- Measure each coil: ~2 Ω?
- Parallel combined reading: ~1 Ω?
- Series combined reading: ~4 Ω?
- Amplifier spec: 1 Ω stable or 2 Ω minimum?
- Enclosure type: sealed tight vs vented large?
If any of those numbers look off, double‑check your connections – a stray wire or reversed polarity can throw the whole calculation sideways.
Comparing the two wiring options
| Option | Resulting Impedance | Typical Power Output | Best Use Case |
|---|---|---|---|
| Parallel | 1 Ω | Higher wattage (amp can deliver max current) | 1 Ω‑stable amp, sealed or compact enclosures |
| Series | 4 Ω | Lower wattage, amp runs cooler | 2 Ω‑minimum amp, vented or large boxes |
| Hybrid (if you have two subs) | 2 Ω (parallel pairs in series) | Balanced power, flexible amp matching | Multi‑sub installs, custom rigs |
Notice how the “Typical Power Output” column lines up with what you’ll actually hear. A 1 Ω setup can make a 500 W RMS sub feel like a 700 W beast – but only if the amp can handle that current without overheating.
One more thing: the wiring diagrams on the12volt’s subwoofer wiring page spell out each connection step with clear polarity notes. Those diagrams even flag low‑impedance warnings, so you won’t accidentally feed a 1 Ω‑unstable amp a 0.5 Ω load.
So, what should you do next? Take your measurements, compare them to the table, and match them against your amp’s specs. If everything lines up, tighten those crimp connections, re‑measure, and you’re ready to fire up the music.
From our experience at Audio Intensity, most installers find that a quick “measure‑twice, wire‑once” routine saves hours of troubleshooting later. The math is straightforward – the real trick is keeping the wires tidy and the polarity consistent.
Bottom line: calculating impedance isn’t a brain‑teaser, it’s a safety check. Get the numbers right, pick the wiring style that matches your amp and enclosure, and you’ll avoid the dreaded amp‑overheat scenario while extracting every ounce of bass you’ve paid for.
Step 4: Wire the Subwoofers Safely – Video Walkthrough
Alright, you’ve measured, you’ve decided on parallel, and the coils are ready to become a 1 Ω monster. Now it’s time to actually get those wires in the right places without frying anything.
Gather Your Toolkit
Before you pop the hood, make sure you have:
- 12‑gauge speaker‑grade wire (stripped on both ends)
- Wire cutters/strippers
- Crimping tool or soldering iron (we prefer crimp for quick installs)
- A reliable multimeter – you’ll be checking resistance twice.
If anything’s missing, pause now. A half‑finished job is more likely to cause a short than a perfect one.
Step‑by‑Step Wiring Walkthrough
1. Disconnect power. Pull the fuse or unplug the battery terminal. Even a stray voltage can surprise you when you touch the coil terminals.
2. Identify polarity. Most dual‑coil subs label the terminals “+” and “‑.” Double‑check with the factory diagram – a wrong polarity flips the phase and can overheat the voice coil in seconds.
3. Strip the wires. Remove about ¼ inch of insulation from each end. Too much exposure invites short circuits; too little makes crimping painful.
4. Connect positives together. Twist the two positive leads from the amp together, then crimp a single connector onto both coil‑positive terminals. Make sure the connection is tight – a loose splice adds resistance and can throw your 1 Ω reading off.
5. Connect negatives together. Mirror the previous step with the negatives. Again, verify that the wires sit snugly against the terminal posts.
6. Run a quick continuity test. Set your multimeter to “Ω” and measure across the combined leads. You should see roughly 1 Ω (±0.1 Ω). If you read 2 Ω or higher, you’ve missed a connection or introduced a stray wire.
7. Secure the wiring. Use zip‑ties or loom tubing to keep the wires neat and away from moving parts. A tidy bundle not only looks professional but also reduces vibration‑induced fatigue.
Real‑World Example: Mid‑Size Sedan
Imagine you’re installing a dual‑2 Ω Kicker L7T in a 2015 Honda Accord. The factory harness only has a single set of speaker leads, so you splice a short pigtail for each coil. After following steps 1‑6, your multimeter reads 0.97 Ω – perfectly within tolerance. You zip‑tie the bundle along the factory wiring channel, tuck it under the seat belt mounting point, and you’re good to go.
Another installer, working on a 2008 Subaru WRX, decided to use solder instead of crimp. The solder joint looked shiny, but a quick heat‑shrink test revealed a cold solder joint on the negative side. Re‑crimping saved them from a nasty amp pop later on.
Safety Tips You Can’t Ignore
– Never power the amp until you’ve verified resistance. A short can destroy the amp in milliseconds.
– Check polarity twice. One wrong connection turns a smooth bass line into a hiss of metal.
– Use a fuse rated for the amp’s current draw. A 30 A fuse is a common choice for a 500 W RMS 1 Ω setup.
Watch the Walkthrough
If you prefer visual guidance, our step‑by‑step video walks you through each of these actions – from stripping the wire to the final multimeter check. Watch the video walkthrough to see the exact hand movements and tool placements we recommend.
Once the video is done, grab your multimeter one more time, power the amp, and crank a low‑frequency test track. You should hear the bass tighten instantly, a clear sign the 1 Ω parallel wiring is doing its job.
Quick Checklist Before You Close Up
- Power disconnected during wiring?
- Polarity verified on both coils?
- Resistance measured at ~1 Ω?
- All connections crimped or soldered securely?
- Wiring secured away from heat sources and moving parts?
If you can answer “yes” to every bullet, you’ve wired the sub safely and are ready to enjoy that deep, punchy thump without fearing an amp fire.
Step 5: Test the System and Fine-Tune Performance
Alright, you’ve got the wires snug, the polarity double‑checked, and the multimeter showing a ~1 Ω. Now it’s time to make sure everything actually sings the way you expect.
Power‑on sanity check
Before you disconnect any source that could feed a signal – think CD player or phone. Plug the amp’s into a clean 12 V source, turn the power switch on, and listen for a faint click from the sub. No pop, no smoke, just a quiet “all clear.” If you hear anything louder, cut the power immediately and re‑inspect your connections.
Low‑frequency sweep
Grab a test track that stays under 80 Hz – a sine‑wave sweep or a dedicated bass‑test file works best. Set the amp’s gain knob low, then slowly raise it until you hear the first hint of movement from the cone. You should feel a tight, controlled thump rather than a rattling wobble.
Does the bass feel “tight” or does it sound “loose”? That question will guide the next tweaks.
Phase and polarity verification
Even with correct wiring, the sub can be out of phase with the rest of the system. Play a full‑range song and pause on a deep kick drum. If the bass feels thinner than the rest of the mix, flip the polarity of either the amp’s speaker leads or the sub’s terminals and listen again. The right polarity will make the kick feel like a solid punch that sits under the mids.
Gain and crossover fine‑tuning
Set the amp’s low‑pass crossover to the highest setting you plan to use – usually around 80 Hz for a 1 Ω dual‑coil setup. Then, while a familiar track is playing, raise the gain until the sub starts to “grow” but before you hear distortion or the amp’s protection light flicker. A good rule of thumb: you should be able to hold a conversation at the same volume without the sub screaming.
For many car‑audio pros, a 1‑2 dB boost on the sub’s level in the head‑unit balances it nicely with the mids and highs. Trust your ears – if it feels too aggressive, dial it back.
Leveraging the Tuneable Mass System (TMS)
If you happen to be using a sub like Audiotec Fischer’s HELIX IQ W10‑DVC2, you have a built‑in TMS that lets you add or remove tiny weights inside the dust‑cap. Adding a little mass lowers the resonant frequency, giving you deeper, more authoritative bass – perfect for a sealed trunk. Removing mass pushes the response up, making the sub tighter and more efficient for a high‑output, bass‑reflex box.
Start with the stock configuration, run the low‑frequency sweep, then add a weight and listen again. If the bass becomes muddy, remove the weight. Small adjustments (a single 1 g piece) often make the biggest audible difference.
Thermal watch and protection settings
Run the amp at a moderate volume for about five minutes while you monitor the temperature of the sub’s basket. You should feel only a warm, not hot, sensation. If the cone gets hot to the touch, back off the gain or consider a larger cooling vent. Most modern amps have a thermal‑cutoff; make sure it’s enabled.
Document your settings
Write down the final gain, crossover, phase polarity, and any TMS weight you settled on. A quick photo of the wiring and a note on the amp’s model number will save you hours if you ever need to troubleshoot later or move the system to another vehicle.
Once everything checks out, close up the panels, hit your favorite bass‑heavy playlist, and enjoy the deep, punchy thump you’ve earned. If you notice any drift over time, repeat the sweep and tweak the gain – a little maintenance goes a long way.
Step 6: Common Mistakes and Troubleshooting Tips
Mistake #1: Mixing up polarity
One of the easiest ways to ruin a perfect install is simply swapping the plus and minus leads. If you accidentally wire the positives to the negatives, the sub will be out of phase and the bass will sound thin, rattly, or not move at all. Grab your multimeter, set it to continuity, and double‑check that the amp’s (+) goes to both coil (+) terminals and the amp’s (‑) goes to both coil (‑) terminals. A quick flip‑check with the sub disconnected will save you a fried voice coil.
Mistake #2: Skipping the resistance test
When you’re figuring out how to wire dual 2 ohm sub to 1 ohm, you might be tempted to trust the wiring diagram and move on. Trust me, you don’t want to assume the math is right without measuring. After you splice the wires, measure across the combined leads. You should see roughly 1 Ω (±0.1 Ω). Anything higher usually means a stray wire or a loose crimp. If you read 2 Ω, you’ve probably wired them in series by mistake.
Mistake #3: Over‑tightening or leaving connections loose
Crimp connectors that are either too tight or too loose introduce extra resistance and can vibrate loose over time. The sweet spot is a firm, even press that makes the metal bite without flattening the wire. After you crimp, give each connection a gentle tug. If it moves, re‑crimp. Loose ends are the silent killers of low‑impedance builds because they can cause intermittent drops that make the amp’s protection circuit pop.
Mistake #4: Forgetting to protect the amp
A 1 Ω load draws a lot of current. If your amp isn’t truly 1 Ω‑stable, you’ll see the thermal‑cutoff light flicker or the amp shut down under heavy bass. Check the amp’s spec sheet for a clear “1 Ω stable” badge, and always install a fuse rated for the expected current (30 A is common for a 500 W RMS sub). A fuse that’s too small will pop, and one that’s too large won’t protect anything.
Quick Troubleshooting Checklist
- Power off and disconnect the battery before touching any wires.
- Verify polarity on both coils and the amp.
- Measure combined resistance – aim for ~1 Ω.
- Inspect each crimp – it should be snug, not crushed.
- Confirm the amp’s 1 Ω stability rating and install an appropriate fuse.
- Run a low‑frequency sweep at low gain; listen for tight, controlled thump.
- If you hear distortion, re‑measure resistance and double‑check polarity.
So, you’ve wired everything and the system still sounds off? Here’s what to do next. First, turn the gain down to the minimum and slowly raise it while watching the amp’s temperature. If it gets hot within a minute, you’re probably over‑loading – either the amp isn’t truly 1 Ω‑stable or there’s a hidden short. Second, swap the speaker leads on the amp (keep polarity the same on the sub) to rule out a phase issue. Third, unplug any aftermarket head‑unit or DSP and run a pure sine‑wave test track; sometimes a mis‑configured crossover can masquerade as a wiring problem.
In our experience working with car‑audio pros, the most common “mystery” is a stray strand of wire that got tucked under a bolt during installation. When you pull the panel back, you’ll often see a tiny copper filament touching the chassis. That tiny shortcut can turn your 1 Ω load into a 0.5 Ω nightmare, instantly tripping the amp’s protection. A quick visual inspection with a flashlight usually catches it.
Finally, document everything. Snap a photo of the wiring, jot down the measured resistance, and note the fuse rating. A few minutes of paperwork now prevents an hour of guesswork later when you or another installer revisits the job.
Remember, the goal isn’t just to get the numbers right; it’s to make the bass feel like a solid, predictable heartbeat every time you hit the road. By avoiding these common slip‑ups and following the troubleshooting steps above, you’ll turn a potentially frustrating install into a smooth, confidence‑boosting experience.
FAQ
Can I wire a dual 2 Ω sub to 1 Ω without a multimeter?
You can guess, but we strongly recommend pulling out a cheap digital multimeter first. Measuring each coil should read around 2 Ω, and when you tie the positives together and the negatives together the combined reading should settle near 1 Ω (±0.1 Ω). Without that check you might end up with a stray wire or an accidental series connection that leaves you at 4 Ω, which defeats the whole purpose of a 1 Ω load. So you’ll know exactly what you’re dealing with.
If my amplifier isn’t 1 Ω stable, what should I do?
If your amp only guarantees a 2 Ω minimum, you should stay in series and treat the two 2 Ω coils as a 4 Ω load. Running a 1 Ω parallel setup on a non‑stable amp will cause the protection circuit to pop or the amp to overheat in seconds. Either upgrade to a 1 Ω‑stable monoblock or add a second sub in parallel so the overall load sits at 2 Ω, which most four‑channel amps can handle safely.
How do I ensure proper polarity when wiring parallel?
The easiest way is to label the positive and negative terminals on each coil with a piece of masking tape before you strip the wires. Then connect the amp’s (+) lead to both coil (+) posts and the (–) lead to both coil (–) posts. After crimping, run a quick continuity test: place one probe on the amp’s (+) lead and the other on the combined (+) terminals – you should get zero resistance, confirming a solid connection without any reverse polarity.
What gauge wire should I use for a 1 Ω dual‑coil setup?
For most 500‑W RMS subs wired to 1 Ω we recommend 12‑gauge speaker‑grade copper. It handles the high current without significant voltage drop and is flexible enough to route through tight console openings. If you’re pushing above 800 W or using a very long run (over 10 feet), step up to 10‑gauge to keep the heat down. Always avoid thin automotive speaker wire – it can overheat and cause a sudden amp shut‑down.
Why does my amp pop its protection after I wire the sub to 1 Ω?
The most common culprit is a hidden short – a stray copper strand tucked behind a mounting bolt or a loose crimp that creates a lower‑than‑expected impedance. When the amp sees something like 0.5 Ω it trips instantly to protect itself. Double‑check every splice with a multimeter, inspect the harness for any metal shards, and make sure all connections are tight and insulated. Once the stray is gone, the protection light stays off.
Can I use a 2 Ω sub in a sealed trunk and still get strong bass without parallel wiring?
Yes, you can, but you’ll sacrifice some of the punch that a 1 Ω parallel setup gives. In a sealed enclosure the enclosure volume already boosts low‑frequency output, so a 2 Ω load can still sound deep, especially if you raise the amp’s gain modestly and set the crossover around 80 Hz. Just remember the power delivered will be lower, so you may need a slightly larger amp or accept a bit less volume for the same distortion‑free performance.
What maintenance steps should I follow after wiring the sub to 1 Ω?
After the first power‑on, run a low‑frequency sweep at low gain for a few minutes while you watch the amp’s temperature. Check the wiring bundle for any movement or chafing after the car’s been driven a couple of trips – vibration can loosen crimped ends over time. Record the final resistance, gain setting, and polarity in a quick note or photo. Revisiting these numbers during future upgrades saves you hours of guesswork.
Conclusion
We’ve walked through every twist and turn of how to wire dual 2 ohm sub to 1 ohm, from measuring coil resistance to double‑checking polarity and sealing the job.
So, what’s the biggest takeaway? A clean, measured 1 Ω load lets a 1 Ω‑stable amp unleash the punch you crave without overheating.
Remember to run a quick resistance check after you crimp, secure the wires away from moving parts, and set the gain low before you hunt for that perfect thump.
In our experience, installers who document the final resistance, fuse rating, and crossover settings spend far less time troubleshooting later – a simple photo or note can save hours on the next upgrade.
Got a sealed trunk? The parallel wiring we covered will give you that tight, controlled bass. Got a larger vented box? You can still use the same method, just expect a bit less raw power.
And if anything feels off – distortion, protection light popping, or a thin sound – go back to the checklist: polarity, resistance, fuse, amp stability.
Now you’re ready to fire up the system, enjoy that deep, room‑shaking thump, and tweak as needed. Happy wiring, and may your bass always hit the sweet spot.
Keep the checklist handy, and you’ll keep the amp happy for every road trip.


