
Ever stood in your garage, staring at two fresh subwoofers and wondered if you could squeeze every ounce of power out of a single amp?
You’re not alone. Most car‑audio enthusiasts hit the same roadblock when they want the thunder of two subs but only have one amp that likes to run at 1 Ω.
The good news? It’s totally doable, and the trick is all about how you wire those dual‑voice‑coil (DVC) speakers together. In our experience at Audio Intensity, we’ve seen installers turn a pair of 4‑Ω DVC subs into a clean 1‑Ω load without sacrificing sound quality.
First, you need to know the basics: each sub’s voice coil can be treated like a separate speaker. When you connect two coils in parallel, their impedances halve; when you connect them in series, they add up. So, two 4‑Ω coils in parallel become 2 Ω, and two of those 2 Ω combos in parallel finally land you at 1 Ω.
Here’s a quick mental picture: imagine you have two ARC Audio 10‑inch subs, each with dual 4‑Ω voice coils. You wire the left coil of the first sub in parallel with the left coil of the second, and do the same with the right coils. Then you tie the two parallel pairs together in parallel again. The result? One solid 1‑Ω load that your monoblock amp can see, delivering that deep, chest‑rattling boom you’re after.
But don’t forget the practical bits: make sure your amp is rated for 1 Ω operation, use high‑quality speaker wire that can handle the current, and double‑check polarity so you don’t end up with a phase cancellation that kills the bass.
So, if you’ve been hesitating because the math looked scary, take a breath. We’ve broken it down to a handful of simple steps, and with the right wiring you’ll hear that extra punch without any guesswork.
Ready to get your hands dirty? Let’s dive into the step‑by‑step guide that walks you through each connection, the tools you’ll need, and the safety checks that keep your install clean and reliable.
TL;DR
Wire two dual‑voice‑coil subs in parallel pairs, then parallel those pairs together, turning four 4‑Ω coils into a single 1‑Ω load your amp can handle. Make sure your amplifier is rated for 1 Ω, use thick gauge wire, and double‑check polarity to avoid phase cancellation and enjoy deeper, tighter bass instantly.
Step 1: Determine Subwoofer Impedance and Power Requirements
Ever stared at the spec sheet of a dual‑voice‑coil sub and thought, “How on earth do I get this beast to play nice with my 1 Ω amp?” You’re not alone. The first thing we do is strip the math down to what really matters: impedance and power handling.
Grab a calculator, but don’t let the numbers scare you. Each coil is its own little speaker. If you have two 4‑Ω coils on a sub, wiring them in parallel drops the load to 2 Ω. Do that for both subs, then parallel those two 2‑Ω groups again and you land at a sweet 1 Ω that your monoblock can see.
Check the amp’s rating first
Does your amplifier say it’s 1 Ω stable? If you’re unsure, look for a rating label or the user manual. Running a non‑1 Ω amp at 1 Ω can fry it faster than a cheap grill on high heat. If you’re on the fence, the dual‑voice‑coil impedance options guide walks you through the safe‑load charts for most popular brands.
Pro tip: always add a 2‑amp fuse as close to the battery as possible. It’s a tiny step that saves a lot of heart‑ache later.
Match power handling
Now, look at the RMS rating of each sub. Say you have two 500 W RMS 4‑Ω subs. In a 1 Ω configuration, the amp can push roughly the sum of both RMS values, so you’re looking at around 1 000 W total. That’s the sweet spot for a deep, controlled boom without clipping.
But don’t just throw any amp at it. A monoblock that can deliver 800 W RMS at 1 Ω is a better match than one that’s only good for 400 W. You’ll hear the difference instantly.
Wire gauge matters
When you’re pulling that much current, the wire size becomes critical. For a 1 Ω load at 800 W, you’re looking at roughly 30 A of current. Use at least 4‑gauge speaker wire, maybe even 2‑gauge if you have a longer run. Thin wire will heat up, cause voltage drop, and mute the bass you worked so hard to get.
And remember to keep polarity consistent – all “+” terminals together, all “–” terminals together. A quick polarity check with a multimeter saves you from a dreaded phase cancellation that makes your bass sound like a whisper.
Test it with music you trust
Once everything’s hooked up, fire up a track that really tests the low end. The high‑resolution test tracks on L337B3AT give you that sub‑sonic punch you need to confirm the 1 Ω load is behaving as expected.
If the bass feels tight and the amp stays cool, you’ve nailed it. If you hear distortion, double‑check your wiring and gauge.
While the video walks you through the actual solder‑free crimping method, keep this checklist handy:
- Confirm amp is 1 Ω stable.
- Calculate total RMS power you’ll draw.
- Choose 4‑gauge (or thicker) speaker wire.
- Wire both subs in parallel‑parallel configuration.
- Secure a fuse within 18" of the battery.
- Verify polarity before powering up.
Having a solid plan before you start keeps the install smooth and the bass thunderous.
Finally, when you publish your install guide or post photos online, don’t forget the little things that bring more traffic to your shop. A quick read on SEO tips for car‑audio installers can help you rank higher in local searches, so more enthusiasts find your expertise.
Take a breath, double‑check each connection, and then crank up that bass. You’ve turned a confusing impedance puzzle into a clean 1 Ω powerhouse – and that’s the kind of win every car‑audio hobbyist loves.
Step 2: Choose the Correct Wiring Configuration
Now that you know the impedance each coil presents, the next decision is how to connect them so the amp sees a clean 1 Ω load.
The good news is there are only two wiring topologies you need to master: parallel and series. In a parallel pair the voltage stays the same but the current capacity doubles, which is exactly what you want when you’re chasing that low‑ohm sweet spot.
In a series chain the voltage adds up while the current stays constant – handy when your amp can’t go lower than 2 Ω but you still need to split power between two subs. For a 1 Ω target, you’ll be stacking two parallel groups together, essentially “parallel‑of‑parallel.”
Step‑by‑step parallel‑of‑parallel wiring
Here’s the walk‑through we use on shop benches every day. Grab a wire cutter, a good set of crimp terminals, and a piece of 2‑ga copper that can handle the current your amp will push.
- Strip about 1 inch of insulation from each voice‑coil lead on both subs.
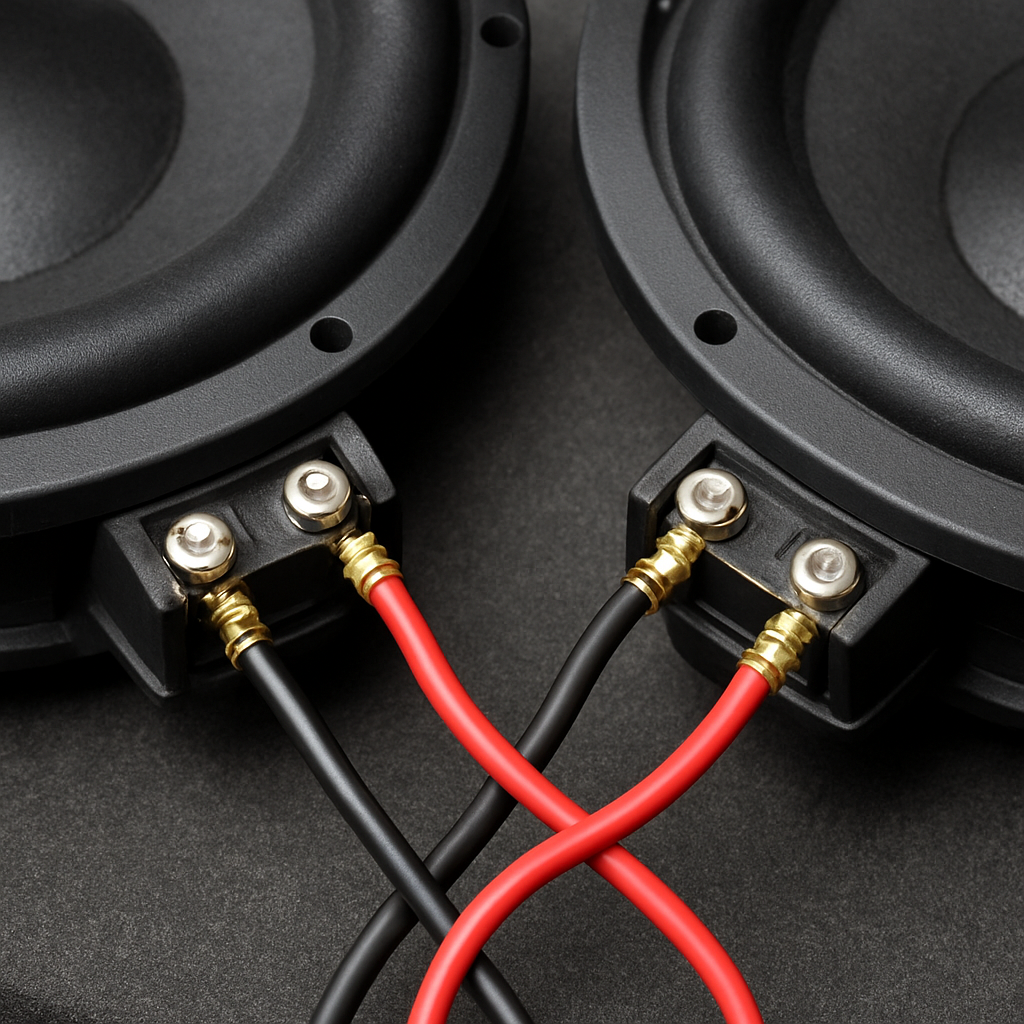
- Twist the left‑hand coil of Sub A together with the left‑hand coil of Sub B. This creates your first parallel pair.
- Repeat with the right‑hand coils – you now have two parallel pairs that each measure 2 Ω (if you started with dual 4‑Ω coils).
- Connect the two combined leads together: positive to positive, negative to negative. The result is a single 1 Ω load.
- Run a single, thick‑gauge (+/‑) pair from the amplifier’s output terminals to the junction point you just made.
Why does this work? Think of each pair as a two‑lane highway. By merging the lanes you double the traffic flow (current) without raising the speed limit (voltage). The amp sees the same voltage it expects, but it can deliver twice the current – perfect for a monoblock that loves 1 Ω.
When series might be your fallback
If your amp isn’t rated for 1 Ω, or if you’re dealing with a mixed‑impedance setup (say one sub is dual 4 Ω and the other is dual 2 Ω), series wiring can bridge the gap. In a series arrangement you connect the positive lead of the first coil to the negative lead of the second coil, then run the remaining free leads to the amp.
Series of two 4‑Ω coils gives you 8 Ω – not useful for low‑ohm amps, but series of a 4‑Ω pair with a 2‑Ω pair lands you at 6 Ω, which some newer amplifiers can tolerate. The key is to always check the amp’s minimum load rating before you settle on a series solution.
Real‑world tip: A friend who installs for a local car‑show crew once had a 2‑Ω monoblock and two 4‑Ω DVC subs. He wired each sub’s coils in parallel (2 Ω per sub) and then linked the two 2‑Ω legs in series, ending up with a safe 4 Ω load. The bass was still massive, and the amp stayed cool.
Quick decision table
| Configuration | Resulting Impedance | Best Use Case | Pros / Cons |
|---|---|---|---|
| Parallel‑of‑Parallel (4×4 Ω) | 1 Ω | Amplifier rated for 1 Ω | + Max power, – higher current demand; need thick gauge |
| Series‑of‑Parallel (4 Ω + 2 Ω) | 6 Ω | Amp minimum 4 Ω, mixed coil values | + Lower current, – reduced power; good for heat‑limited amps |
| Full Series (4+4 Ω) | 8 Ω | High‑impedance amp or sub‑woofer protection mode | + Very safe, – significantly less output; rare for bass‑hungry builds |
Before you snap any connectors, double‑check polarity. A flipped coil will cancel half the bass and leave you with a thin, “hollow” sound that no amount of gain can fix.
Finally, give the whole assembly a quick visual audit: all solder joints should be shiny, all crimps tight, and the wire bundle should be routed away from any sharp metal edges or moving parts. A tidy install not only looks professional; it also reduces the risk of a short that could fry your amp.
Once the wiring is solid, fire up a deep‑test track, watch the amp’s temperature gauge, and listen for that tight, controlled boom. If the amp stays within its safe temperature zone and the bass feels full, you’ve nailed the configuration.
Step 3: Connect the Subwoofers in Parallel for 1 Ohm
Alright, you’ve double‑checked the specs and you’ve already got your two parallel‑of‑parallel groups ready. Now comes the part where the magic actually happens – tying those groups together so the amp sees a clean 1 Ω load.
First thing’s first: grab a length of 2‑ga (or thicker) copper that can handle the current surge. If you’re using a 1 kW monoblock, you’re looking at peaks of 150 A or more, so don’t skimp on gauge.
Step‑by‑step wiring guide
1. Strip the wires. Cut about an inch of insulation off each voice‑coil lead on both subs. You’ll have four stripped ends – left‑positive, left‑negative, right‑positive, right‑negative.
2. Form the first parallel pair. Twist the left‑hand coil from Sub A together with the left‑hand coil from Sub B. Crimp a solid terminal over the twisted bundle – that’s your first 2 Ω leg.
3. Form the second parallel pair. Do the exact same thing with the right‑hand coils. You now have two identical 2 Ω legs ready for the final merge.
4. Merge the two legs. Connect the positive terminal of the left‑hand pair to the positive terminal of the right‑hand pair, and do the same for the negatives. When you solder or crimp those two connections together, you’ve created a single 1 Ω node.
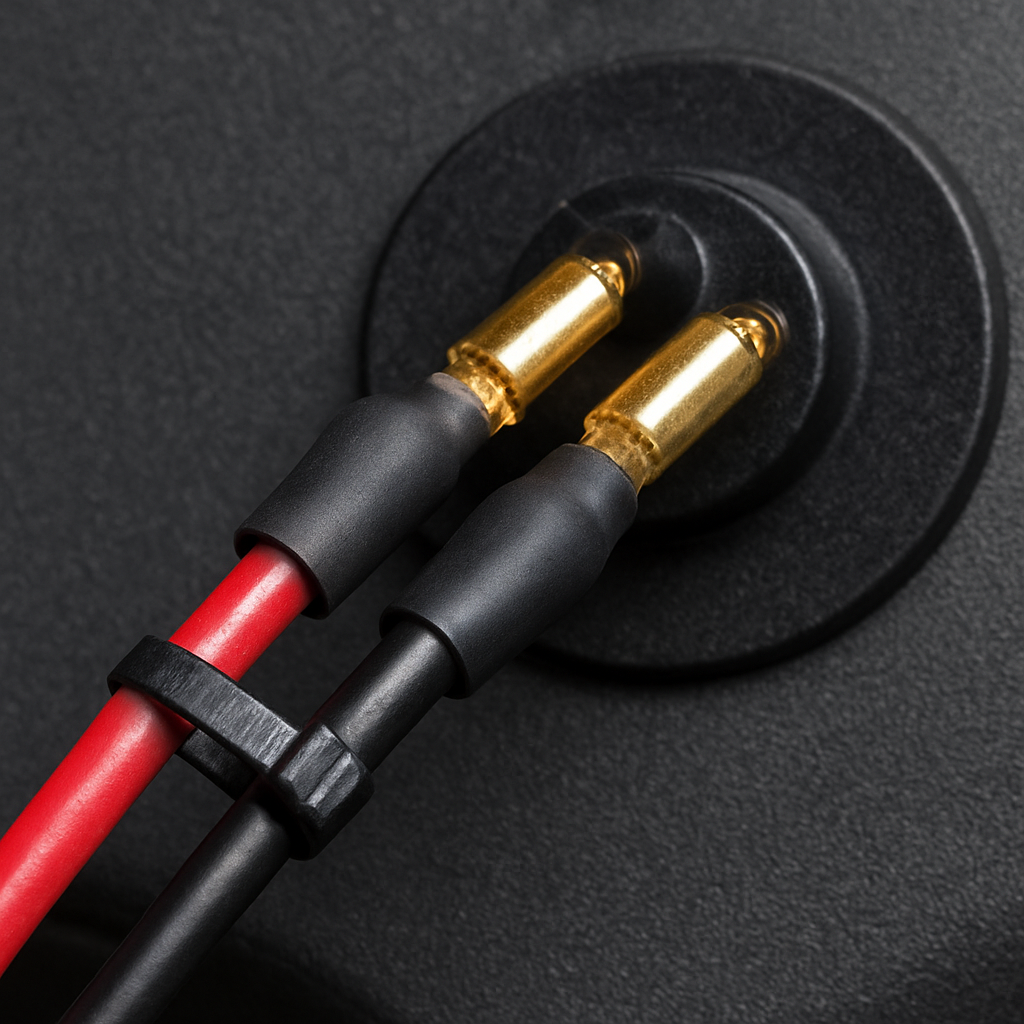
5. Run the main feed. From your amp’s output terminals, run a single thick‑gauge (+/‑) pair straight to the junction you just made. Keep the run as short as possible to minimize resistance, and route it away from any sharp metal or moving parts.
That’s it – the electrical picture is now a clean 1 Ω load. But before you start cranking the gain, let’s talk about a few practical details that keep the install reliable.
Polarity sanity check
Grab a multimeter and verify that each coil’s positive lead really is positive relative to its negative. A single flipped coil will cancel half the bass, leaving you with a thin, “hollow” sound that no amount of power can fix. If anything looks off, swap the leads and re‑measure.
Pro tip: label each stripped end with a piece of heat‑shrink tubing before you start twisting. It saves you a lot of head‑scratching later, especially when you’re working in a cramped trunk.
Heat & current considerations
Even though you’ve got a low‑impedance load, the amp still has to stay cool. After you hook everything up, fire up a deep‑test track (something with a long, sustained 30 Hz note) and watch the amp’s temperature gauge. If it climbs past the manufacturer’s safe zone within a few minutes, you might need a better heat sink or a higher‑rated fuse.
Another quick test: use a clamp‑meter to measure the current flowing through the main feed. At full 1 Ω power, you should see something in the 120–150 A range for a 1 kW amp. If you’re seeing less, double‑check your connections – a loose crimp can add unexpected resistance.
Final visual audit
Give the whole bundle a once‑over. All solder joints should be shiny, all crimps tight, and the wire bundle neatly bundled with zip‑ties. Keep the harness away from any sharp edges, exhaust pipes, or moving suspension components. A tidy install not only looks professional; it reduces the chance of a short that could fry your amp.
Once you’re satisfied, sit back, crank the amp to a modest level, and listen. You should feel a tight, controlled boom that stays in sync with the music rather than wobbling or distorting.
That video walks you through the exact crimping technique we use in the shop, so pause it, follow along, and you’ll have a rock‑solid 1 Ω connection in no time.
Quick checklist before you power up
- Strip and label all coil leads.
- Twist left coils together, right coils together.
- Merge the two parallel pairs into a single node.
- Run a single thick‑gauge (+/‑) feed from amp to node.
- Verify polarity with a multimeter.
- Check continuity and resistance (should read ~1 Ω).
- Inspect all crimps, tighten zip‑ties, keep wires clear of heat sources.
- Test with a deep‑bass track and monitor amp temperature.
If every item on that list checks out, you’ve successfully connected two subs in parallel for a 1 Ω load. Your amp can now unleash its full power, and the bass will hit the kind of chest‑rattling depth that makes every road trip feel like a concert.
Step 4: Secure Connections and Test the System
Alright, you’ve got those two parallel‑of‑parallel groups hanging together, but before you let the amp howl, you need to lock everything down so it stays rock‑solid when the bass hits hard.
Double‑check every crimp
Grab a pair of needle‑nose pliers and a good quality crimp tool. Each twisted pair should sit snug inside its terminal – no stray strands, no wiggle room. A tight crimp isn’t just tidy; it prevents resistance spikes that can mute the low end or, worse, fry the amp.
Give each terminal a gentle pull with the pliers. If it slides, re‑crimp and add a little more heat‑shrink tubing. We’ve seen a single loose crimp turn a 1 Ω load into something that reads 3 Ω on a multimeter – and the amp will complain.
Seal the connections
Once the crimps feel solid, slide a piece of heat‑shrink over each joint and fire it up. The shrink creates a moisture barrier and keeps vibration from loosening the metal over time. If you’re working in a truck bed, think about the extra jostle from bumps; the shrink is your insurance policy.
For extra peace of mind, run a short piece of silicone tubing over the whole bundle. It’s cheap, it looks clean, and it adds another layer of vibration‑dampening.
Polarity sanity check (again)
It’s easy to get confident after the first check, but a quick second pass with a multimeter never hurts. Set the meter to continuity, touch the probes to the positive and negative leads of the final node – you should get a clear beep and a reading of about 1 Ω.
If the meter flashes “OL” or you see a higher resistance, something’s still crossed. Flip the offending coil, re‑measure, and you’ll hear the difference instantly when you power up.
Route the main feed wisely
Take that thick‑gauge (+/‑) pair from the amp and run it straight to the junction you just built. Keep the run as short as possible – every extra inch adds a tiny bit of resistance. Secure the cable with zip‑ties every 6‑8 inches and keep it away from heat sources like the exhaust or the engine block.
If you have to cross other wires, do it at a 90‑degree angle and add a little extra zip‑tie cushioning. Crossed wires can act like a tiny antenna for EMI, which can introduce hiss into your bass.
Power‑up test routine
Now comes the fun part. Start the amp at a low gain, play a deep‑bass track you trust – think of a sustained 30 Hz sine wave or a classic sub‑test song. Watch the amp’s temperature gauge. In the first few minutes it should stay well below the “red” zone.
Grab a clamp‑meter and snap it around the main feed. At half‑power a 1 kW amp will show roughly 75‑80 A; at full tilt you might see 130‑150 A. Those numbers confirm you’re pulling the current the amp expects without bottlenecking the wire.
If the amp starts to climb into the red, pause, let it cool, and consider a bigger heat sink or a higher‑rated fuse. It’s better to add cooling than to push a hot amp into thermal shutdown.
Final visual audit
Step back and give the whole harness a once‑over. All zip‑ties should be snug but not cutting into the cable. No bare wire should be exposed, and the bundle should sit clear of any moving suspension components.
A tidy job not only looks professional; it also reduces the chance of a short that could ruin weeks of work. When everything looks good, crank the amp up a notch and listen for that tight, controlled boom you’ve been chasing.
Step 5: Troubleshooting Common Issues
So you’ve wired those two subs, you’ve got the thick‑gauge feed in place, and the amp’s humming nicely. But what if the bass sounds thin, the amp trips, or the temperature gauge creeps into the red? That’s where a bit of detective work saves you from a night‑long rewrite.
Check the actual impedance
First thing – grab a multimeter and measure the resistance at the final node. You should see close to 1 Ω (a few milliohms off is normal). If you read 2 Ω or higher, something’s still in series somewhere.
Common culprits: a stray wire left attached to the chassis, or a forgotten connector that’s still in the circuit. Unplug the amp, isolate the sub‑woofer harness, and measure again. If the reading drops to 1 Ω, you’ve found the rogue piece.
Polarity sanity check (again)
Even a single flipped coil can cancel half the bass, leaving you with a “hollow” sound that feels like you’re listening through a wall.
Set the meter to continuity, probe the positive of one coil against the negative of the same coil – you should get no beep. Then probe positive to positive across the two parallel pairs; you should hear a solid click. If you get a beep where you shouldn’t, swap that coil’s leads and re‑measure.
Watch the amp’s temperature and current draw
Run a deep‑bass track at half power and glance at the amp’s temperature gauge. If it’s already flirting with the red zone, you’ve got a heat‑or‑current problem.
Snap a clamp‑meter onto the main feed. For a 1 kW monoblock you’d expect 120‑150 A at full tilt. Anything noticeably lower suggests a high‑resistance connection; anything higher means you might be over‑loading the amp or using undersized wire.
Secure crimps and heat‑shrink
A loose crimp can add a few ohms of resistance, enough to throw the whole system off balance. Give each terminal a gentle pull with needle‑nose pliers – if it wiggles, re‑crimp and seal it with heat‑shrink tubing.
Vibration in a truck bed is relentless. A short length of silicone tubing over the entire bundle acts like a cushion, keeping the connections from rattling loose over time.
Fuse and power‑supply sanity
Did you install the fuse recommended by the amp’s manual? An under‑rated fuse will pop as soon as you hit a burst of bass, while an over‑rated one won’t protect the wiring at all.
Double‑check the fuse rating against the amp’s maximum current draw. If the amp trips at 80 A, you probably need a 150 A fuse and a beefier power‑in feed.
Diagnosing amp protection modes
Modern amps have built‑in protection – thermal, DC, and over‑current. If the amp shuts down after a few seconds, look at the protection LED (if it has one) or consult the manual.
Thermal protection? Let the amp cool, add a bigger heat‑sink, or improve airflow with a vented enclosure. DC protection? Make sure the ground strap is solid and that you haven’t introduced a ground loop with the sub‑woofer wiring.
Quick troubleshooting checklist
- Measure final resistance – aim for ~1 Ω.
- Confirm polarity on every coil.
- Check amp temperature and current draw with a clamp‑meter.
- Re‑crimp any loose terminals and seal with heat‑shrink.
- Verify fuse rating matches amp’s max current.
- Listen for “hollow” bass – a polarity issue.
- Review amp’s protection LED or error codes.
If you walk through this list and the bass still sounds off, it might be time to revisit the wiring topology. Sometimes a stray series link or an unexpected 2‑Ω sub can slip in unnoticed.
Remember, troubleshooting is less about “fixing” and more about confirming each assumption you made when you first wired the system. One measurement at a time, and you’ll have that thunderous, rock‑solid 1 Ω load humming perfectly.
FAQ
What does a “1 Ω load” actually mean for my two‑sub setup?
In plain terms, a 1 Ω load tells the amplifier how much resistance it’s pushing current through. When you wire two dual‑voice‑coil subs in a parallel‑of‑parallel configuration, the four 4 Ω coils combine to present roughly one ohm to the amp. That low impedance lets the amp deliver more current, which translates into louder, tighter bass – as long as the amp is rated for 1 Ω operation.
Can I use any gauge wire for a 1 Ω configuration?
Not really. The current can easily top 120 A on a 1 kW monoblock, so you’ll want at least 4‑ga copper for up to 150 A, and 2‑ga if you expect higher peaks or longer runs. Thicker wire reduces voltage drop and keeps the amp from heating up. Think of the wire like a highway: the wider it is, the smoother the traffic flow of current.
How do I check polarity to avoid that hollow‑bass sound?
Grab a multimeter, set it to continuity, and probe each coil’s positive and negative leads. All positives should read the same voltage relative to ground, and the negatives should match each other. If one coil is flipped, the waveforms cancel and you’ll hear a thin, “hollow” thump. A quick label‑and‑check routine before you crimp saves you a lot of re‑wiring later.
What fuse size should I pair with a 1 Ω dual‑sub install?
First, look at the amp’s maximum current draw at 1 Ω – most 1 kW monoblocks list around 150 A. Choose a fuse a bit higher than the continuous draw but lower than the wire’s rating; a 150 A to 200 A fuse is common. That protects the wiring while still allowing the amp to hit full power without tripping the fuse on short bursts.
Is it safe to run a 1 Ω load on a monoblock that’s only rated for 2 Ω?
No, it’s a recipe for overheating. An amp designed for 2 Ω expects half the current of a 1 Ω load. Feeding it double the current can trigger thermal protection or, worse, burn out components. If your amp isn’t explicitly rated for 1 Ω, either add a series resistor, reconfigure the subs for a higher impedance, or upgrade to a true 1 Ω‑capable amplifier.
What’s the simplest way to measure the final impedance before I power up?
Disconnect the amp, then place a multimeter set to resistance across the final node where the two parallel pairs meet. You should read close to 1 Ω – a few milliohms off is normal because of wire resistance. If you see 2 Ω or more, double‑check for stray series connections, a missed coil, or an accidental short to chassis ground.
If the amp trips into protection, what should I check first?
Start with the basics: verify the fuse is correct, confirm the final resistance is ~1 Ω, and re‑inspect polarity on every coil. Next, measure the amp’s temperature – if it’s already hot, add a larger heat‑sink or improve airflow. Finally, use a clamp‑meter to see if the current spikes beyond the amp’s rating; if it does, you may need thicker wire or a lower‑gain setting.
Conclusion
If you’ve made it this far, you now know exactly how to wire 2 subs to 1 ohm without guessing.
Remember the core steps: check each sub’s voice‑coil specs, parallel the matching coils, merge the two parallel pairs, use thick‑gauge wire, and double‑check polarity and resistance before you power up.
Why does that matter? A clean 1 Ω load lets a 1 kW monoblock deliver its full punch, giving you that chest‑rattling thump you’ve been chasing.
In practice, we’ve seen installers avoid costly heat‑sink upgrades simply by confirming the final resistance reads around 1 Ω and that every crimp is tight.
So, what’s the next move? Grab your multimeter, verify the ~1 Ω reading, fire up a deep‑bass track, watch the amp’s temperature, and enjoy the bass you’ve earned.
Got a hiccup? Go back through the troubleshooting checklist – polarity, loose crimps, fuse size – and you’ll usually pinpoint the issue in minutes.
And if you ever need a reliable 1 Ω‑rated amp or a DVC sub that fits your build, our catalog has options ready to ship.
Bottom line: careful planning, proper wiring, and a quick sanity check turn a daunting project into a straightforward win. Happy wiring!
Feel free to reach out if you hit any snags – we’re here to help you fine‑tune the sound.
