
Ever sat in your car, turned up the bass, and felt that low‑end rumble just wash over you, but also notice a harsh, tinny edge that makes the music feel muddy?
That moment is where a low‑pass filter steps in – it’s the quiet gatekeeper that lets only the deep frequencies through to your subwoofer while sending the higher tones elsewhere.
In plain English, a low‑pass filter (LPF) is like a sieve for sound: everything below a set cutoff point flows straight to the sub’s sweet spot.
Why does that matter for us car‑audio enthusiasts? Because without an LPF, your amp would be forced to handle a full‑range signal, wasting power on mids and highs that your sub can’t reproduce, and you’d end up with weak, distorted bass.
Think about installing a new Alpine Shallow 10" Subwoofer. You’ll set the LPF on your amplifier somewhere between 80 Hz and 120 Hz, matching the sub’s sweet spot. That way the sub focuses on what it does best – delivering punchy, clean lows.
And for the pros installing kits in a Mercedes, the Eton MBXLP low‑pass crossover does the heavy lifting automatically, letting you fine‑tune the cutoff without digging into complex menus.
But what if you crank the filter too high? Suddenly the sub tries to reproduce frequencies it’s not built for, leading to that dreaded “boomy” sound that masks vocals and instruments.
On the flip side, set it too low and you’ll miss out on the fullness that makes a track feel alive – the low‑end will feel thin, and you’ll wonder why your system sounds weak despite a massive amp.
So, the simple rule is: let the low‑pass filter define the boundary where your sub stops and the rest of the system takes over. That balance gives you tight, controlled bass without sacrificing clarity.
Ready to hear the difference? In the next sections we’ll walk through how to dial in the perfect cutoff for different sub sizes and vehicle setups, plus tips on tuning the phase and gain for that seamless blend.
TL;DR
A low‑pass filter lets your subwoofer handle the bass frequencies, preventing it from trying to reproduce mids and highs that cause boominess or thin sound. Set the cutoff between 80 Hz and 120 Hz for most car subs, and you’ll get controlled bass that blends with the rest of your audio system.
Understanding the Basics of Low Pass Filters
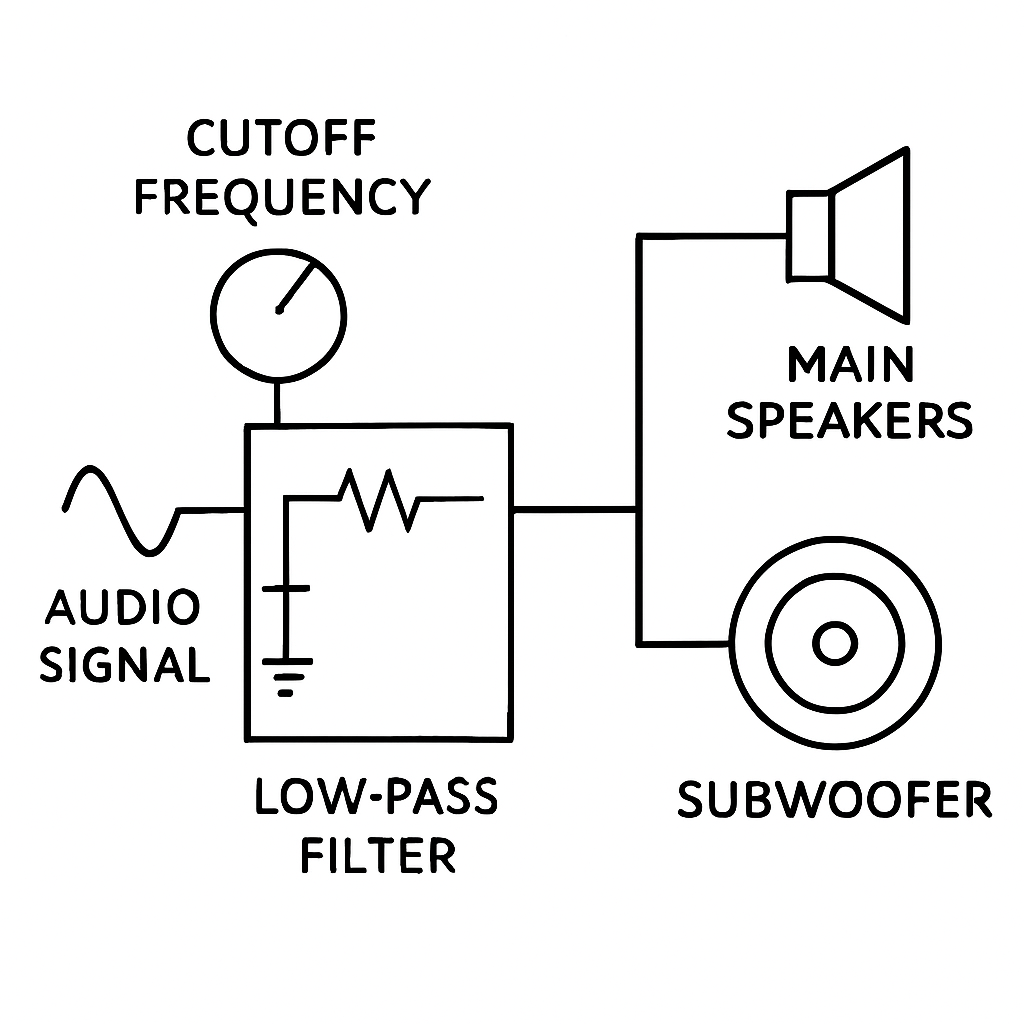
Ever wonder what a low‑pass filter actually does for your subwoofer? In plain terms, it’s the gatekeeper that decides which frequencies get to the sub and which get sent elsewhere.
Imagine you’re at a coffee shop and the barista only hands you the espresso shots you asked for, while the rest of the menu stays on the shelf. That’s exactly how a low‑pass filter works – it lets the deep, rumbling bass through and blocks the mids and highs that would otherwise muddy the sound.
How the filter shapes the signal
The filter has a single setting we call the “cutoff frequency.” Anything below that number sails straight to the sub, anything above it gets diverted to your main speakers. Set it too high, and the sub tries to reproduce frequencies it can’t handle, leading to that booming, indistinct mess we all hate.
Set it too low, and you’ll notice a thin, lifeless bass that never quite fills the cabin. The sweet spot usually lands somewhere between 80 Hz and 120 Hz for most car subs, but the exact number depends on the sub’s size, enclosure type, and the overall system balance.
Why the cutoff matters for different setups
If you’re installing a shallow‑mount Alpine 10‑inch sub, the driver’s natural roll‑off starts around 100 Hz. Pairing it with a cutoff just above that lets the sub shine without straining. For a larger sealed enclosure, you might push the cutoff a touch higher to capture more of the low‑end energy.
Professional installers often use a dedicated crossover like the Eton MBXLP for Mercedes applications because it automatically adjusts the filter based on the vehicle’s acoustics. It’s a handy tool that saves you from endless trial‑and‑error.
What does this mean for you, the DIY enthusiast? Start with the manufacturer’s recommended range, then listen. If the bass feels “boxy” or the vocals get swallowed, dial the cutoff down a few hertz. If the thump feels weak, nudge it up.
One practical tip: after you set the cutoff, double‑check the phase switch on your amp. A mismatched phase can make the bass cancel out, leaving you with a phantom thump that never quite lands.
Another thing to watch is the subsonic filter, which removes frequencies below what the sub can actually reproduce. This protects the amp from unnecessary load and keeps the overall system tidy.
When you’re fine‑tuning, grab a trusted track with a solid, steady bass line – something like “Billie Jean” or a classic rock anthem. Walk through the song, pause at the low notes, and adjust the cutoff until the bass feels tight yet full, and the rest of the mix stays clear.
Remember, the low‑pass filter isn’t a “set‑and‑forget” knob. As you change tires, add sound deadening, or swap speakers, the acoustic environment shifts, and you may need to revisit the setting.
A quick sanity check: if you tap the sub cone and hear a clear, deep thump without rattling, your cutoff is probably in the right ballpark.
Bottom line: the low‑pass filter decides where the bass ends and the mids begin. Get that boundary right, and your car audio will feel like a concert in a box, not a rumbling truck.
How Low Pass Filters Affect Signal Frequencies
When you crank up the sub and hear that low‑end start to smear, the culprit is often the way the filter is shaping the signal. A low‑pass filter (LPF) isn’t just a blunt switch; it’s a frequency‑shaping tool that decides exactly which part of the audio spectrum gets sent to your subwoofer and which part gets blocked.
In plain terms, the LPF creates a slope on the frequency graph. Below the cutoff point—say 100 Hz—the signal passes almost untouched, so the sub can move air the way it was designed to. Above that point, the filter gradually attenuates the signal, usually at 12 dB per octave or twice that if you select a steeper 24 dB/octave curve.
Why does the slope matter? Think of a gentle hill versus a steep cliff. A 12 dB/octave slope lets a little bit of the mid‑bass linger, which can make the transition from sub to main speakers feel natural. A 24 dB/octave slope, on the other hand, cuts off the higher frequencies almost dead‑on, tightening the bass but risking a tiny gap where the mids disappear.
Here’s where the magic shows up in a real‑world install. Imagine you’re fitting an Alpine Shallow 10‑inch sub in a compact sedan. You set the LPF to 95 Hz with a 12 dB/octave roll‑off. As you play a rock track, the kick drum lands solid, the bass stays tight, and the guitars stay clear. Raise the cutoff to 130 Hz and you’ll notice the sub trying to reproduce the guitar’s low strings—suddenly the bass feels “boxy” and the vocals lose definition. Dial it back, and the clarity returns.
Conversely, drop the cutoff too low—say 70 Hz—and you’ll starve the sub of the frequencies that give a track its punch. The bass will feel thin, like a whisper instead of a thump, especially on electronic music where the sub‑bass lives around 80 Hz.
Another subtle effect is phase interaction. When the LPF cuts off sharply, the phase of the signal can shift near the crossover point. If the sub and the mains are out of phase, you’ll hear a hollow or “cancellation” effect, especially on sustained notes. Most modern amplifiers let you flip the phase switch to align the waveforms, and a quick ear test—listening to a sustained bass note while toggling the switch—will reveal which setting sounds fuller.
What about the filter’s Q or resonance? Some LPFs include a small boost right at the cutoff, which can add a bit of extra thump. For most street‑ready setups, you want this boost muted; otherwise you risk “pumping” the sub as the music moves in and out of the cutoff zone. Keep the resonance low unless you’re chasing a specific studio‑monitor sound.
Quick checklist for tuning the LPF
- Start with a cutoff between 80 Hz and 120 Hz, matching the sub’s rated low‑frequency response.
- Choose 12 dB/octave for a smoother blend, or 24 dB/octave if you need tighter control in a very small enclosure.
- Play a familiar track with a strong kick and listen for the point where the bass starts to sound mushy or the mids become dull.
- Back off a few hertz until the bass feels punchy and the rest of the music stays clear.
- Flip the phase switch if you notice a hollow feeling, and double‑check the overall balance by lowering the mains a notch.
- Finally, verify that the sub and main speakers work together without any noticeable dip around the crossover point.
Bottom line? The low‑pass filter is the gatekeeper that shapes how much of the signal actually reaches the subwoofer. By understanding how cutoff frequency, slope, and phase interact, you can sculpt a bass response that’s tight enough for a fast‑lane cruise yet deep enough to make your favorite track feel alive. It’s not magic—just a few deliberate tweaks, and you’ll hear the difference the next time you hit the highway.
Practical Applications of Low Pass Filters
Imagine you’re cruising down the highway, the bass is thumping, and then the sound starts to feel muddy or the vocals get swallowed. That moment is the low‑pass filter doing its job – it tells the subwoofer which frequencies it should actually reproduce.
In a real‑world install, the filter becomes the bridge between the sub and the rest of the system. For a compact Alpine Shallow 10‑inch sub in a sedan, you’ll typically set the cutoff between 80 Hz and 120 Hz and choose a 12 dB/octave slope. The result? The sub delivers tight, punchy kicks while the mids and highs stay clear through the factory speakers.
Tailoring the Filter for Different Vehicle Set‑ups
Truck owners often have larger enclosures and more power headroom. With a 12‑inch or 15‑inch sub, you might push the cutoff up to 130 Hz and switch to a 24 dB/octave roll‑off for tighter control. The steeper slope prevents the larger cone from “talking” to the mids, keeping the overall sound clean even at high volumes.
On the other hand, a small hatchback with a shallow sub can benefit from a gentler 12 dB/octave curve. It lets a touch of low‑mid linger, which adds body to rock or hip‑hop tracks without drowning out the front‑stage instruments.
Professional Installations and the Eton MBXLP
Automotive professionals love plug‑and‑play solutions that save time on the bench. The Eton MBXLP low‑pass crossover, for example, matches the factory speaker layout in many Mercedes models and gives a precise 100 Hz cutoff with a selectable 12 or 24 dB/octave slope. Installers can set the filter, flip the phase switch, and walk away confident that the sub and mains will mesh without a noticeable dip.
What we’ve seen work best is to start with the factory‑recommended cutoff, play a familiar track, and then fine‑tune by ear. If the bass feels “boxy” or the vocal clarity drops, back the cutoff down a few hertz. If the sub feels thin on electronic music, raise it just enough to recapture that sub‑bass thump.
Beyond Cars – Marine and Home Audio
The same principles apply when you’re wiring a marine sub in a boat. Water‑proof enclosures often use sealed designs, so a 24 dB/octave slope helps keep the bass tight in a noisy environment. Likewise, home‑theater enthusiasts use low‑pass filters on subwoofers to prevent the bass from leaking into the front‑left/right channels, preserving dialogue clarity.
In a DIY home setup, you might use a graphic equalizer or a dedicated crossover module. Set the cutoff just above the sub’s rated response, typically around 80 Hz for a 12‑inch sealed box, and choose a gentle slope to blend smoothly with the main speakers.
Practical Tuning Checklist
- Pick a cutoff that matches the sub’s specifications – 80‑120 Hz for most car subs, 70‑90 Hz for larger sealed enclosures.
- Decide on slope: 12 dB/octave for a natural transition, 24 dB/octave for tighter control in tight spaces.
- Play a track with a strong kick drum; listen for the point where the bass starts to “muddy” or the mids become dull.
- Adjust the cutoff in small 2‑5 Hz steps until the bass feels punchy and the rest of the music stays clear.
- Flip the phase switch if you notice a hollow or cancellation effect on sustained notes.
- Re‑check balance with the mains at a lower volume to ensure there’s no dip around the crossover.
So, whether you’re a weekend hobbyist fitting a shallow sub in a compact car or a pro installer wiring a high‑power system in a luxury sedan, the low‑pass filter is the tool that lets you shape the bass exactly the way you want. By treating it as a musical dial rather than a technical checkbox, you’ll get that deep, controlled thump that makes every drive feel like a live concert.
Designing Your Own Low Pass Filter Circuit
Let’s get practical: designing a low‑pass filter that actually sounds good in a car is about choices, not equations.
You want punch, not boom; you want the sub to vanish into the groove, not call attention to itself.
Here’s how to build a simple, reliable LPF and tune it for real rides.
Pick the topology, passive vs active
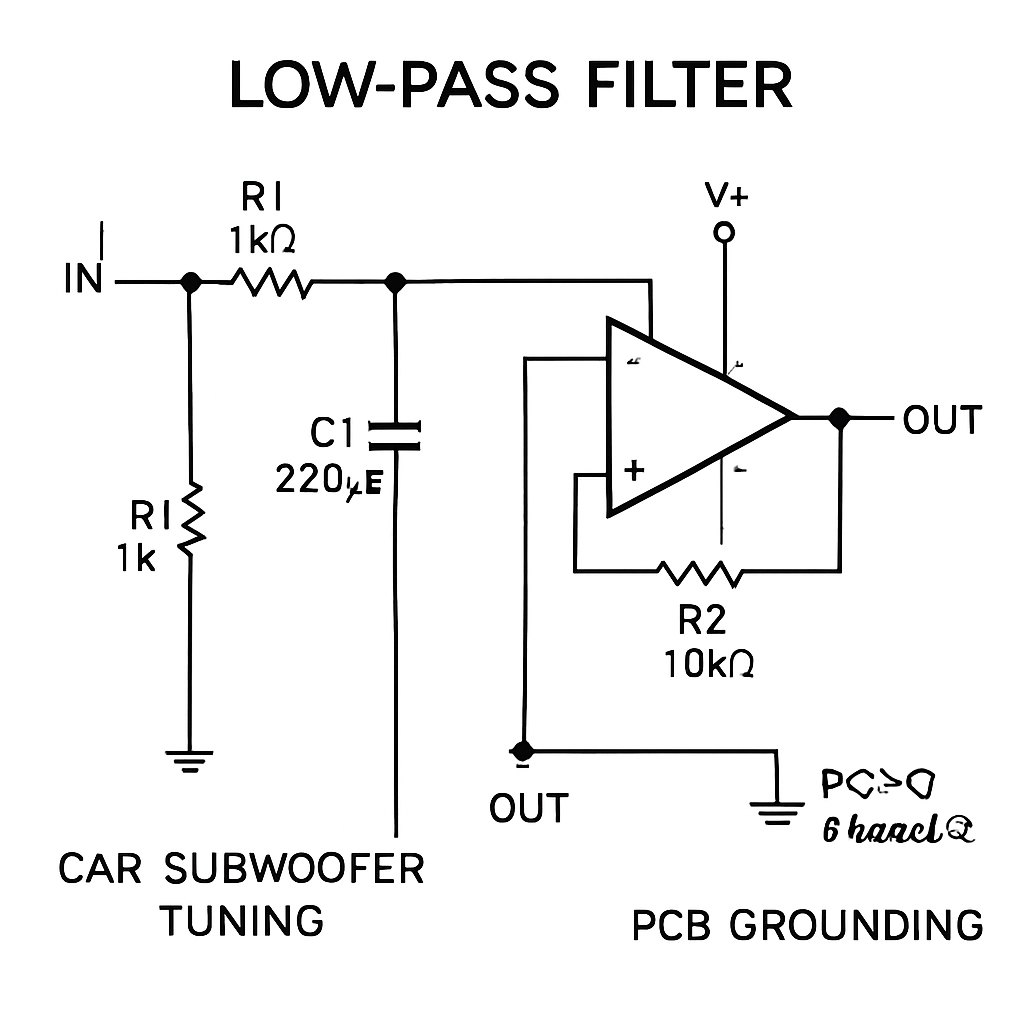
Passive RC is simple and bulletproof for car subs.
Use a series resistor and a cap to ground when you need a cheap, low‑maintenance cutoff.
But if you need adjustable cutoff, steeper slopes, or buffering for long cable runs, go active with an op‑amp.
Calculate — then tune by ear
Start with the cutoff formula for an RC: fc = 1/(2πRC).
Pick fc near the sub’s sweet spot, e.g., 80–120 Hz for most car subs.
Want a tighter hand on the bass? Choose a second‑order (12 dB/oct) or fourth‑order (24 dB/oct) design.
If math isn’t your thing, resist the temptation to set the knob at max and drive — start conservative.
Adjust in 2 to 5 Hz steps; listen between changes.
So far, this is theory — now a quick wiring checklist.
Wiring checklist
Confirm input is full‑range before the LPF; use the amp’s remote turn‑on to avoid pops.
Place the cap close to the ground reference to reduce noise.
If using active filters, buffer the output to the amp with a low‑impedance op‑amp stage.
Always verify phase at the crossover; flip phase or delay the sub if you hear cancellation.
Does this feel doable?
Real‑world examples: a weekend DIY in a hatchback used a 12 dB/oct RC at 95 Hz for an Alpine shallow 10 and the result was tighter kicks without sacrificing warmth.
Professionals installing Mercedes systems often prefer a plug‑and‑play solution — Eton MBXLP Mercedes Low Pass Crossover Plug and Play Set makes that step quicker and cleaner.
For deeper theory, see the TI application note on filter design which walks tradeoffs for component values and op‑amp choices if you want to nerd out.
Final tuning tips: keep resonant Q low to avoid pumping, check gain structure before aggressive cutoff, and always test with tracks you know well.
Want a ready solution instead of wiring from scratch?
If you prefer plug‑and‑play confidence, consider a vehicle‑matched crossover like the Eton MBXLP to save time on fit and tuning.
One image to guide your wiring below.
Wrap up: build carefully, listen critically, and tweak small.
If you need parts or vehicle‑matched crossovers, check out our Eton MBXLP for Mercedes installs.
Step-by-step practical build: 1) Sketch signal flow and mark where the LPF goes. 2) Choose initial cutoff (start 100 Hz). 3) Calculate R and C for passive, or pick an op-amp and design around unity gain for active. 4) Prototype on a breadboard or a small perf board. 5) Test with a real track and an RTA, adjust in 2 to 5 Hz steps.
Comparing Common Low Pass Filter Types
When you first pull out a filter kit, the biggest question is usually “which flavor of low‑pass should I use?”
In practice you’ll run into three families: the simple passive RC network, the more flexible active op‑amp design, and the digital or DSP‑based crossover that lives inside a modern amp.
Passive RC filters – the old‑school workhorse
Think of a passive filter as a pair of kitchen knives – no power needed, just the right angle and a steady hand. It’s just a resistor in series with a capacitor to ground, so the cutoff frequency is set by the formula fc = 1/(2πRC).
Because there’s no amplification stage, the signal loses a bit of level – usually a few dB – but the circuit can handle the high current that a sub‑woofer amp throws at it.
What does that mean for you? If you’re installing a shallow 10‑inch Alpine sub in a compact sedan, a passive RC at 95 Hz with a 12 dB/oct roll‑off gives a smooth hand‑off to the factory mids. You’ll love the linearity and the fact that it never runs out of juice.
Active filters – the tunable companion
Active designs add an op‑amp (or a small transistor stage) into the mix. The amp buffers the signal, lets you add gain, and lets you stack multiple RC sections without worrying about loading effects. The result is a steeper slope – 24 dB/oct is common – and the ability to fine‑tune the cutoff with a potentiometer or a digital pot.
Our experience shows installers love the flexibility when they’re dealing with a 12‑inch sealed box in a truck cab. You can push the cutoff up to 130 Hz and still keep the mids clean because the op‑amp isolates the filter from the rest of the system. The trade‑off? You need a clean 12 V supply and you introduce a little extra noise if you pick the wrong op‑amp.
For a deeper dive on active vs passive filter differences, see this article from Wevolver.Active vs passive filter overview
Digital or DSP‑based filters – the “software” option
Many new amplifiers hide the low‑pass inside a DSP. You set the cutoff on a screen, the processor applies a precise FIR or IIR curve, and you get the same 24 dB/oct roll‑off without any extra hardware. The big win is recallability – you can dump a preset from one car to another.
But there’s a catch: the DSP runs on the amp’s internal clock, so any jitter or power‑supply ripple can leak into the audio. For high‑power street rigs, a solid passive or active circuit still feels more rock‑solid, especially when you’re running long speaker runs that can pick up noise.
Quick comparison table
| Filter Type | Typical Car‑Audio Use | Pros / Cons |
|---|---|---|
| Passive RC (1st‑order) | Shallow subs, budget builds | Simple, no power needed; limited slope, signal loss |
| Active op‑amp (2nd‑order) | Mid‑size enclosures, professional installs | Steep roll‑off, gain possible; requires supply, adds noise potential |
| DSP / digital | High‑end amps, custom presets | Exact slopes, easy recall; depends on amp firmware, can introduce jitter |
So, which one should you reach for?
If you’re a weekend hobbyist who wants a plug‑and‑play solution, start with a passive RC – it’s cheap, reliable, and you’ll hear the difference right away. If you’re a pro installer working on a Mercedes Eton MBXLP or a custom truck build, an active filter gives you the control you need to fine‑tune the crossover without hunting for the perfect resistor value.
And if you’ve already invested in a modern amp with built‑in DSP, lean on the digital LPF for repeatable results, but keep a simple passive network handy as a safety net for when the amp’s firmware decides to act up.
Bottom line: the low‑pass filter’s job is the same no matter the topology – let the sub do what it does best and keep the rest of the system clean. Choose the topology that matches your power budget, space constraints, and how much tweaking you enjoy.
Tips for Optimizing Low Pass Filter Performance
Ever tweaked a sub and still heard that annoying “boom‑mud” after the bass? That’s the low‑pass filter not doing its job, and a few small adjustments can turn that mess into pure, controlled thump.
Start with a realistic cutoff
We all love the idea of pushing the cutoff up to hear more bass, but if you crank it past the sub’s sweet spot you’ll just overload the driver. In practice, aim for the 80‑120 Hz window that matches the spec sheet of most Alpine Shallow or similar enclosures. Grab a track with a punchy kick, set the knob at the low end of the range, then raise it in 2‑Hz increments until the bass starts to feel “boxy.” Back off a notch and you’ve found the sweet spot.
Pick the right slope for the job
A 12 dB/octave roll‑off feels like a gentle hill – it lets a little low‑mid linger, which is great for a hatchback where you want the sub to blend with factory speakers. A 24 dB/octave slope is a steep cliff, tightening the bass for a big truck or a competition build where every millisecond counts. If you notice a dip in the mids right after the crossover, switch to the gentler slope and listen again.
Mind the phase switch
Even the perfect cutoff can sound hollow if the sub and mains are out of phase. Flip the phase button on the amp and listen to a sustained bass note – does it get fuller or does a dip appear? Most modern amps let you toggle this on the fly, so don’t skip this quick test.
Don’t forget the Q or resonance knob
Some filters add a tiny boost right at the cutoff. That can add “punch” on a club track, but it also risks “pumping” when the music crosses the crossover point. Keep the resonance low for everyday driving; raise it only if you’re chasing a studio‑monitor vibe in a controlled environment.
Check your wiring and grounding
Loose ground wires or long runs of unshielded cable can inject noise that masks the filter’s effect. Keep the filter as close to the amp’s output as possible, and use short, thick gauge speaker wire. If you’re running an active filter, power it from a clean 12 V source and add a decoupling capacitor near the op‑amp.
Use a reference track
Pick a song you know inside out – maybe a favorite rock anthem with a solid kick and clean vocals. Play it at a moderate volume, then walk through the checklist: cutoff, slope, phase, resonance, wiring. Jot down the settings that give you the tightest bass without smearing the mids. That “template” will save you hours the next time you install a different sub.
Document your settings
It’s easy to forget whether you landed on 98 Hz 12 dB/octave or 102 Hz 24 dB/octave. A quick photo of the amp’s LCD or a handwritten note on your install sheet keeps the knowledge alive, especially if you’re a pro installer juggling multiple builds.
So, what’s the final takeaway? Treat the low‑pass filter like a musical dial, not a checkbox. Start low, listen, adjust in tiny steps, verify phase, and lock in the settings that make your sub feel like it’s breathing with the rest of the system. With those habits, you’ll turn every drive into a concert‑hall experience.
Conclusion
If you’ve made it this far, you already know that a low‑pass filter isn’t just a technical term – it’s the gatekeeper that decides which notes get to thump through your subwoofer and which stay with the mids and tweeters.
What does low pass filter do? In plain language, it lets the deep bass you love reach the sub while keeping the rest of the music clean, tight, and free of that muddy “boom” that can ruin a favorite track.
For car‑audio enthusiasts, the sweet spot is usually 80‑120 Hz with a 12 dB/octave slope, but the exact numbers shift with sub size, enclosure type, and vehicle acoustics. A quick listen‑test – kick drum on repeat, turn the knob a few hertz at a time – will tell you when the bass feels punchy instead of boxy.
Professional installers often lock in the settings with a photo or a scribbled note, so the perfect dial is never lost between jobs. And don’t forget the phase switch; a simple flip can turn a hollow sound into a full‑bodied thump.
So, what’s the next step? Grab your favorite reference track, fire up the LPF controls, and treat the filter like a musical dial, not a checkbox. Small adjustments add up to a concert‑hall feel on every drive.
Remember, mastering what low‑pass filters do is about listening, tweaking, and documenting – a habit that turns any car audio build from “loud” to “legendary.”
FAQ
What does a low‑pass filter actually do in my car audio system?
A low‑pass filter tells the subwoofer which frequencies it’s allowed to play. It lets everything below the set cutoff – usually the deep bass you love – pass straight through, while it attenuates anything above that point. By keeping mids and highs out of the sub’s path, the filter prevents the “boomy‑muddy” sound that can drown out vocals and guitars, leaving the rest of the system clean and tight.
How can I tell if my LPF is set too high or too low?
If the filter is set too high, you’ll hear the sub trying to reproduce low‑mid notes – the bass starts to sound “boxy” and the vocals get lost in a fog of rumble. If it’s too low, the sub will feel weak, missing the punch of a kick drum and leaving the music sounding thin. A quick test is to play a track with a strong kick, raise the cutoff a few hertz until the boxiness appears, then back off just enough to keep the thump while the mids stay clear.
What is the ideal cutoff frequency range for most car subwoofers, and why does it matter?
For the majority of 10‑inch to 12‑inch car subs, the sweet spot sits between 80 Hz and 120 Hz. This window captures the fundamental frequencies of most bass instruments without letting the sub stray into the territory of mids and highs. Staying in this range gives you a punchy, controlled thump that blends smoothly with factory speakers, while also protecting the sub from distortion caused by trying to move air it wasn’t designed for.
Should I use a 12 dB/octave or a 24 dB/octave slope, and how will each sound?
A 12 dB/octave slope is a gentle hill – it lets a hint of low‑mid linger, which can add warmth on a small hatchback or a modest enclosure. A 24 dB/octave slope is a steep cliff, cutting the unwanted frequencies more aggressively; it’s perfect for larger boxes or competition builds where you need a tight, focused bass. Experiment with both: start with 12 dB/octave, listen, then switch to 24 dB/octave if the mids feel too busy.
How does the phase switch interact with the low‑pass filter?
The phase switch flips the polarity of the sub’s signal. Even with the perfect cutoff, a phase mismatch can make the bass sound hollow or cause a dip where the sub meets the mains. Flip the switch while a sustained bass note plays; if the note suddenly sounds fuller, you’ve found the correct polarity. Pairing the right phase with a well‑tuned LPF eliminates cancellation and gives the sub a solid, cohesive presence.
Can I trust the factory‑installed LPF settings, or should I always fine‑tune?
Factory presets are a good starting point, but they’re usually set for a generic listening environment. Every vehicle has unique acoustics, and each subwoofer has its own sweet spot. In our experience, taking a few minutes to listen and adjust the cutoff, slope, and phase will dramatically improve clarity and impact. Think of it as dialing in the perfect song on a radio – a tiny tweak can turn “good enough” into “wow‑worthy.”
What quick checklist should I run through before I lock in my LPF settings?
Here’s a short, practical list you can run through in the garage or on the road:
- Set the cutoff between 80 Hz and 120 Hz based on your sub’s specs.
- Choose a slope – start with 12 dB/octave, switch to 24 dB/octave if the bass feels loose.
- Play a familiar track with a strong kick; watch for boxiness or thinness.
- Adjust in 2‑5 Hz steps until the bass feels punchy and the mids stay clear.
- Toggle the phase switch and listen for the fullest sound.
- Take a photo or jot down the final numbers so you can repeat the magic later.

